Showing posts with label stencil. Show all posts

Wednesday, 6 July 2022

Paper Funday At The Beach


      The new challenge this month at The Paper Funday is anything goes, with an optional twist of A Day At The Beach. I love the beach so I chose to follow the twist with this card.
     I started with a white card blank and taped it to my craft mat with masking tape, so I could keep a white border all the way around the card. Then I stamped the lighthouse image with blue ink and the sentiment block aswell, with the ink left on the stamp I stamped on masking sheet, cut out and covered the block area.
     With the masking sheet and tape in place I used a stencil to make the background. Using a little of the same ink as the stencilling I added some colour to the stamped image, but not very much.
     The masking sheet was removed from the block area and the sentiment was stamped in the same blue ink as the image. Once completely dry the masking tape was removed from the card edges, a simple, flat card was the result.
     Our challenge at The Paper Funday is anything goes but you can follow the twist if it inspires you, please take a look at all the DT inspiration and then join us with your creations.


I would like to enter this card in the following challenges:
Cardz 4 Guyz - #299 Summer
Gem Of A Craft - Wk14 Anything Goes

Monday, 10 January 2022

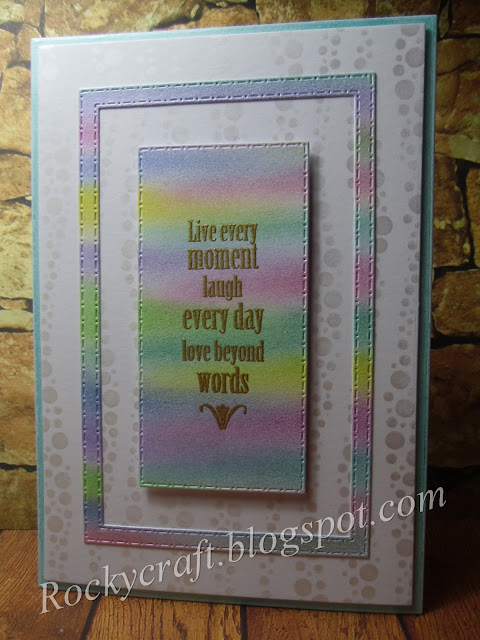
Rainbow Mica Magic


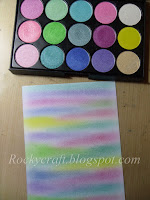
     If you haven't worked with mica before then give it a try, this is Mica Magic, it comes in cake form rather than powder but can be used in the same way. This mica has a binding agent in it already which makes it a little creamy in texture, but it will still dust onto a project just like a powder.
     
     This pallet is the new Spring set from John Next Door, a selection of gorgeous Spring colours.
     To begin this card I coloured an A6 piece of white card with the mica, just using my finger to paint it on in stripes. Once I'd covered the card I left it for a few minutes, then buffed it wish a soft cloth, this brings up the shine of the mica and because of the binding agent it doesn't rub off the card.
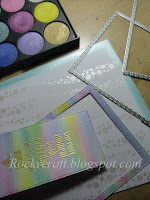
     With some of the rectangle dies I cut two frames and a panel from the rainbow card. For this card I only wanted the panel and the outer frame, I have used the inner frame for another project so nothing was wasted.
     To make the background I used a stencil on white card and the white pearl mica from the set, this gives some pattern but doesn't complicate the colours.
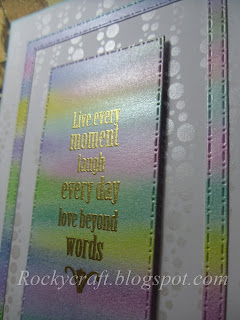
     The amazing thing about Mica Magic is you can stamp and emboss over it without having to use specialised ink, I used a Versamark ink pad and detail embossing powder.
     The card blank has been coloured blue around the edge, then the white patterned background was mounted on 1mm foam. The frame was mounted flush to the white background with the sentiment panel went on 2mm foam in the centre.
     I always loved working with mica powders but Mica Magic is so much easier to use as it's less messy, there is no dust floating around when you use it and you still get that great shine.


I would like to enter this card in the following challenges:
Dream Valley - #261 Anything New
Allsorts - #658 Anything Goes / option~New     Top 5
Stamping Sensations - Anything Stamped Goes / option~add a die
Let's Craft and Create - # 179 Anything Goes / option~New


Wednesday, 3 November 2021

Paper Funday Thanks


     This months optional theme at The Paper Funday is Give Thanks/Grateful, we are an anything goes challenge for papercraft projects so it doesn't have to be a card.
     
     To make the background I used a die cut mandala as a stencil, this gave me a lovely background and a pretty papercut to use on another card.
     The inks were a pigment petal set from Craft Artist which had a choice of colours that worked together perfectly. To blend these inks I used a make up brush, the bristles on these are so soft, they don't pull at the stencil even when it's paper.
      The background square was mounted on a narrow mat layer in lilac, with the sentiment cut from the same card and stuck flush to the front.     
     The flowers were die cut from a piece of card decorated with Brusho powders, that's why they have a mottled effect. Adding a little bit of silver mirri helped lift the whole card and with some small silver pearls the flowers were done.
     This type of card is always handy to have in your stash, you never know when you might need one. Please pop over to The Paper Funday to see all the DT inspiration, then come and join us with your project.


I would like to enter this card in the following challenges:
Clever Dexter - #22 Give Thanks/Thank You
Crafting Happiness - #117 Give Thanks
Shopping Our Stash - #457 You Don't Bring Me Flowers
Classic Design - #11 Anything Goes

Wednesday, 6 October 2021

Dead Gorgeous Kitty


      And now for something completely different, this month's project for The Paper Funday is all about almost Halloween. I say almost because it's not something we really celebrate here, but I do have a friend that loves all things black, purple and fantasy so this is for her.
      
      To make the coloured hexagon I used a stencil from Crafts Too that fits in my stamp platform and a few Distress Oxide inks.
      I cut a small circle in Stix2 masking sheet for a moon and placed it within the hexagon before starting to ink the shape. I started with the palest colour around the moon, working out with darkening shades of purple, I used a touch of grey at the bottom to add a bit more depth to the shape.
      
       Once the stencil was removed I stamped a tree branch by Lavina Stamps in Versafine black coming in from the side. I searched my stash for a tiny bat stamp but couldn't find one, something to go on the wish list.
      The cat skeleton is an old die by Sheena Douglass cut in black card twice, I then stuck both cats together to make him a bit thicker.
      When I put it onto a black card blank it looked a bit too crisp around the edges so before sticking it down I went all the way around with a Memento grey inkpad, then I touched a little grey ink onto the moon and that was that.
      The Paper Funday is an anything goes challenge but we do have an optional twist, this month it's Halloween or Purple, please come and join us with your spooky makes.


I would like to enter this card in the following challenges:
Crafting Happiness - #116 October colours Purple, Black
Crafty Calendar - Halloween
Just Us Girls - #604 Halloween
The Paper Players - PP561 Spooky

Saturday, 5 June 2021

Learning To Fly


     It's our second challenge at River Of Creativity, this month our theme is Parent and Child. We accept any hand crafted project as long as we can see how our theme has inspired you.
     I have been watching some very inspiring videos online by Eileen Godwin, her use of stencils to give just a hint of colour to the background really caught my attention.
     To begin this card I stamped the mushroom by Lavinia Stamps in Versafine black. Before getting a stamp press silhouettes were a bit problematic, but now it's so easy, if you miss a bit then stamp it again.
      To make sure my moon was kept perfectly clean I die cut a circle of Stix2 masking sheet and placed it so it would appear to be behind the mushroom.
     With the mask in place I used a stencil, some Distress Oxide in Lilac and a blending brush to colour my background.
     I only coloured part of the area through the stencil, I kept lifting it up to peek underneath and check it was where I wanted it to be.
     Once the Distress Oxide had dried off I stamped the large dragon in the air and the baby dragon sitting on top of the mushroom, looking at his Mum.
     The mushroom was grounded by adding a small shadowy area at it's base with a coloured pencil. The sentiment is also a Lavinia stamp, stamped in Versafine black.

      The image panel was trimmed to fit a 6x6 black card blank but it needed a tiny splash of colour to bring it all together, this was when I started searching my stash for the right piece of card or paper. After what felt like hours I gave up and used a purple pearl marker to colour the edge of a white card mat, once under the image panel it looked perfect, just a hint of purple to match the background.
      River Of Creativity is not just for cards or mixed media, we would like to see any hand crafted project that fits your interpretation of our theme, please come and join us.


I would like to enter this card in the following challenges:
Shopping Our Stash - #446 Gnomes / Mythical Creatures
2 Crafty Critter Crazies - Anything Goes With A Critter
A Bit More Time To Craft - #141 Anything Goes

Monday, 8 March 2021

Moon Gazing Hare


     This is a birthday card I made for my friend, she loves hare's and fairies. I was so engrossed in making it I forgot to take any photos of the process, not that you need them as I'm sure you can see just how easy it was.
     It started with a square of white card, a large toadstool stamp and Versafine black ink. I have to say having a stamp platform has revolutionised my work, I can stamp a silhouette with confidence now, safe in the knowledge that if I miss a bit I can stamp again in exactly the same place.
     I then die cut a circular mask for the moon and placed it partly over the top of the toadstool. With the moon masked I used a stencil, a couple of blending brushes and some Distress Inks to create a subtle background in the centre of the card. This technique was picked up from the amazing Eileen Godwin.
     With the mask removed I stamped the fairy, the two small toadstools and the hare with Versafine black ink. Once dry I used a watercolour pencil to add a touch of yellow to the fungi and a little shadow beneath the hare and the toadstools to ground them.
     The sentiment was added, again in black, there is no reference to a birthday so she can frame it to add to her growing hare collection.
     A little thin black mat layer before going on a white card blank sets off the stamping. The final touch was to add some Stardust Geli glaze to the fairy's wings, just enough to catch the light but not to over power the image.
     I didn't know that a moon gazing hare is an ancient symbol of growth, abundance and good fortune, rather nice for a birthday card.
     

I would like to enter this card in the following challenges:
Animal Friends - Hare / Rabbit
Country View - Silhouettes
Just Us Girls - #574 Animals     Chick of the week
The Fairy and The Unicorn - Anything Fantasy     Top 3

Saturday, 17 October 2020

Stencilled Oundle


     This is another of the new die sets from John Next Door, he named it Oundle, the home of the Hochanda studio. I love this set, it has so many different possibilities with a beautiful shape at the heart of it all.
     I decided to use the background die and the frame die as stencils, I used Lucy's trick and put a magnetic sheet under my card so the dies wouldn't move when I was colouring. I also masked off the outside edge to keep it clean, Stix2 stencil tape is perfect for this.
     Once the card was all masked up I put the dies on and began to colour with Distress Ink using one of the amazing blending brushes from CraftsToo. I am so impressed with these brushes, they don't lift even the most delicate mylar stencil when colouring.
     To get the chequered look I cleaned off the die and turned it over, turning it round didn't change the direction of the stripes, and inked again.
     After removing all the tape I trimmed the card and die cut the centre shape, I also die cut the centre decorative die from a piece of teal card to go under the centre hole and embossed a piece of silver mirri to go behind that.
     You can use these dies to emboss as well as cut, it's just a case of changing the 'sandwich' in your machine and using an embossing mat, a soft rubber like mat that will absorb the pressure from the dies edges stopping it from cutting through the card.
     All the pieces were stuck together which looked OK, but not quite nice enough. The answer was to die cut a frame in white card and mount this with foam over the stencilled frame.
     Luckily I had in my stash some teal card that matched the ink colour perfectly, sadly I have no idea where it came from so I'm using it sparingly. A mat layer of this teal card, with the centre cut out for another project, was added before going on a white card blank.
     Using the Chrysanthemum die I cut from silver paper and made two flowers, one large and one small. Lesley's twigs are cut from silver mirri and the Aster Leaves were cut from the piece that came out of the mat layer.
     I have started to use square cards with the fold at the top, like John does, as they stand well and look better on the mantle with full focus on the front rather than at an angle. I thought it would slide down and collapse but if you use a good card weight it doesn't budge. 


Materials List   (available from your local craft shop)
JND171 - Oundle die set
JND187 - Twigs die set
JND117 - Chrysanthemum die
JND175 - Aster Leaves die set
CAT013 - Blending Brush set of 3
S56994 - Low Tack Stencil Tape
S57262 - 3D PVA Glue from Stix2


I would like to enter this card in the following challenges:
Crafty Catz - #523 Anything Goes
Creative Fingers - #195 Anything Goes 
Love To Craft - #51 Anything Goes
The Sisterhood Of Crafters - Lots Of Layers     Top 3

Saturday, 18 July 2020

Craft Artist Autumn Pigment Petals


     This card is another of the samples made for John Next Door and his new Craft Artist Pigment Petal ink pads. I love using the media plates and these inks work well on them.
      Using the Autumn set of inks I inked up the media plate with a graduating colour change, then with a hard brayer smoothed it out across the plate. This was then stamped on to white card, it was paler than I wanted so I inked the plate again, brayered and stamped a second time.
      Using a stencil and the gorgeous new blending brushes, I inked the media plate through the stencil. Then with stencil removed I stamped the card again, this gave me a subtle pattern across my background. I didn't think that I needed any more brushes, sponges or pads for blending but these brushes are so very soft and this is what makes them a real must for stencils, I'm hooked.
      With all the work on the media plate finished I moved on to stamping a single flower, from an old Woodware set, in brown. I didn't add a greeting as I did't think it needed it.
      I added a dark brown mat layer to the image panel and started to look for a suitable coloured layer, nothing in the stash stood out so it was on to making one. Using some basic white card I cut the right size layer and then used the inks and a synthetic sponge to colour it. This is a better way to work really as it gives you a perfect colour match to your image.
      With all the layers added it was then onto a white card blank. To add that little point of interest, I die cut one of John's butterflies in the same brown card as the surround and stuck it near the edge of the oval.
      There is always a need for a few simple, blank cards in your stash and this is a great way to make them while experimenting with media plate techniques.


Materials List    Available from your local craft shop
CAT053 - Craft Artist Pigment Petal - Autumn
CAT013 - Craft Artist Blending Brushes 
JLGP004 - Media Plate set of 4
JNDAD008 - Small Butterflies
S57262 3D PVA Glue by Stix2


I would like to enter this card in the following challenges:
Colour Crazy Craft - Anything Colouring Goes
As You Like It - Summer or Autumn  Autumn for the gorgeous colours
Inkspirational - Painting or Colouring
Allsorts - Flowers All Over

Monday, 13 July 2020

Craft Artist Pigment Petals


     Today sees the release of the new Craft Artist Pigment Ink Petal sets, there are five in total, this card was made using the Autumn set.
     This card began as a white A6 piece of card which was put in the Press To Impress stamp platform, then it was stamped with one of the recent Two Jays stamps in brown ink. I then stamped again onto some Stix2 masking sheet and cut it out to cover the first image.
     Once the main image was covered I inked up the round Media Plate and stamped it onto the card. One of the other new products is a set of amazing little brushes which I sued to blend the ink around the edges of the plate.
     I left this to dry for a few hours, checked it and decided to finish it off with the low heat setting on my heat gun. I wanted this to be completely dry because I was going to use mica powder and that will stick to anything damp or sticky. Using a stencil and Versamark I inked up the Media Plate, this way the mica should only be on the circle and the beauty of a stampplatform is if you missed a bit you can go back and do it again knowing it will be in the same place.
     I dusted the image with an anti-static bag, stamped the image and then dusted with pearl mica. I used a dry paintbrush to remove any stray mica before giving it a quick spray with cheap hairspray, it needs to be cheap because you don't really want added conditioner.
     After all this it was time to remove the mask, the image was completely clean, this masking sheet is sticky all over so it sits down perfectly covering everything, it can be reused several times too. The image looked rather pale so with a water brush I coloured in the rocks by stamping on my craft mat and using it as a palette.
     When it came to mats and layers I found some card colours that I liked but one of them wasn't big enough to use, thinking cap on....blend a few ink colours together on beige card to make the shade I needed.
     A small wording embossed in gold tucked up in the corner was all that was needed to finish this card off. When the light catches the mica the lighthouse really shines out across the sky.


Materials List    Available from your local craft shop
CTJJ133 - Lighthouse by Two Jays
CAT053 - Craft Artist Pigment Petal - Autumn
CAT013 - Craft Artist Blending Brushes 
JLGP004 - Media Plate set of 4
S57268 - Masking Sheet
S57262 3D PVA Glue by Stix2


I would like to enter this card in the following challenges:
Challenge Up Your Life - Vacation Mood
Craft Rocket -For Men/Boys
Creative Fingers - Anything Goes

Tuesday, 11 February 2020

Love is....


     .....not just for Valentine's, this would make a good anniversary card too. Not Just Cards have a new challenge starting today, I'm sure you'll find some inspiration over there if you haven't already looked.
     I don't have run through pictures for this one as I got carried away and forgot all about the camera! It started with a heart shaped Media Plate, three shades of red/pink inks and a hard brayer. Starting with the palest ink at the top I inked up the heart with all three shades and then used the brayer to blend them on the plate. Stamping the plate onto white card left me with a gorgeous pinky shape, I then used a stencil on the plate and inked the middle tone ink through it, removed the stencil (actually forgot to do this once!) and stamped the image over the pinky heart.
     To get the gorgeous shine I thoroughly dried the heart shape, cleaned off the plate a little and then used the same stencil, but in a different position, with Versamark. Again removing the stencil, stamping the image onto the card but this time dusted the heart with pearl mica powder.
     The two birds stamp is from stash, I can't remember where it came from, stamped in Versafine black. Using a stamp press makes life so much easier when stamping silhouettes as you can stamp the image a couple of times to get a really solid image.
     The little sentiment is one of John Next Door's stamps, again in black and tucked away in the corner. There is a thin black mat layer to set off the black on the image panel, followed by another thin layer, this time in pearl pink.
     The photo below shows how the card looks when the light doesn't catch the mica shine, the pattern still shows but muted.


Materials List    Available from your local craft shop
JLGP006 Medai Plate - Heart
JND0013 Everyday Sentiments
Pigment Inks
Versafine Black
Versamark
Pearl Mica Powder
Stamp Press


I would like to enter this card in the following challenges:
Allsorts - Add A Heart
Sweet Stampin' - All You Need Is Love
Always Fun - Love/Valentines
Crafty Cardmakers - Love Is All You Need
Dream Valley - Love
Make My Monday - I Heart You


Wednesday, 15 January 2020

Dragonfly Slide With Brayer Bonus


     Another slide card using John Next Door's die set, this time with a little Media Plate magic too. The dragonfly media plate, stamp and die fit rather well on this card, along with a few tiny dragonflies from the Gerbera Daisy stamp set.
      To begin this card I cut the two panels required for the basic card. There is a video by John giving assembly instructions on YouTube, some of you have found it difficult to see the link on the last post so it is HERE. Once you watch John in action it all becomes clear, much clearer than my description would be.
      Before any assembly I decorated the card with Distress Inks, stencils and a pigment I-Zink white ink pad. Using the media plate I stamped the dragonfly on the front before cutting the window.
      The greeting that shows when the card is closed is embossed in silver and coloured with the same inks through the same stencil to maintain continuity. I have left the surprise greeting on a white background to give it more impact when the card is opened.
     There are a few tiny dragonflies dotted around the card both inside and out, again using the same ink colours
      I stamped in white pigment I-Zink on vellum and coloured the back with more pigment inks in colours as close to the Distress Inks as I could find. Pigment inks gave me a better coverage in stronger colour to show through the vellum.
     I die cut the dragonfly and then glued just the body to the card, directly over the media plate stamped version. It will sit flat for postage and I was careful to make sure it's tail didn't stick out past the edge of the card.


Now for the frugal bit, crafters never waste anything.


      When using a brayer you end up with some ink left on the roller and John always says 'don't waste it', so I did as he suggests and ran it off on a spare piece of card. This gave me a lovely mottled band of colour that I trimmed and mounted on silver mirri, then stuck it onto a small white card blank.
     The beauty of decorating my slide card before cutting the windows meant I had two decorated circles left over, perfect for this little card.
     A stamped and silver embossed greeting, mounted on silver miri and set off centre gives me a small card that could be used as a tag for the gift to go with the slide card, or just a neat little card for to tuck away in my stash until needed.


Materials List    Available from your local craft shop
JND099 Slide Card die set
JND150 Loving Sentiments stamp set
JND5001 Gerbera Daisy  stamp set
JLMP001 Dragonfly Media Plate
JND112A  Bold Dragonfly Stamp
JND109    Butterfly and Dragonfly die set
Hard Brayer
I-Zink pigment inks
Distress Inks
Stix2 3D PVA Glue
Silver Embossing Powder


I would like to enter these cards in the following challenges:
Addicted To Stamps - Make Your Mark
Crafty Card Makers - Anything Goes


Monday, 11 November 2019

Spread A Little Sunshine


     A non Christmas card for Not Just Cards using a new Two Jays stamp, Tree and Bridge.
     I have used a media plate for the background on this card, with a stamp press it's so easy to ink up the plate, spritz with water and stamp it onto the card. I stamped the plate a couple of times but left any white patches in the sky as they could pass for clouds.
     Using the media plate again, after a good wipe over, I added Versamark through a stencil to the plate. As the plate hadn't been moved it went perfectly over the dry background, leaving the sticky sun rays, which I dusted with pearl mica powder.
     To get a matching mat layer I cut a piece of white card and sponged the edges to co-ordinate with the background.
     When it came to stamping the image black looked a little too harsh, so i used Memento Grey Flannel instead.
     I searched through my stash to find some silver paper that had a sheen similar to the mica powder for another mat layer.
     I have chosen not to add a greeting on the outside, I would normally add one inside when it's needed but I no longer have the card as it was a sample for John Next Door and Two Jays stamps.
     Please pop over to Not Just Cards to see all the inspiration from the DT, come and join us with your creations, as the title says it's Not Just Cards.


Materials List    Available from your local craft shop
JLGP004 - Media Plate set of 4
CTJJ114 - Two Jays stamp  Tree & Bridge
Versamark Ink Pad
Distress Inks
Pearl Mica Powder
S57262 - 3D PVA Glue Stix2


I would like to enter this card in the following challenges:
Addicted To Stamps - Anything Stamped Goes
Sweet Stampin' - Make Your Own Background
Country View - Hand Stamped

Thursday, 22 August 2019

Two Jays Blue Bauble


     This is my second card using a new stamp by Two Jays - Festive Farm. It's very similar to the kraft card I made earlier but I had a few hiccups with this one.
     For this one I used another bauble die to cut my own stencil, this time a different shape.
     I used the duster brush and a sponge to add white ink to the card and as before stamped the image with the stencil still in place, this was because the image is slightly larger than the bauble shape, using a dark blue ink.
     Once the ink was dry I drew around the inside of the bauble shape with a white pen. Then with the same pen I added accent to the image for the snow.
     I used the same die bow as before but this time in silver, a ribbon bow would be better if the card is to be sent through the post.

     Now this is where I had a hiccup, I die cut a greeting and stuck it on the bottom of the card......it did not go well!
     I removed the greeting but damaged the card in the process. I didn't want to waste the card when it was almost complete but how was I going to get out of this mess.
     The usual remedy for a smudge or mark is to 'stick a butterfly on it', but that wouldn't work for this one.
     I die cut a tatty banner in the same dark blue card I had used for layering, it was just the right size to cover the hiccup but I didn't have a stamp small enough to go on it......good thing I've still got a few peel offs in my stash. Mounted on foam pads it goes across the bottom of the card covering the little tear perfectly, the only down side is it does cover the point at the bottom of the bauble......nobody will ever know why!!


I would like to enter this card in the following challenges:
Crimbo Crackers - Anything Christmas
Winter Wonderland - Christmas Ornaments
Cute N' Crafty Christmas - Anything Christmas
Creative Craft Cottage - Christmas