Wednesday 11 August 2021

Silver Snowflake Mandala


     The new challenge at Christmas Craft Creations starts today, this month's theme is to use Non Traditional Colours in your project. It doesn't have to be a card, just anything Christmas related that follows the theme.
     
     I chose purple and silver as I have several friends who love those colours. I used a purple card blank and die cut the outer mandala shape, plus the corners from the front cover. 
     I then lined the inside cover with white card, ready to drop the shapes back in the holes. It's also a good idea to have an insert on a coloured card as it makes it easier to write in.
     
     Using silver mirri card I cut the four corners, then glued them in the holes on the front cover so the white showed through.
     The mandala outer shape was cut in silver mirri, then I put all the inner dies on to the shape but embossed them rather than cut them. I love the effect you get from embossing mirri card and as long as you have a soft silicone mat to use under the dies it's quite easy to do.
     I used foam tape on the back of the mandala and put it back in the hole but turned it so the shapes were not perfectly in line, I think it makes the shape look bigger that way.
     To bring purple to the mandala I used a large clear gem, coloured with an alcohol marker, in the centre. A relatively simple card with a nice splash of bling.
     Please pop over and join us at Christmas Craft Creations with your non traditional colours project and remember it doesn't have to be a card, just something seasonal that you have created.


Materials List
JND245 - Snowflake Mandala
JND244 - Snowflake Corners
S57262 - 3D PVA Glue
Foam tape


I would like to enter this card in the following challenges:
Crafty Hazelnut's Christmas - #554 Anything Christmas/ option Penguins
Merry Little Christmas - Anything Christmas
The 12 Months Of Christmas - Anything Christmas/option Clothing
The Holly and Ivy - #99 Anything Christmas
Dream Valley - #252 Embossing Wet or Dry


Sunday 8 August 2021

Penny's Baubles


     Today sees the launch of John Next Door's Baroque Christmas collection, part one. This years festive season has a had a later start than before, a combination of Covid, customs and canals have all had an impact, but we're up and running now.
     This die set is called Penny's Baubles and they feature a selection of shapes all with gorgeous deer and snowflakes.
     Starting with a satin gold card I cut a square using the stitch dot dies, then with just the bauble outline dies I embossed the card, not cut it. I also embossed the little finials at the top of the baubles. I then cut the baubles inner designs on the gold card. 
     To go under the gold card I cut a tartan paper layer and a dark red card layer, I always cut the centre out of the card mats to keep for another project, it saves card and makes the finished project a tiny bit lighter in weight.

     I also cut a Noel stencil sentiment from the gold layer and backed it with a bit of the dark red card. I added the red and tartan layers to a white card blank and stuck them down firmly.     
     Next was to add foam tape to the gold card, making sure to give enough support around the cut outs. When adding it to the tartan paper I only peeled off one corner to begin with, making sure it was all lined up evenly. With this corner stuck down I then peeled off all the remaining tape and secured the card layer on the paper.
     To add a little bit of sparkle I glued some tiny green gems in the middle of each snowflake.

Materials List
JND258 - Penny's Baubles
JND195 - Jane's Tree  -  Noel sentiment
S57262 - 3D PVA Glue
Foam tape


I would like to enter this card in the following challenges:
Jingle Belles - Red & Green
Merry Little Christmas - Anything Christmas
My Time To Craft Christmas - Plaid / Gingham     (Top 5)

Thursday 5 August 2021

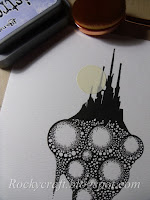
Castles In The Sky


     I do seem to be carrying a bit of a theme through most of my River Of Creativity projects, it wasn't intentional but I do love dragons. Our theme this month is 'One Earth', a bit of a stretch maybe but this is my dragons earth.
    
     Using the Lavinia Stamps Fairy Orbs I stamped on white card, this was following an idea I had seen on their FB page and I'm very sorry to say I can't remember who to credit for this idea.
     The castle is an Encaustic Wax stamp that I have had sitting in my stash for years.
     Once the castle was stamped and dry I used a fine micron pen to draw lots of tiny circles to join up the orbs, it took an hour or so but I really wanted to try this idea and I think it was worth it.
     Once I had drawn all the circles I die cut a circle in masking sheet and covered the card with it so that it would make a moon just behind the castle towers.
     I chose three shades of lilac/purple to blend around the castle, trying to avoid colouring the orbs if possible. The advantage of using Distress inks was I was able to bleach out the colour with a water brush where needed.
     When I was happy with the colour coverage I used a spritz bottle and my hand to flick water across the card to make marks. I also used a white Posca pen to make tiny specks on the card by tapping it with a rule to make it splatter.
     Using the same pen I added some white lights to the castle windows. Then it was time to add the dragon, another Lavinia Stamp, using black Versafine.
     A thin black mat around the card frames the image and helps pick out the stamping. It was a little tricky finding the right shade of purple for the wide mat layer. I didn't want to colour it with inks as I wanted a solid, plain colour that wouldn't distract from the image.
     Finally it all went on a white layer, ending up 8x8. It won't be a card, I'm keeping it as a picture. I might try another one sometime but right now it's happily sitting above my desk until I decide how to frame it.
     If you have a project that you think will fit our loosely based theme then please come and join us at River Of Creativity, we would love to see your creations. Remember it doesn't have to be papercraft, it can be anything you have made yourself with any materials. 


I would like to enter this project in the following challenges:
Addicted To Stamps and More - #411 Make Your Mark
Ike's World - #147 Anything Goes/option Animal
Through The Craft Room Door - Anything Goes Aug3
Crafting Happiness - Anything Goes
Challenge Up Your Life - #138 Circles
Country View - Monochromatic

Wednesday 4 August 2021

Gnometastic Happy Birthday


     The new challenge at The Paper Funday is open, this month our optional theme is Cute Critters. This happy little chap may not be a critter but he is cute, he's Gnometastic Happy Birthday from Polkadoodles.
     
     My colouring skills are not that great so I chose to paper piece this little fellow. That meant printing him out on thin white card and on some 8x8 thick paper I had in my stash, this was all done at the same time so I wouldn't forget the size I used for the first one.
     The printed paper was double sided, spotty on one side and a plain distressed look on the other. When cutting out the pieces I made sure I cut to leave the black line showing on each piece that I wanted to keep.
     
     Some of the image had to be coloured so I used some alcohol markers for this.
     I'm not sure why but I took his hands to be gloved, so I cut the lighter paper for those so his hands matched his hat.
     The spots could be seen through the pen so I had to cut off his boots and colour them on the white card.
     All the colouring was done before I added the paper pieces, then using tweezers and a fine tip glue bottle I added the glue to the paper and placed it over the corresponding white area.
     I was very lucky with the candle flame, there was a pinky spot just at the base of the flame so once coloured yellow the flame looks darker at the bottom.
     To mat the gnome I used the plain back of the ds paper, I didn't have enough to use just one so I stuck the two pieces together, then cut the mat at an angle across the join. Using the same paper meant the colour tones would all match. The finished panel was mounted on foam pads, then on to a gold card blank.
     For the greeting I stamped on white with green ink and die cut it, then using some Distress Ink I coloured around the very edge for definition. The circle was then mounted on foam pads in the corner of the card.
     The Paper Funday is an anything goes challenge but we would love it if you used the twist, so come and share all your 'cute critter' projects with us for a chance to a prize.


I would like to enter this card in the following challenges:
Lil Patch Of Crafty Friends - #163 Anything Goes
Inkspirational - #244 Spots/Dots
  Gem Of A Challenge - #16 Anything Goes  
CraftyHazelnut's Patterned Papers - Anything Goes With Patterned Papers