Monday 25 August 2014

Silk 'n' Sketch

     This week at House Of Cards we have the shabby and vintage team showcasing their cards, please pop over and take a look at the lovely creations the DT have made following this month's sketch.
     I have chosen to tip my sketch on it's side as my chosen digi topper was portrait. The digi is from Free Vintage Digital Stamps, it was originally sepia and I have changed it to black and white in my photo program. It's matted on deep red foil card and black.
     All other materials used have come from stash so I'm feeling rather pleased with myself for being brave and cutting up precious paper, card and ribbon!
     The backing paper is actually tissue that came wrapped around a new pair of shoes, the shoes are great, the box is already re-purposed and the tissue has finally been cut and used too. I used Stick and Spray Repositionable to stick the tissue to the card, with an overlap folded onto the back so it won't peel up on the edges. One of my most useful tools is a small roller that is meant for flattening wallpaper seams, I used it to smooth the tissue down.
     I cut a strip of black card a bit wider than my solid edged organza ribbon and wrapped the ends over, then added another strip of solid ribbon down the middle with a couple of little black bows, I thought this was a little like a garter to go with my stockings.
     The topper is stuck to the garter with tape but has foam pads on the card side to keep it level. I have had some black gem swirls in my stash for years, now I have finally used some!
     There is a thin black mat layer between the tissue layer and a white card blank, black card being very precious I chose to use a white piece and colour the edge that would be seen with a black alcohol marker, no point in using a big piece of black and covering most of it up. Have you noticed that black card comes in different shades? some of my 'black' card is most definitely on the very dark grey side.
     Our challenge at House Of Cards runs for another week so please come and join us.


I would like to enter this card in the following challenges:
Digitally Sweet - Guys Only
CraftyHazelnut's Patterned Paper Challenge - Anything Goes Using Patterned Paper (Tissue Paper?)
4 Crafty Chicks - Masculine
Crafty Creations Challenges - Dig Deep, use something from stash


Wednesday 20 August 2014

Seeing Stars

      Today sees the start of a new challenge at The Male Room, we are looking for anything masculine featuring stars.
     My inspiration came from an idea I saw at Chocolate Baroque to suspend a die cut within a die cut frame. I have tried this before but strung the centre piece on thread, not very successfully. This idea suggested using acetate.....much better!
     I cut my star shaped hole in the card first, then embossed it with a star folder. Tip 1- cut first and then emboss or you will squash the embossing when you cut!
     Each little star has been coloured with a glitter gel pen to add twinkle. I have cut a blue glitter star from paper put on to double sided sticky sheet, this helps me stick it down without using wet glue, that way I can't stick the card shut! (Tip 2) Peel back one corner of the sticky cover, close the card and ease the star through the hole, this will line it up perfectly, then remove the rest of the sticky cover sheet (Tip 3).
   
     The centre star is cut from glitter card using the smallest die in the set. First cut two stars and a strip of acetate long enough to go from the small star to the top of the inside of the card. Glue one star on to the acetate, then turn over and stick the other star on to line up with the first one, it looks nicer with an inside star as well.
     Line up the small star with the blue star with the card open, put double sided tape on the acetate strip at the top and close the card carefully so they stay aligned and press gently to secure the sticky tape. The acetate holds the star in position perfectly and is hardly visible.

I would like to enter this card in the following challenges:
Top Tip Tuesday - Anything Goes ~ with tips
Christmas Card Challenges - Embossing, Wet or Dry
Christmas Cards Al Year Round - Sparkle and Shine

Friday 15 August 2014

Snow Flower

     Here is a mid month reminder for CraftHazelnut's Christmas Challenge Extra, anything goes as long as it's Christmas so come and show us your seasonal creations.
     This card was stamped by the lovely Annette from Woodware and Stix2 using Bubble Bloom Snow Flower, she has used white Candi for the flowers. I was lucky enough to get to finish it off with a Happy Christmas stamp and some white gel pen. I then mounted it on gold and green to make my card, thank you Annette.
     A very quick and easy card to make that still looks great. I shall have to make a few more like this as my box is no where near full enough yet!
     Your entry doesn't have to be a card, it could be anything Christmas so pop by and join in the fun at CraftyHazelnut's Christmas Challenge Extra.

Wednesday 6 August 2014

Silhouette Sails

      The new challenge at The Male Room is to 'Make Pink Masculine'.  Well I did try....honest! This has come out looking far more lilac than pink, sorry.
     I have used one of the many sunset pictures I took at Aberearon and changed it with my photo program to look pink. It's a combination of ink, printer, camera and operator that has made it look 'not pink' at this stage.
     I printed out on a 6x4 photo card and made sure I had a white border.
     There is a black silhouette peel off stuck on to the bottom corner, with tiny wave lines added in a black fineliner pen. I have used the same pen to draw three gulls in the opposite top corner.
     The photo is mounted on grey card with a grey and white bakers twine knot added, this is stuck down with the very sticky red tape. A small anchor peel off is added to the bottom corner, then mounted on black before being stuck on to a white card.
     As usual I have not added a greeting yet, this will come later when I know who I shall send it to and what the occasion is.
     Please take a look at the DT inspiration on the challenge blog, there are some great cards to get you started, then come and join us at The Male Room.

I would like to enter this card in the following challenges:
Use Your Stuff - Stickers (peel offs)
Eclectic Ellapu - Nautical / Seaside

Monday 4 August 2014

All Crafts Christmas

      We have a new sponsor this time at All Crafts Challenge, Woodware Craft Collection.  Woodware have an amazing array of craft products, many of which you will find in your local craft shops here in the UK.
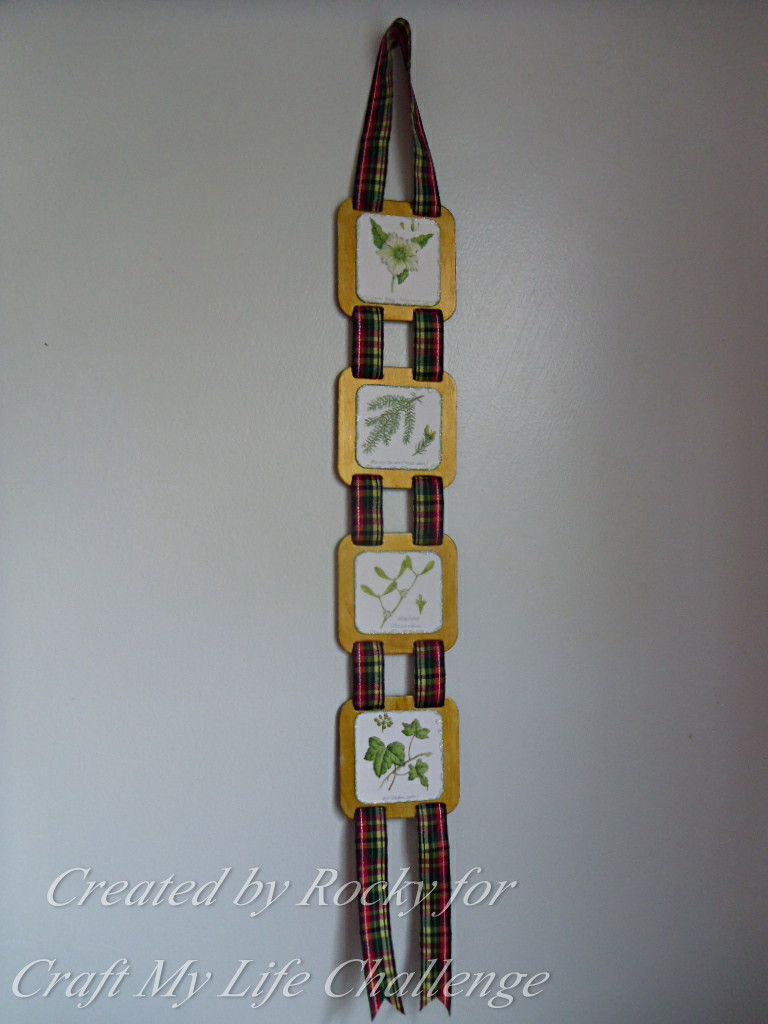
     The lucky DT were given some samples to play with, my stash had a definite Christmas feel to it, here is part one of what I came up with.
     I had some tartan ribbon and four chipboard 'slide' shapes so all I had to do was decorate and thread them up.
     Each shape has been painted with gold acrylic paint both front and back. The pictures are from an old Christmas card in my bits box, each one has been cut out with the corners rounded off, then edged with a green marker and a little crystal Glamour Dust.
      The shapes are almost 2 1/4 inches square and would look just as good painted black with small photographs on them.
     The ribbon is threaded through each shape and holds in place without the use of glue, so I can change them around if I wish.
     We are a multi craft challenge for anything crafty that's Not A Card.  Please pop over and see the DT inspiration, we've all made something different with similar goodies. Come and join in with your creations at Craft My Life All Crafts Challenge.


Friday 1 August 2014

Christmas Brat Girl Ornament

      Today sees the start of another month at Craftyhazelnut's Christmas Challenge Extra. There's nothing quite like making Christmas projects when the heat is a steady top twenties, nothing unusual for some of you I'm sure but I live in the UK!  I hasten to add I am not complaining.
     This image is from Bugaboo Digi Stamps, she's called Christmas Brat Girl Elf, she goes quite well with the Brat Boy Elf I used here.
      Brat Girl is printed on white card, when printing for this ornament I copied the image and flipped it so that she would face both ways and remain the same size.
      Brat Girl is coloured with alcohol markers, this I did before sticking the card together so as not to get colour bleed through. Once coloured I held the card up in front of a bright light and matched up the images, then I stuck it together.
     Once the glue was dry I used a Spellbinder Christmas Ornament die to cut it out, the largest die in the set. The edges are covered with gold glitter and so is the bell on her hat.
     There is a hole punched in the top of the ornament that is threaded with a green organza ribbon for hanging. I have used two red ribbon bows, one on each side, to finish off. I think the bows were from a box of chocolates that got eaten long ago and as usual the ribbon was added to the stash box, after all we crafters waste nothing do we?!
     This type of Christmas decoration is ideal if you have small visitors at Christmas, it has no sharp edges, nothing to harm them should they decide to try and eat it other than a little glitter and PVA glue.    
     Our challenge runs for a whole month and there is no theme other than it must be something Christmas, so come and join us at Craftyhazelnut's Christmas Challenge Extra.