Wednesday 18 November 2020

Shutter Card Fairy


     This was made using the new Shutter Card die set from John Next Door, it's not as complicated as it looks....honest. John has made a video on how to put this card together, which you can find here.
     The background was something I already had sitting in my 'to finish' pile, it's a stack of part made experiments. The coloured area was made using Distress Oxides and a 'Splatter' stamp from Inkylicious, the stamped seed heads and fairy are all Lavinia Stamps.
     To add extra effect I used the new Poppy Heads die set, adding DS adhesive sheet to black card then cutting two seed heads and adding them to the stamped ones.
     The image panel was mounted on black and then on to white card, this was trimmed to fit once the front panel was cut so that they would be equal once assembled.
     Using a sheet of patterned card and two square dies I cut the front aperture. To make anything other than the rectangle that comes in the set the only thing to remember is the height of the shutters, as long as they are able to open through the aperture it can be any width you choose. The shutters are added individually so you can put in as many as you like, I chose two for this card.
     The shutters have a stencilled pattern in pink on the back to look pretty when open. I've also cut a couple more seed heads to go on the outside and a tiny butterfly. The banners are in the main die set, as are the words, these are cut in silver mirri and then a black top one with the words cut in. To finish I added a couple of die cut corner decorations, also a JND die.


Materials List   (available from your local craft shop)
JND198 - Shutter Card die set
JND177 - Poppy Heads die set
S57262 - 3D PVA Glue from Stix2
Lavinia Stamps - various seed heads & tiny fairy
Inkylicious - Splatter Circle XL  


I would like to enter this card in the following challenges:
Crafty Sentiments - Anything Goes
Inkspirational - Frame It
Creative Fingers - Anything Goes
A Bit More Time To Craft - Anything Goes

Wednesday 11 November 2020

Lolly Stick Sledge


      With just a few weeks to Christmas my thought are moving from cards to decorations and with limited access to new stash I have been taking a much closer look at what I already have. This is my project for Not Just Cards, a challenge where cards are welcome along with any other hand crafted project.
     I have some wooden lolly sticks in a pot on my desk and after a quick look at Pinterest this is what I decided to do with some of them. I didn't think to colour the sticks before I stuck them together, so had to do it carefully after the glue had set, this left me with a rustic look. With the addition of a short length of string my sledge was complete. I set this aside while I started on my MDF tag.
     The tag was painted with white acrylic, then dry brushed with some blue paint, making sure to work in one direction only.

     Once the paint was dry I added some True Snow paste with a palette knife to add a little texture, while still wet I sprinkled some white bio-degradable glitter on it for a dash of sparkle.
     The sledge was stuck on with 3D PVA, it's a great strong glue that dries clear and seems to stick almost everything porous. I found some very small polystyrene balls in my stash so I stuck some next to the sledge.
     The words were die cut using some Tim Holt dies and stuck on with the 3D PVA. To finish off the rather messy back of the tag I stuck on a piece of patterned paper, then sanded the edges off once dry. With the addition of some ribbon and a twine loop to hang by the MDF tag was complete.

Materials List   (available from your local craft shop)
S57447 - MDF Tag set of 3
S57433 - Bio-degradable Glitter - White
S57262 - 3D PVA Glue from Stix2


I would like to enter this project in the following challenges:
Fezziwigs Festive Frolics - Anything BUT A Card
The Holly & Ivy - Anything Christmas Goes
Crimbo Crackers - Anything Christmas Goes
Dragonfly Dreams - Christmas/Winter
Craft Rocket - Christmas/Winter

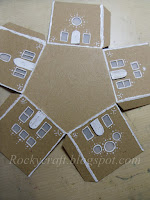
Gingerbread Village Light Box


     The theme this month at Christmas Craft Creations is Anything BUT A Card. I love making decorations and with the arrival of the new Paper Village die set by Tim Holtz and an idea I saw on FB, this is what I've come up with.
     
     Believe it or not this whole box and the church was cut from one A4 sheet of brown card, it took a little bit of planning but it means everything matches.
     I used one of the skinny houses to make the tower on the church, if you lay the house die on top of the tiny house cut out you can work out the pitch of the roof so it will fit.
     To make it look like a gingerbread village I used a white gel pen to add decoration all over, though the doors were coloured with a white Sharpie to get better coverage.

    
     A church should have stained glass windows so I used some patterned vellum stuck on the inside of each opening, it was stuck on the wrong way around so the strong colour is on the inside. I cut a hole in the roof so the light could shine through into the tower.
     To get the roof tiles even I used the deckle edge of a piece of card like a ruler. It was all stuck together with a good strong PVA glue which gave me a little wiggle room to get my edges right.

     
     The base of the box was die cut with all the variations available in the die set for windows and doors, I tried to make every house different.
     I used some plain vellum for the windows in the village and decorated it all with the gel pen.
     At first the houses weren't going to have a porch roof but it didn't look quite right so they were all added later.

     The lid of the box had a white cover added to the brown so I only had to colour the edges with the gel pen. There was a hole cut in the lid so the light from the box would shine into the church.
     The church was glued onto the lid but it lacked something......snow!  Using some True Snow paste I added this and it looked so much better, it also hid any gaps around the base of the church that the light might shine through.
     I added a small tree to the scene and buried it in the snow because it had a tiny wooden base that needed to be hidden.

     I wanted a small car to add to the scene, where on earth was I going to find one small enough?...cake topper?...toy car?....Monopoly piece!  Not wanting to use the only Monopoly car I have I decided to make my own silicone mould so I could have a whole fleet of cars.
     Making a mould is quite easy, silicone glue, cornflour, a few drops of baby oil and a spritz of paint for colour. Push the car into the 'dough' and leave overnight to set. Remove the car and then use hot glue in the mould to make many more. The advantage of this is the glue card had a flat bottom, making it easy to stick in the snow. The car was coloured with a mix of Sharpie pens and acrylic paint.    

     
     It was important that the back look just as good as the front so the whole thing has been decorated all the way round to look the same. Even the rear windows of the church are stained glass.
     The light source is a colour changing LED tea light placed in the bottom of the box. I did try a string of tiny LED lights but all together they were too bright, I rather like the changing colours too.
     This Paper Village is so cute, it's going to be used over and over for years, you have been warned!


I would like to enter this project in the following challenges:
Fezziwigs Festive Frolics - Anything BUT A Card    Top pick
Creative Craft Cottage - Christmas/Winter
Country View Crafts - Anything BUT A Card
Dragonfly Dreams - Christmas/Winter
Jingle Belles - Include A see Through Element - windows
ABC Christmas - W - Winter Wonderland/ X - eXtra Special   Top 5


Saturday 7 November 2020

Gnomemade Christmas Tree


     This card was inspired by two friends, it was Jenny's idea to make a tree with these stamps and Val's amazing hand sewn gnome that really set the colour scheme, thank you ladies.
     I started by stamping each of the six gnomes on to Stix2 masking sheet and cutting them out. Then I stamped the centre gnome, masked him and stamped his two friends beside him.
     The piece of card I stamped on was quite large so I had plenty of room to play around with the images. I continued to stamp and mask until all six gnomes had been used and my tree shape was formed.
     I left the card for a while to make sure that all the ink was completely dry before I removed the masks, I knew it was likely that anything was still wet I would smudge it and have to start all over again.
     There were a few tiny gaps in the stamping where I hadn't got the mask exactly right, this was put right with a black micron pen.     
     To colour the image I used alcohol markers, with having spare card around the image I was able to try out the pens to make sure I was happy with the shade I'd chosen.
     I added a tiny bell to the top of each hat by sewing through the card. This did make matting and layering a little tricky because of the lumps, but it all worked out and meant my thread was all hidden.
     To add the greeting I die cut various phrases and chopped them about until I got 'gnomemas', I wanted something a bit different for this card.
     I shall have a play and make some variations using these cute little gnomes, as they can be any colour a gnome is not just for Christmas.


Materials List   (available from your local craft shop)
CTJJ143 - Gnomes by Two Jays
S57268 - Masking sheet
S57262 - 3D PVA Glue from Stix2


I would like to enter this card in the following challenges:
CraftyHazelnut's Christmas - Anything Christmas
Send a Smile For Kids - Happy Holidays/Anything Goes
Colour Crazy Craft - Anything Coloured
Craft Rocket - Christmas/Winter
Christmas Crafts All Year Round - Family and Friends
The 12 Months of Christmas - #71 For The Boys
Merry Little Christmas - Anything Christmas