Showing posts with label Not Just Cards. Show all posts

Friday, 11 December 2020

Pick Up A Pine Tree


     Sadly this will be the last challenge at Not Just Cards, it has been running since 2014 but now it's time to hang up the scissors, thank you Helen for the last 6 years. 
     Making Christmas projects is one of my favourite things to do at any time of year, especially when I can make something tailored to the recipient. I have one friend that owns a few WWII American military vehicles and another that owns a haulage firm, so this was a perfect way to make something for them.
     
     I started with the Sizzix Bigz die by Tim Holtz called Old Jalopy and an A5 piece of card folded in half. Either side of the centre fold I added another fold to make a pleat, this was in one of Tim's many demo's, I'm sorry to say I don't know which one.
     When I put the card on the die I made sure that the pleat was just above the cutting edge at the bottom of the wheels, it didn't matter having a flat at this stage as tires would be added later.

     
     I also cut six wing pieces, two in red to match the car and four in black. I stuck two black together and then a red one on top to make them stand out, trying to get foam tape this thin would have been a nightmare!
     The hub caps and bumpers were also cut in black card, then they were coloured with silver guilding wax but not with a perfect cover as they are vintage vehicles and need to show wear and tear.....vintage will hide any tiny mishaps too.

     The lower part of the car was cut in black card, this forms the tires and shading under the wings, it was trimmed down to fit below the wings and running board. I cut the back of the car off to make it into a pick up.
      These vehicles are double sided so both sides have been decorated, when gluing the various bits on to the car remember that they will be the other way around on the back.
      The trees are also a TH die, cut in light green card, stuck onto a darker green card and then fussy cut. Again these are double sided so the tree outline on the back had to be stuck on back to front.

     With all the car parts stuck on and the tree loaded in to the back of the pick up it was time to stick both sides together but only at the top. I ran a small line of glue along the bonnet, across the cab and then along the top of the buck.
     If you stick the whole card together it will not stand up, having the ability to open at the bottom helps the pleat become the stand for the pick up.
     To make the military truck I used a suitable green card for almost everything except the tires and added a small white star to the door. Both the red and the military trucks have been aged with a dusting of black Distress Ink.
     For the blue truck I used blue card and silver satin mirri card for the wings, hub caps and bumpers, the Chris Riches fleet are always spotless with gleaming chrome accessories and at night they light up like a Christmas tree. The logo on the door was taken from a photo as my drawing skills were not up to copying it accurately.
     There is little space to write anything as they are not really a card, so I will be adding a small tag to the tree with my Christmas message. I hope that these will come out again next year as a simple decoration, I have kept several stand up items, both commercial and handcrafted, over the years because they have been too nice to throw out.


I would like to enter this project in the following challenges:
Christmas Cards All Year 'Round - Not A Card    Top Pick
Winter Wonderland - Anything Christmas
Merry Little Christmas - Anything Christmas
613 Avenue Create - Anything Goes/optional Vintage
Ike's World - #139 X is for Christmas
Dream Valley - Christmas
Use Your Stuff - Winter/Snow/Christmas
The Paper Funday - Anything Goes/option Christmas

Wednesday, 11 November 2020

Lolly Stick Sledge


      With just a few weeks to Christmas my thought are moving from cards to decorations and with limited access to new stash I have been taking a much closer look at what I already have. This is my project for Not Just Cards, a challenge where cards are welcome along with any other hand crafted project.
     I have some wooden lolly sticks in a pot on my desk and after a quick look at Pinterest this is what I decided to do with some of them. I didn't think to colour the sticks before I stuck them together, so had to do it carefully after the glue had set, this left me with a rustic look. With the addition of a short length of string my sledge was complete. I set this aside while I started on my MDF tag.
     The tag was painted with white acrylic, then dry brushed with some blue paint, making sure to work in one direction only.

     Once the paint was dry I added some True Snow paste with a palette knife to add a little texture, while still wet I sprinkled some white bio-degradable glitter on it for a dash of sparkle.
     The sledge was stuck on with 3D PVA, it's a great strong glue that dries clear and seems to stick almost everything porous. I found some very small polystyrene balls in my stash so I stuck some next to the sledge.
     The words were die cut using some Tim Holt dies and stuck on with the 3D PVA. To finish off the rather messy back of the tag I stuck on a piece of patterned paper, then sanded the edges off once dry. With the addition of some ribbon and a twine loop to hang by the MDF tag was complete.

Materials List   (available from your local craft shop)
S57447 - MDF Tag set of 3
S57433 - Bio-degradable Glitter - White
S57262 - 3D PVA Glue from Stix2


I would like to enter this project in the following challenges:
Fezziwigs Festive Frolics - Anything BUT A Card
The Holly & Ivy - Anything Christmas Goes
Crimbo Crackers - Anything Christmas Goes
Dragonfly Dreams - Christmas/Winter
Craft Rocket - Christmas/Winter

Sunday, 11 October 2020

Winter Wishes


      As it's getting closer to Christmas I've been trying out some new, to me, techniques. Colouring through a stencil isn't new but it is when you use one of the new blending brushes from Crafts Too, they really are amazing little brushes for stencil use.

     I chose three shades of blue Distress Ink to go through my Sweet Poppy stencil, being metal they are nice and heavy but the soft brush is still perfect for getting into all the little bits. I also followed Lucy's tip about using a magnetic sheet under my cardstock to stop the stencil moving about...thanks Lucy.
     The moon is masked with some of Stix2 masking sheet die cut in a circle and tucked under the stencil. I also masked off all around the stencil because I wanted a wide white border.
     The stag is a Lavinia stamp, stamped in Medieval Blue VersaFine Clair. I used a stamp platform so I was able to stamp him three times to get a very dark image.
     The Winter Wishes was cut with some Tim Holtz dies and backed with some silver paper, using paper rather than mirri card means there is no lump under the words.
     I went through most of my blue card stash to find the right shade, I even tried the VersaFine pad, but it just wasn't quite right until I went over it with an alcohol marker.
     Matted onto the blue layer and then onto a white 7x5 card blank it's still thin enough to go as standard post, which if you're sending out a few helps keep the cost down.
     Not Just Cards is exactly that, not just cards, you can join us with any project you have made. Please pop over and take a look at all the inspiration from the DT and our lovely challenge participants.


I would like to enter this card in the following challenges:
ABC Christmas - V=Vixen (deer)
CraftyHazelnut's Christmas - Anything Christmas
Crimbo Crackers - Anything Christmas
Merry Little Christmas - Anything Christmas
Allsorts - Winter Scene or Snow
Lavinia World - Anything Using A Stamped Image

Tuesday, 11 August 2020

Sam's Circles Forest


     This card has the third centre that comes with Sam's Circles die set by John Next Door. It can be used any time of year, not just Christmas, there are deer, birds and a bunny so it would be rather nice for a Spring card too.
     For this one I decided to use John's Box Scene die from a couple of years ago, the star lattice panel doesn't fit the box front to cut direct into the box but it will fit just inside with a tiny trim.
     To get a little depth I stuck the lattice inside the box on foam tape, this way it sits away from the front but not all the way at the back.
     I cut a gold pearl paper backing sheet and stuck this down on the bcaking card ready to line up the woodland scene. I stuck a green backing on to the woodland scene, placed the lattice on top and made sure I lined it up in the right place before gluing down the deer scene on to the gold backing.
     The box was then built around the backing panel to show the deer sitting happily in the middle of the circle opening. To make the box stand up I have made my own easel and stuck it on the back.
     To decorate the front I have die cut some of the new Lesley's Twigs, along with pine cones, a pine branch and mistletoe, a couple of tiny pearls for berries keeps the festive decoration simple.
     This card would be alright for hand delivery, it's a bit deep for postal as it would have to go large letter and be well packed. I don't always put a greeting on this type of card as some recipients like to use them each year as a decoration, there is plenty of room to write on the back.
     Come and join us at Not Just Cards with your project, it doesn't have to be Christmas, it doesn't have to be a card either, just something you have made.


Materials List
JND183 - Sams Circles
JND187 - Lesleys Twigs
JND137 - Christmas Elements   (pine cone & mistletoe)
JND052 - Square Scene Box
S57262 - 3D PVA Glue


I would like to enter this card in the following challenges:
ABC Christmas - Pinetrees, Quiet & Robins 
Merry Little Christmas - Anything Christmas

Saturday, 11 July 2020

Wedding Card / Table Decoration


     Using the Tag Card die set from John Next Door I made a wedding card that could be used as a table decoration. The first one I made was for a cafe table, you can find John's construction video based on that card over here.
     I cut two of the tag pages in white card, then using the dies from the Wedding Bells set I cut the doves, bells and Mr/Mrs panels. These cut outs were then backed with pink pearl card, I used a whole strip to do this to keep it neat.
     For the panels that would stick out once assembled I chose to decorate them with pink ink through a stencil, continuing the pattern to any panels that would be on the inside. When this card is on a table you can see the inside so it needs to be neat and tidy.
     I cut all of the little hearts in the panels in gold mirri card and stuck those in place, it adds a tiny bit of shine to lift the card.
     The name and date panels are cut in white card and decorated with the same pink ink and stencil as before. Each panel is edged with gold gilding wax to highlight it. Using a darker pink card I cut all the names and dates and stuck them on to the panels.
     With all decoration complete I then assembled the card, the folds are the opposite way if using as a journal type card, please watch the video for guidance, it's easier to watch than it is to following written instruction.
     The beauty of this card is it will fold flat for posting or transportation to a venue, it's simple to construct making mass production easy.
     We have all sorts of craft inspiration for you over at Not Just Cards so please pop over and take a look, then come and join us with your project.


Materials List    Available from your local craft shop
JND160 - Wedding Bells   (die inserts for Pop Box)
JND100 Tag Card Large
S57262 3D PVA Glue


I would like to enter this card in the following challenges:
Inspire, Create - Fancy Fold
Sparkles - Wedding
Love To Craft - Anything Goes
Creations In Pink - Anything Goes Mainly Pink
A Perfect Time To Craft - Anything Goes
Cardz 4 Galz - Wedding

Thursday, 11 June 2020

Light Bulb Glow Bug


     Lockdown has proved to be inspirational, having time to look at some amazing projects on blogger and Pinterest has sparked a few ideas. This is based on a project I saw that was crafted in glass and metal, again skills and tools beyond my capabilities. The challenge?.....to use what I have in my stash to make something similar and then post it for Not Just Cards as my DT project.
     The centre piece is the lamp, this came from Poundland some months ago, it has a short string of LED lights inside, battery operated, and a nylon string to hang it up.
      I have in my stash some jewellery wire of differing gauges, I found two of similar colours and set about making some legs. I did try wrapping the wire around the screw part of the bulb but it looked chunky and untidy, so I made three pairs of legs and wire wrapped them together, leaving a length of fine wire to wrap around the screw.
     The screw part of the lamp comes off so you can change the tiny batteries, this meant I had to attach all limbs, etc. to the screw only.
     For the wings I die cut some foiled acetate, this was quite thick so the open work in the wings did not cut out but it did emboss rather well. I cut two sets of wings and coloured them with a little alcohol ink in colours to go with the legs. I also used an embossing ball tool to give a little dimension to the wings before sticking both sets together in the middle.
     Assembly began with the legs hot glued to the screw, once the glue set I used the long wire to twist around the screw for added security, the wings were then stuck on with hot glue.
     It's larger and a little more crude in it's construction than the gorgeous ones I saw on Pinterest but I am very happy with it. If I manage to find any more lamps then I shall make him some friends, maybe with different coloured bodies. He looks good in daylight but so much better at night all lit up.
     Please pop over to Not Just Cards to see all the DT inspiration, come and join us with your projects, we'd love to see what you've been making.


I would like to enter this project in the following challenges:
Creative Crafting Uncles - Anything But A Card    (top 3)
Moving Along With The Times - Things With Wings
2 Crafty Critter Crazies - Anything Goes with A Critter   (top 6)
A Bit More Time To Craft - Anything Goes
A Perfect Time To Craft - Anything Goes   (winner)
Classic Design - Anything Goes
Through The Craft Room Door - Anything Goes

Monday, 11 May 2020

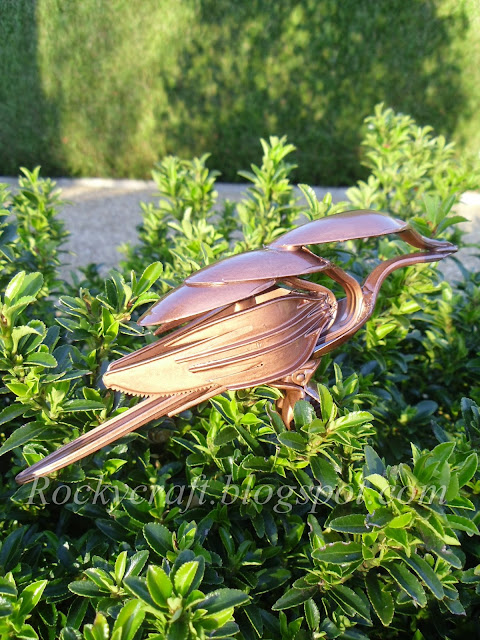
Cutlery Bird


     I have always admired the amazing items made from old metal cutlery, sadly I have neither the skills nor the tools to make my own. What I do have is a selection of plastic cutlery, a heat tool, a glue gun and the challenge to try it my way.
     I used to play around with my plastic stir stick and hot coffee on the train journey back from college, so if hot liquid and mild force will bend a plastic stick then a heat gun should be just as good, if not better........it is!
     Making sure to use a heat mat, a silicone mat and finger guards I started to go all Uri Geller with my cutlery. There were a few melt downs but it didn't take long to work out just how much heat was too much.
     I confess I used a photograph of a metal bird as a guide, but this one is not exactly the same as the photo, I used whatever plastic items I had to hand.
     Using spoons for the body, forks for the wings and knives for the tail the bird started to take shape. Feet were a bit of an issue for a while, then the penny dropped and I payed a visit to my local discount shop for some hair accessories. Small claw clips turned out to be perfect and while I was there I got some other bits and bobs for future projects.
     I have also bought some coloured plastic cutlery to play with, it will be interesting to see if the core colour takes over when melted. I would suggest making sure the windows are open when melting plastic, or better still try and do it outside.

     As this bird was made with white plastic I wanted to see what I could do to colour it. For this one I used a special grey primer for use on plastic, followed by a copper spray paint. There are some craft paints that may work on plastic but I have yet to try them.
     My collection of small plastic bits and bobs has increased a little so I will try some other birds or animals soon.
     Not Just Cards is the perfect challenge blog for a non papercraft project, so pop over and see what else we have for inspiration this month.


I would like to enter this project in the following challenges:
2 Crafty Critter Crazies - Anything Goes With A Critter
Crafty Animals - Anything Goes
Love To Craft - Anything Goes
Worldwide Open DT - Anything For A DT Goes
A Bit More Time To Craft - Anything Goes
The Crafter's Cafe - Anything Goes

Saturday, 11 April 2020

Spring BBQ


     Making cards for men can be a bit of a challenge but with this bench/bridge card die set from John Next Door it's easy to come up with ideas, here's another one. You will find John's basic assembly video here.
      The base for this card was cut from white cardstock, approx 250gsm, but the shelf was cut from black card.
      Before sticking it all together I covered the base card with sky backing paper and the long 'bridge' panel with grass backing paper.
     Each side of the card has a small strip of black card added to make a shelf for the BBQ. The main shelf was cut down in height to give a gap underneath to show grass, it was then stuck on the outside of the main strip. Two tiny wheels and two small doors with mirri handles were added to the front, plus four tiny brads for knobs.
      The coals on the BBQ were made using alcohol markers on white card, covered with a small die cut mirri grid and dabbed over with black acrylic paint to knock back the shine.
      All the tools were cut from mirri card, those with wooden handles had the handles added from kraft card. The bottle of wine is the chopping board cut in green card and trimmed to look like a bottle, with a tiny scribbled label added.
      There is plenty of space to add a greeting or more tools and bottles, adapt it to suit your recipient. If this is not quite for you then pop over to Not Just Cards to see what else you could make.


Materials List    Available from your local craft shop
JND083 - Bench (Bridge) Card die
JND086 - Kitchen Tools die set
JND087 - Kitchen Tools stamp set
Strong PVA Glue


I would like to enter this project in the following challenges:
Southern Girls - Anything Goes
Creative Moments - Anything Goes/option Something to look forward to - BBQ with friends
A Bit More Time To Craft - Anything Goes
Love To Craft - Anything Goes

Wednesday, 11 March 2020

Computer Reboot


     Making masculine cards can be a challenge but this stamp has it covered, it's not a new stamp but it's one I keep coming back to, when teamed with paper piecing it can be tailored for almost any theme.
      These two cards were made for a couple of young men celebrating their birthdays on the 29th of February. They are both keen gamers so I printed off some suitable papers containing computer code and circuit boards.
      For each card one set of boots was stamped and embossed on the patterned paper and another set on white card. I cut out the white card boots and then cut out selected parts of the patterned boots. To get the darker areas on the boots I used a grey alcohol marker but for the laces I used a white Sharpie pen.
      The word 'Urban' comes from another old Woodware set, stamped, embossed and coloured with alcohol markers. Then the backing paper was matted on to black card, before going on to a Kraft card blank.
      To tailor each card to the young man receiving it I stamped the little heal guard detail differently, one has ties to Canada so I used the tiny Woodware leaf that comes with the boots for his card and the star for the other.
      Inside the kraft card is a die cut shape to match the heal guad detail with Happy Birthday stamped on it. They may be very similar but they are certainly not the same.
      If you're looking for more ideas then please pop over to Not Just Cards where you'll find lots more inspiration.


I would like to enter these cards in the following challenges:
     Di's Digi Designs - Show Some Green
Send a Smile For Kids - Cards 4 Boys    Top 3
Double D - It's All About The Green
The Male Room - Team Colours
Do-Al (l) Creative - Male Birthday

Tuesday, 11 February 2020

Love is....


     .....not just for Valentine's, this would make a good anniversary card too. Not Just Cards have a new challenge starting today, I'm sure you'll find some inspiration over there if you haven't already looked.
     I don't have run through pictures for this one as I got carried away and forgot all about the camera! It started with a heart shaped Media Plate, three shades of red/pink inks and a hard brayer. Starting with the palest ink at the top I inked up the heart with all three shades and then used the brayer to blend them on the plate. Stamping the plate onto white card left me with a gorgeous pinky shape, I then used a stencil on the plate and inked the middle tone ink through it, removed the stencil (actually forgot to do this once!) and stamped the image over the pinky heart.
     To get the gorgeous shine I thoroughly dried the heart shape, cleaned off the plate a little and then used the same stencil, but in a different position, with Versamark. Again removing the stencil, stamping the image onto the card but this time dusted the heart with pearl mica powder.
     The two birds stamp is from stash, I can't remember where it came from, stamped in Versafine black. Using a stamp press makes life so much easier when stamping silhouettes as you can stamp the image a couple of times to get a really solid image.
     The little sentiment is one of John Next Door's stamps, again in black and tucked away in the corner. There is a thin black mat layer to set off the black on the image panel, followed by another thin layer, this time in pearl pink.
     The photo below shows how the card looks when the light doesn't catch the mica shine, the pattern still shows but muted.


Materials List    Available from your local craft shop
JLGP006 Medai Plate - Heart
JND0013 Everyday Sentiments
Pigment Inks
Versafine Black
Versamark
Pearl Mica Powder
Stamp Press


I would like to enter this card in the following challenges:
Allsorts - Add A Heart
Sweet Stampin' - All You Need Is Love
Always Fun - Love/Valentines
Crafty Cardmakers - Love Is All You Need
Dream Valley - Love
Make My Monday - I Heart You


Saturday, 11 January 2020

Bee Slide Surprise


        A new challenge at Not Just Cards means a mechanical card made using John Next Door's new slide card die set. All my basic card pieces were cut and decorated before any assembly started.
     The die has two main pieces that make the front and the insert, the back is made using part of another front panel. John has a video on YouTube showing just how to put this card together.
      There is a little piece of flat metal in the set, this is your aperture positioning guide, it makes sure you can get the three windows required in the right place. For me it worked well in making sure the window was correctly placed from the tab end, but being a fussy guts I wanted my window in the middle of the card height wise, so I made my own tiny adjustment.
     This adjustment meant that when I cut the inside window I had to place one of the cut outs back in the hole, tape it down, then place the die over it and cut with it in place. If you use the guide as John recommends you won't need to do it this way.
     The picture inside was made up with some of John's flower stamps and a bee stamp from stash, coloured with watercolour pencils as alcohol markers would have shown through to the back.
     The decoration was done with Distress Ink Scattered Straw and a hexagon stencil.
     I stamped and coloured one set of flowers, then cut them out and worked them with a ball tool to give them shape. Each flower is two sets of petals stuck together, I have also used a few rose leaves to add foliage.
     The middle of each flower has some black Flowersoft stuck in it to add texture, plus it's a good way to use up what's been sitting in my stash for years.
     These were all stuck on with a good strong PVA so they won't fall off as the card gets moved back and forth.
   
     The sentiment on the slide was stamped in brown ink as black looked a little too harsh, and the gold embossed bee on acetate was stuck in between the top layers of the card using redline tape. I also found the mechanism worked much better if I stuck these two pieces of card together right up to the fold of the sliding part.


Materials List    Available from your local craft shop
JND099 Slide Card die set
JND150 Loving Sentiments stamp set
JNDGD010 Gerbera Flowers die plate
JND5001 Gerbera Daisy  stamp set
JND120 Rose Leaves die set
Distress Inks
Stix2 3D PVA Glue
Gold Embossing Powder
Versamark Ink
Heat Resistant Acetate


I would like to enter this card in the following challenges:
Alphabet Challenge - T is for Try Something Different
Creative Fingers - Anything Goes
Southern Girls - Anything Goes
Colour Throwdown - Brown, Yellow & Green

Wednesday, 11 December 2019

Seasons Greetings


     Not Just Cards challenge blog is for all things crafty, so this month I made a wreath for the door.
     The base for this was a polystyrene ring, which I then covered with hessian ribbon, to secure the ends I used hot glue.
     There is a wire loop on the back which gives me somewhere to tie the wreath to the door.
     The pine fronds are from an old artificial tree that I use as an outside decoration. The pine cones were collected on one of many walks around parkland, all I had to do was use the hot glue gun to secure it all and add in a few wired berries.
     The bow is wire edged ribbon, again stuck on with hot glue. A rather simple but effective seasonal make. Please pop over to Not Just Cards and see what other inspiration we have.


I would like to enter this project in the following challenges:
The Holly and Ivy - Anything Christmas
International Art & Soul - Anything BUT A Card