Showing posts with label Alcohol ink. Show all posts

Thursday, 11 June 2020

Light Bulb Glow Bug


     Lockdown has proved to be inspirational, having time to look at some amazing projects on blogger and Pinterest has sparked a few ideas. This is based on a project I saw that was crafted in glass and metal, again skills and tools beyond my capabilities. The challenge?.....to use what I have in my stash to make something similar and then post it for Not Just Cards as my DT project.
     The centre piece is the lamp, this came from Poundland some months ago, it has a short string of LED lights inside, battery operated, and a nylon string to hang it up.
      I have in my stash some jewellery wire of differing gauges, I found two of similar colours and set about making some legs. I did try wrapping the wire around the screw part of the bulb but it looked chunky and untidy, so I made three pairs of legs and wire wrapped them together, leaving a length of fine wire to wrap around the screw.
     The screw part of the lamp comes off so you can change the tiny batteries, this meant I had to attach all limbs, etc. to the screw only.
     For the wings I die cut some foiled acetate, this was quite thick so the open work in the wings did not cut out but it did emboss rather well. I cut two sets of wings and coloured them with a little alcohol ink in colours to go with the legs. I also used an embossing ball tool to give a little dimension to the wings before sticking both sets together in the middle.
     Assembly began with the legs hot glued to the screw, once the glue set I used the long wire to twist around the screw for added security, the wings were then stuck on with hot glue.
     It's larger and a little more crude in it's construction than the gorgeous ones I saw on Pinterest but I am very happy with it. If I manage to find any more lamps then I shall make him some friends, maybe with different coloured bodies. He looks good in daylight but so much better at night all lit up.
     Please pop over to Not Just Cards to see all the DT inspiration, come and join us with your projects, we'd love to see what you've been making.


I would like to enter this project in the following challenges:
Creative Crafting Uncles - Anything But A Card    (top 3)
Moving Along With The Times - Things With Wings
2 Crafty Critter Crazies - Anything Goes with A Critter   (top 6)
A Bit More Time To Craft - Anything Goes
A Perfect Time To Craft - Anything Goes   (winner)
Classic Design - Anything Goes
Through The Craft Room Door - Anything Goes

Wednesday, 8 May 2019

Snowflakes in May


     Where is this year going?! It's May already. It really is time to get those Christmas cards made and we have lots of inspiration for you over at Christmas At Sweet Stampin'.
      Snowflakes are one of my favourite images to use. They are great for masculine, general seasonal and traditional projects.
      Using Sizzix die Ice Flake I cut a shape from snowy acetate, then used alcohol inks to add a little colour to it. Another Ice Flake was cut from white glitter card.
      Sizzix Layered Snowflake was used to cut a shape from mirri card, then embossed with the  folder that comes in the pack.


      All three layers were then put together using Glossy Accents to glue them. I also put a brad through the middle just incase the glue gave out. I didn't have any snowflake brads so I used a silver flower and put a gem in the centre, coloured with an alcohol marker.
      I wanted a mat layer that matched the mirri card but was a little more subtle, so out came the Distress Inks. I have found I can match my layer colours to my project more easily by cutting a white mat and using the inks or pens used in the image to colour the edge that will show.
     The layer directly under the flake has been embossed with snowflakes to add more texture. The main snowflake has been stuck down with red line tape just to make sure it's stuck fast. Only the centre is stuck down, allowing the snowflake to look like it's just resting on the card.
      Please pop over to Christmas At Sweet Stampin' to see all the wonderful snowflake ideas we have for you, you don't have to use a snowflake to join our challenge but it would be fun if you did.


I would like to enter this card in the following challenges:
The 12 Months Of Christmas - #53 Anything Goes, Option-Creature Feature
CraftyHazelnut's Christmas - #436 Anything Goes, Option-Bells
The Holly and Ivy - #49 Anything Goes
Simon Says Stamp Mondays - Add Something Metallic


Wednesday, 1 May 2019

Seascape Inktin


     What do you do with an old, dried out ink pad that's not worth trying to revive? Well maybe nothing with the pad, but the tin is a different story. This project is for Altered Eclectics challenge blog as we love anything altered, recycled or mixed media.
   
     It took a bit of brute force to get the pad off the base, only to discover that the base wasn't really going to be of much use, so that went in the metal recycle bin.
     The lid has many possibilities as it's a nice silver tray about half an inch deep. After peeling the label off the lid I used some Sticky Stuff Remover to get all the glue off, leaving it nice and clean.
     To be able to pop it on the fridge I added a strip of Stix2 self adhesive magnetic tape on the outside.
      To decorate the inside I used Alcohol Inks in shades of blue, ready for my seascape.
      The weed and creatures are all made with hot glue in a silicone mould, this means they are slightly flexible which is very handy when sticking them on a curve.
      The shapes were painted with a mix of acrylic and pearl paints, then stuck into the tin with hot glue. The addition of a few shells collected on various outings completed the tin.
      If you have anything altered, recycled or mixed media then please come over to Altered Eclectics and join us, we would love to see what you've made.


Wednesday, 3 September 2014

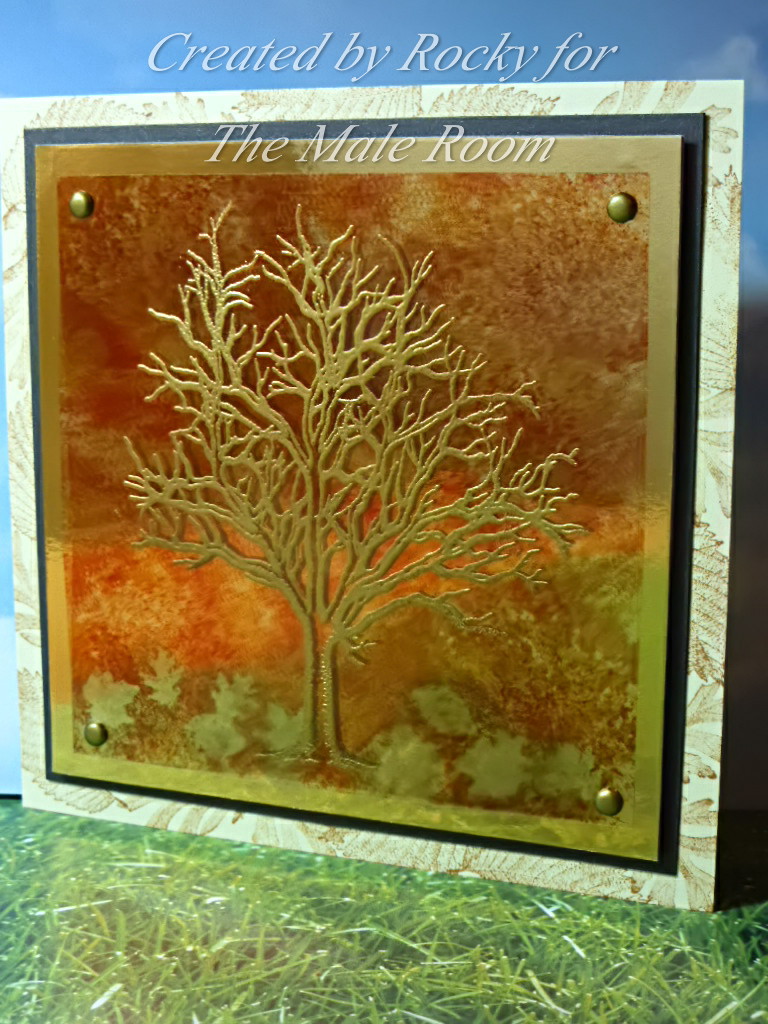
Autumn in The Male Room

      It's Autumn in The Male Room, where did the summer go? We have a new challenge beginning today so now's your chance to use all those beautiful Autumn colours and make something with a masculine feel to it.
     It wasn't until I had finished this that I remembered how much I detest taking pictures of acetate, and to put it with mirri card aswell....Ahhhhh!
     I began by stamping and embossing a bare tree in gold on some heat resistant acetate. On the back I have used alcohol inks in Autumn colours. Then I have stamped with Archival ink using leaf shapes and wiped away the ink before it dries, this takes away the alcohol ink too, leaving silhouette leaf shapes.
     The acetate is attached to the gold mirri card with brads, I did try using some invisible sticky dots but discovered that they were not.
     The mirri card shines through the acetate showing off the colours as well as giving a great shadow effect from the stamping.
     There is a small mat layer of dark brown card under the gold, because the brads made the corners stand out I have used foam tape to mount the gold layer to keep it level.
     The card blank is cream with brown stamped leaves all around the edge to bring the Autumn feel to the whole card. As usual I have not added a greeting at this stage, that will happen when I need to send it to someone.
     Please come and join us at The Male Room, as long as it's Autumnal with a masculine feel to it you can make anything papercrafted.


I would like to enter this card in the following challenges:
City Crafter - I See Clearly (acetate)
Sweet Stamps - Embossing


Saturday, 6 July 2013

Recycled Metal Flower

     This metal flower brooch is made from recycled drinks cans. A standard size fizzy drink can will give enough metal to make this brooch.
     This is something I saw a friend make and I thought it was great. It is a hardship having to drink the contents just to get the can, but this is where the family can all help out!
    My colour choice was set by Inkspirational this week, shades of purple and green. Try it on Tuesday have challenged us to 'Show us your metal' and Creative Moments would like to see flowers. I have also used this as my Sunday DT blog over at J&C Creations as they are having a flower making workshop on Wednesday.
     Please be VERY careful when you cut open the aluminium can, wear gardening gloves and use old scissors. Once die cut the edges are not so sharp but please dispose of the scraps carefully too.
    The petals are cut using Tattered Florals Bigz die from Sizzix and the leaves are cut with Tattered Leaves, also Sizzix. I have cut two large petal sets and one thin petal set, plus two leaves. The metal is coloured using Alcohol Inks in Eggplant, Purple Twilight and Pesto. Once coloured the big petal sets and the leaves have been embossed. A detailed embossing folder may cut the metal so I would suggest using a broad pattern to avoid this happening.
    In the centre is a flower shaped brad which goes through all the layers of metal holding them firmly together. It's not easy finding an adhesive that will hold firm so a brad is great to use. Die cut a small petal set in felt and stitch the brooch back to it, then use red line double sided tape to stick the felt flower to the back of your brooch, this also hides the back of the brad and keeps the metal off your clothes.
    If you don't have Alcohol Inks try stamping a design in Stazon and colouring it in with Promarkers.
I would like to enter this brooch in the following challenges:
Inkspirational - Colours..Purple/Green
Try It On Tuesday - Show Us Your Metal
Creative Moments - Flowers

Monday, 10 June 2013

Vintage Felt Brooch

    Here is a little item I made for J&C Creations with some of their wonderful new stock. They are branching out into crafts other than paper based items to compliment the existing J&C Beads.
    I began with the gorgeous teal felt which I die cut using Sizzix Tim Holtz Tattered Florals. I stuck two pieces of felt together using double sided sticky sheet and then die cut them, it gives a slightly more rigid flower than one layer.
    The lace is a cream crochet lace from the Vintage range as is the cog in the centre. I cut a length of lace and gathered it along one edge using a needle and cotton, then I pulled the thread and formed a rosette which I then stitched to the flower.
    The cog is fixed to the flower using a screw top brad which goes right through the whole item securing everything in place.
    The little dragonfly is a charm hung a small length of chain which is just passed through the cog, the lace behind the cog helps hold it in place, you could stitch this in place if you wish.

    The dragonfly's wings are coloured using alcohol inks. If you mix a little Snowcap white with another colour it will become opaque. I have used Lettuce and Stonewash to colour his wings.
    Finally I have stitched a brooch back onto the flower. You could cut a flower freehand if you don't have a die, this felt cuts easily without stretching, it's very good quality.
    These make great little presents, have fun making them for your friends.    


I would like to enter this creation in the following challenges:
Country View Craft's Challenge - Die cuts
Our Creative Corner - Recipe (Lace,Metal,Ink)

Saturday, 16 March 2013

Tattered Floral challenge

    There is a challenge over on Tim Holtz blog for anything made using the Tattered Florals Die.
   This flower is made from a fizzy drinks can, cut open , cut out and coloured with alcohol inks. After colouring I have run it through a cogs embossing folder. There is also a fabric layer using the daisy like flower from the same die.
   The flower layers have been stacked up using a screw top brad wrapped with stamens to hold it all together. I have tried different types of glue and tape with mixed success but a brad is perfect as it goes right through it all.
   There are two leaves cut using the Tattered Leaves die, also a Tim Holtz die, coloured with greens and run through a bark embossing die.
   The flower is attached to something I am working on at the moment but am unable to finish by the end of the week. Please pop back soon to see the companion to 'The Old Boot' which can be seen in the background.
   The Old Boot was a project done at the end of last summer, I am now working on it's companion. If you would like to see the making of the boot then please click on this link here. Flowers were cut from card, fabric, metal and paper, Bigz dies will cut through almost anything, I love them.

Sunday, 2 September 2012

The Old Boot gets Flower Power


Here as promised is The Boot.  It began life a long time ago as a lovely new work boot but when it's work was done I thought it should have a new life.
J&C Creations challenge this month is Try Something Different, so I did. I decided that as distress and grunge are so in vogue at the moment I would go the other way.
With the exception of one sequin covered flower they are all die cut from metal, card and fabric using a range of Sizzix and Spellbinder dies.
 I wanted to put my flowers on a green base so I had to paint my boot. I masked off the top brown cuff so it stayed brown and then painted with a cream emulsion I have in a tester pot.

 The green layer is a mix of various shades of acrylic paint and some Cosmic Shimmer misters.
The large purple and blue flower in the bottom left corner is the only metal one I made, it's coloured with alcohol inks.

The large pink flower with the button in the middle is fabric stuck on double sided sticky sheet then on to card and cut out. The netting is also die cut with a card flower in the middle and a gingham brad.

  The foliage is cut from a mixture of pearl card, plain card and some coloured with Distress inks or sprayed with mica misters.
The butterfly is the only stamped item on the boot. Stamped and embossed then coloured with Cosmic Shimmer Watercolours.I used a flower stamen folded in half and stuck behind his head to give him antenna.
Everything is stuck on with Cosmic Shimmer PVA dries clear glue, it's amazing stuff, much stronger than it looks!
 The whole project has taken a few weeks to complete but it has been fun. Oh and it has a jam jar inside so you can use it to store your brushes or put flowers in it!
I would like to enter my boot in the challenge over on Fashionable Stamping Challenges - Handmade Flowers.  When you see the creations people have come up with you'll be amazed. I don't enter to win, I just want to share because it was so much fun making something different.
So go on and Try Something Different!


Wednesday, 15 September 2010

Blooming Fuchsia

This card was made using the 'Fuchsia' stamp plate from Creative Expressions and a gorgeous sheet of fuchsia coloured metal from Walnut Hollow. I was lucky enough to find a sheet of mirri board the same colour as the metal which really helped frame it.
The metal was coloured with alcohol inks, Purple Twilight, Raspberry and Pesto. I stamped the swirl in black Archival ink on the front of the metal and very gentley traced over it, then I turned it over and traced the lines a bit harder on the back to get the raised swirls on the front.
The flowers were stamped on the back of the metal and worked with the texture tool to produce a raised image on the front. I felt black lines on the swirls made it a stronger looking branch, no black lines on the flowers a softer image.
To stop all your hard work being squashed pack the back of the raised areas with filler, I use 'Sand Less Filler' from B&Q (500ml pot will last you months). It dries very quickly and is so smooth you really do sand less! No idea what it's like on a wall...it's for crafting!!!
To remove the colour on the flowers I used Blending solution. The coloured metals from WH are coated aluminium (except copper and brass) so the top colour can be sanded off or wiped off with the blending solution. I felt this made the flowers stand out more.
Well it's onto christmas designs now so I'll post one I'm working on at the moment when it's finished. Happy crafting!