Showing posts with label embossing. Show all posts

Wednesday, 3 May 2023

Embossing With The Paper Funday


     Welcome to my contribution to this month's The Paper Funday Challenge, this month our twist is Embossing - Hot or Dry, or both if you wish.
     I chose to dry emboss with a Tim Holtz embossing folder - Elegant. I have inherited a large craft stash for my mum so it seemed right to use some of it on this project, Clarity papers caught my eye but I can't tell you which set it comes from, sorry.
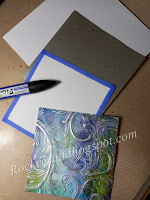
     There were a few areas of damage on the piece I chose, so I cut it down to a 4inch square and ran it through the embossing folder. I have a Bigshot so for my machine I used the base plate, the folder and one clear plate, the 3D folders are much thicker than the ordinary ones so you'll need to adjust your sandwich according to your machine.
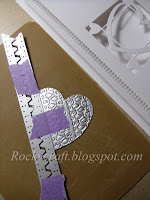
     Once embossed I used a little silver Pebeo gilding wax on a hard foam pad to add highlight to the raised areas. I left it for a few minutes then gave it a gentle buff with a soft cloth to get a nice shine.
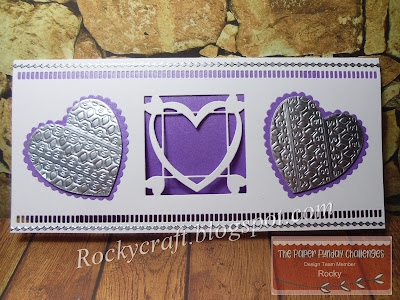
     I wanted to have a coloured mat layer under my patterned paper but nothing in my stash was the right shade, so I made my own. I cut a square of white card and used an alcohol marker to colour the edges, no need to do the whole card as only the edge will be seen.
     After sticking the embossed topper to the mat layer I then cut another mat layer in silver paper and mounted that underneath on foam tape.
     Once stuck onto the white card blank I went in search of a suitable greeting. My card stash needs lots more birthday cards so after a little rummage I found some greeting toppers, the birthday one wasn't quite right so I used a Best Wishes instead. Mounted on foam tape and tucked in the top corner finished this card off and with the colour scheme it could be for a man or a woman.
     If you haven't been to The Paper Funday then please pop over and take a look at all the lovely inspiration you'll find there, then come and join us with your project.


I would like to enter this card in the following challenges:
The Paper Players - PP638 Tic-Tac-Toe  (last row down)
Can You Handle The Pressure - Anything Goes Embossing     (Top Winner)
Pammie's Inky Pinkies - #2317 Anything Goes     (Honourable mention)
Love To Craft - #74 Anything Goes

Sunday, 10 April 2022

Ares Quilted Leaves


     This was made with two new die sets from John Next Door, Vintage Leaves and Ares background die. Die's can be used for embossing as well as cutting as long as you use a silicone mat and the right sandwich of plates for your machine.
     I cut a rectangle of off white card to the required size, then using various Autumn colours I cut the leaves. The leaves were stuck down on the card with a good strong PVA glue and left to dry.
     Once dry I put the background die on top of the card and ran it through the embossing machine. My machine is a little worn so the rollers are slack, for my own machine (Bigshot)I used the following sandwich, from top to bottom.....Cutting plate, die, card, silicone mat, cutting plate, one cereal packet card, base plate (no tab sheets). You will need to try this on scrap to find the ideal sandwich for your machine before you try it on your project.
     Once you have mastered your own machine you can use many different dies to 'quilt' with. This can be very effective if used under the same die cut background as the raised areas fill the gaps and give a perfect 'quilted' look.
     To mat and layer this I used some of the same card used for the leaves, not wanting to use too much of this precious card I gutted the layers, cutting out the middle part that will never be seen and isn't required for support.
     A layer of double sided foam tape around the top card before going onto the bottom layer gave it a little height.
     For the greeting I wanted something raised but this one was too thin for foam tape. The answer was to cut it once in the gold and three more times in white card, then stick them all together with the gold on top, making the greeting stand tall and solid.
     This makes a nice card for a man, still colourful but no flowers, it could be made in shades of blue or green and still be effective.


I would like to enter this card in the following challenges:
Gem Of A Challenge - #8 Anything Goes
Happy Little Stampers - April Anything Goes with Dies
Craft Rocket - #91 For The Boys/Men
The Male Room - #161 Dry Embossing
Lil Patch of Crafty Friends - #179 Anything Goes
Allsorts - #671/2 Masculine
Crafty Catz - #590 Anything Goes

Wednesday, 2 February 2022

Paper Funday Hugs and Kisses


     A new challenge begins today at The Paper Funday, it's anything goes but I have chosen to follow the optional twist of Hugs and Kisses.
     This is made with a mix of old and newish dies from John Next Door. The old die is the cut out heart in the middle, it's from a set that goes well with the pop out box. This has been cut into the front of a DL card blank so that the purple card behind can be seen.
     The newer dies are the strip dies used to make the edging at top and bottom of the card and the embossing on the silver satin card. To use dies as embossing templates is easy and it gives them yet another use. Place a silicon embossing mat under the card you wish to emboss, place the die on the card and run through the machine, you will need to adjust your 'sandwich' - for my machine I use two pieces of card from a cereal box with my clear plates, leaving out the 1 & 2 shims.
     Each silver heart has a scalloped edge purple heart underneath to tie it in with the card liner. It looked a little bare so I used some silver peel off borders to bring in a little more silver, I have lots of peel offs in my stash so it's time to use\them up. I don't feel it's cheating, I know if I tried to stamp a long border like that it would fine until the last bit so at least this way it looks even.
     The Paper Funday has lots of inspiration for you so please pop over and take a look, then come and join us with your creation.


I would like to enter this card in the following challenges:
Shopping Our Stash - #463 Heart and/or beets
International Art & Soul - #126 All About Love/Hearts
Use Your Stuff - #440 Embossing

Saturday, 20 February 2021

Mica Magic Metallic


     John has been on TV again this week with some new products and some old ones, this tag is made with the Mica Magic Metallic set which has been around for a while but is a firm favourite.
     I have always loved the effects you can get with mica, I have a stash of powders from years ago and really enjoyed stamping and colouring with them. The beauty of the Mica Magic is it is not a powder, it's a sort of creamy consistency but not quite like a gilding wax, very easy to apply and it doesn't smell.
     It's definitely magic to be able to turn a piece of embossed black card into something that looks like a sheet of aged metal. On this project the mica was applied using my fingers, left to 'set' for a short while....long enough to make a cup of tea....and then gently buffed with a cotton cloth.
     It's all very well making these gorgeous pieces of card but what do you do with them? I have seen it used to cover journals, boxes or just cards, but I chose to cover a mount board tag. It was glued down with some strong PVA, left to dry and then trimmed to fit. The edges of the tag were showing white so I coloured them black with Distress Ink.
     I die cut two banners and cut the greeting into them, then stuck small pieces of silver mirri card behind the words to make them shine. I also die cut a small shape in mirri card and mounted it on a black disc, using the banners and the disc I made a rosette.
     The rosette was stuck down on black foam so the disc sits proud of the banners, which were stuck down with redline tape. A couple of lengths of ribbon to finish off the tag and now I have something to either add to a card or to hang around the neck of a wine bottle when gifting it.
      I'm often asked about ideas for making masculine cards, I would have to say that this type of project would be ideal for both genders, just vary the embossed image and with Mica Magic available in many colours the choices are endless.


I would like to enter this tag in the following challenges:
Little Red Wagon - #589 Tag, You're It
Watercooler Wednesday - WWC309 - Masculine    Rocker
The Male Room - #147 Steampunk
Fab 'n' Funky - #511 Birthday

Monday, 8 February 2021

Izink Smooshed Heart


     Another technique using the Izink liquid pigment inks, I have used this before at Keep On Crafting, when the inks came in a dropper bottle. It's my favourite way to use them because they work so well on non porous surfaces.
     Using two pieces of heat resistant acetate I dropped inks on to one of them, then I put the other piece on top of the inks and smooshed them together, it's like making the ink blot pictures many of us made at school.
     If you work quickly you can smoosh the inks around to cover the whole surface, some may come out on your craft mat so mop it up with a spare piece of card, you can use this for another project.
     Once smooshed pull the two pieces of acetate apart, you will get some interesting patterns, every time you do this it comes out with a different look. Set them aside to dry, which doesn't take very long hence the need to work quickly when smooshing and separating.
    
     These inks can also be added to water to make a co-ordinating spray for your project, even the pearl ones work well, leaving a faint sheen to the droplets.
     The spray pattern will depend on the nozzle of your bottle and the height from which you spray. Mop up any overspray from your mat with the same piece of card, building up a rather nice background.....waste nothing.
     All these mop up pieces make really pretty die cut flowers and you make sure you get full value from your inks.
     For a mat layer I tried various shades of pink pen, card and ink pad, finally settling on a Distress Oxide. I cut the mat and coloured around the edge, no need to colour the middle as it will never be seen.
     What is the best way to glue acetate without it showing?...... For this I used a sheet of DS sticky film, laying the acetate, ink side down, onto the sheet slowly rolling it on to avoid air bubbles, then die cut the heart shape. With sticky all over it has an even cover and nothing appears to stand out.
     The heart was then stamped and embossed in gold. I did try this on an offcut of the acetate to see if the sticky was affected by the heat, it wasn't.
     All that remained was to assemble the layers and add the heart to the centre, again rolling the acetate shape onto the card to avoid air bubbles.


Materials used 
I-Zink Pigment Ink - Orchid (pearlescent)
S57107 - A4 Double Sided Adhesive Tape Sheet - Stix2
S57262 - 3D PVA glue
Distress Oxide Inkpad, White card, White card blank 6x6, heart shaped die (3.5")
Versamark Ink, Antistatic pad, Gold embossing Powder


I would like to enter this card in the following challenges:
Allsorts - Love Is....
Just Us Girls - #570 Valentine

Wednesday, 9 December 2020

Winter Blues


     The theme this month at Christmas Craft Creations is Winter Blues. I know this has a touch of purple but they go so well together. 
     This idea came from a friend of a friend, it's so simple but looks like you've spent hours making it. The best thing is there is a video tutorial to follow which you can find here.
     For this card I used Ultramarine Brusho on the embossing folder, silver guilding wax and some die cut snowflakes. It's not the same as Mary Ellen's but that's the beauty of this technique, it's not going to be the same even if I use the same items.
     After polishing the crackle I added the snowflake and some blue dewdrops type gems from deep in my stash. I decided to mat and layer on purple to bring out the odd bits of purple in the Brusho.
     Just having Winter on it means it's a good card for anyone not celebrating Christmas and being snowflakes, my favourite seasonal thing, it's not religious either. Our challenge doesn't have to be a card, anything you have made that fits the Winter Blues theme is fine with us.


I would like to enter this card in the following challenges:
ABC Christmas - Y-Your Favourite Things - Snowflakes
The 12 Months of Christmas - #72 Anything Christmas
CraftyHazelnut's Christmas - Anything Christmas
Bastel-Traum - Winter

Wednesday, 28 October 2020

Oundle In Bloom


     Believe it or not this was the first idea I had when I saw the Oundle die set, a nice big, bright tissue flower and it had to be yellow. I think it was the honeycomb style centre that did it.
     I spent a little while rummaging through my stash but eventually found a small stack of coloured tissue, luckily there was some yellow left. I used one sheet folded into twelve layers, which I die cut all at the same time.
     Using PVA I put a small drop of glue in the centre of each petal and rotated them as I stacked them. Once dry I gently pulled up each layer until they were all fluffed up, then I opened the out again until they looked like a multi layered flower.
     For the centre I cut the honeycomb type piece in black and cut it out with the small octagon shape. Using gold mirri I cut another small octagon and embossed it with the same honeycomb type die.
     The raised areas of the mirri sat happily in the holes of the black card making it easy to slot together and glue.
     I smothered the back of the octagon with PVA and nestled it in the centre of the flower, fluffing up the petals afterwards to make the flower tidy.

     For the background I used two shades of green, one die cut with the main body of the die set, the other as a flat backing.
     I wanted a tiny gold mat layer to offset the gold centre, not wanting to use a huge piece of gold that would be hidden I cut out the centre for use on another project.
     With the mats and layers done I added them to a Kraft card to keep it all looking natural. I put a mid size dollop of PVA on the back of the flower and popped it in the middle of the card, I had to hold it down for a short while as the tissue wanted to lift it back up.
     I needed a little something to add to the card but didn't want to use a greeting, I chose a gold butterfly in one corner to break the symmetry.


Materials List   (available from your local craft shop)
JND171 - Oundle die set
JNDAD008 - Small Butterflies
S57262 - 3D PVA Glue from Stix2


I would like to enter this card in the following challenges:
All Fun - #18 Anything Goes
Simon Says Stamp - Anything Goes

Saturday, 17 October 2020

Stencilled Oundle


     This is another of the new die sets from John Next Door, he named it Oundle, the home of the Hochanda studio. I love this set, it has so many different possibilities with a beautiful shape at the heart of it all.
     I decided to use the background die and the frame die as stencils, I used Lucy's trick and put a magnetic sheet under my card so the dies wouldn't move when I was colouring. I also masked off the outside edge to keep it clean, Stix2 stencil tape is perfect for this.
     Once the card was all masked up I put the dies on and began to colour with Distress Ink using one of the amazing blending brushes from CraftsToo. I am so impressed with these brushes, they don't lift even the most delicate mylar stencil when colouring.
     To get the chequered look I cleaned off the die and turned it over, turning it round didn't change the direction of the stripes, and inked again.
     After removing all the tape I trimmed the card and die cut the centre shape, I also die cut the centre decorative die from a piece of teal card to go under the centre hole and embossed a piece of silver mirri to go behind that.
     You can use these dies to emboss as well as cut, it's just a case of changing the 'sandwich' in your machine and using an embossing mat, a soft rubber like mat that will absorb the pressure from the dies edges stopping it from cutting through the card.
     All the pieces were stuck together which looked OK, but not quite nice enough. The answer was to die cut a frame in white card and mount this with foam over the stencilled frame.
     Luckily I had in my stash some teal card that matched the ink colour perfectly, sadly I have no idea where it came from so I'm using it sparingly. A mat layer of this teal card, with the centre cut out for another project, was added before going on a white card blank.
     Using the Chrysanthemum die I cut from silver paper and made two flowers, one large and one small. Lesley's twigs are cut from silver mirri and the Aster Leaves were cut from the piece that came out of the mat layer.
     I have started to use square cards with the fold at the top, like John does, as they stand well and look better on the mantle with full focus on the front rather than at an angle. I thought it would slide down and collapse but if you use a good card weight it doesn't budge. 


Materials List   (available from your local craft shop)
JND171 - Oundle die set
JND187 - Twigs die set
JND117 - Chrysanthemum die
JND175 - Aster Leaves die set
CAT013 - Blending Brush set of 3
S56994 - Low Tack Stencil Tape
S57262 - 3D PVA Glue from Stix2


I would like to enter this card in the following challenges:
Crafty Catz - #523 Anything Goes
Creative Fingers - #195 Anything Goes 
Love To Craft - #51 Anything Goes
The Sisterhood Of Crafters - Lots Of Layers     Top 3

Monday, 12 October 2020

Castle Reveal Card


     Today is the launch of a new die set from John Next Door called the Reveal Card, it has internal sliding doors that reveal the back panel when the front doors are opened.

      The outer cover and the inner sleeve were die cut from grey card to look like stone. To get some texture and increase the stone look I used an embossing folder, but as I didn't want an all over texture I used the open folder and a ball tool so I could be selective on where I embossed.
      For the inner sliding doors I cut from light brown card and stamped woodgrain in a darker brown. I did find with the inner doors I needed to cut a tiny bit off the height to aid sliding, this may be because I fixed the window sleeve a little to tightly, I would suggest you check yours before gluing.

     For the reveal I cut an arched window in the sleeve and added some ivy for a splash of colour and interest.
     The image is a piece of my artwork from a few years ago which I thought went well with the castle theme. I placed the window over the image and held it with clips until I had the image in just the right place, then I stuck the image down.
     The window sleeve was then stuck down in the centre of the back panel. I slid the doors in place and held them together with a small piece of stencil tape while I stuck them in place, this made sure they would still meet when the card was shut.
     For the front cover I used the 3D embossing folder called Quilted Blocks, I though it looked like an old studded door. Using Kraft card and some Distress ink to dirty it up, one embossed piece of card was enough for two door panels.
     For the hinges I used a Sizzix Tim Hiltz die and cut from Kraft card, to make them look a little more metallic I used Distress ink for the rust and gilding wax to look like brass.
     For a castle I thought the doors should have brass studs, so I used a pearl pen from Dutch Doobadoo, it's similar to pearl drops. 

     I was going to cut the hinges off at the edge of the card but they wrapped around to the back and met in the middle so beautifully, so I stuck them down.
     To help my doors slide a little more easily I added a gentle fold down the back, this means that the doors have less tension on the inner sleeve when they move, making it all run more smoothly.
     John has made a video to show how this card is put together which you can see here. For my card I didn't use foam tape, I scored a second fold very close to the first, both top and bottom of the sleeve to make a tiny tunnel for the doors to slide through. 
     I strongly suggest making this up in basic card to get the feel of it before you use your best card. Bear in mind that a textured card may make a difference to the slide of the doors, as will anything raised on the back panel behind the doors, this is speaking from experience!


Materials List
JND170 - Reveal Card die set
PCD304 - Quilted Blocks 3D embossing folder
JND129 - Mini Ivy die
656632 - Sizzix Tim Holtz Hardware Findings  (retired)
S57262 - 3D PVA Glue


I would like to enter this card in the following challenges:
613 Avenue Create - Anything Goes/ optional Winged Things
Challenge Up Your Life - Dragon or Kite     Top 3
Crafter's Castle - Anything Goes
The Fairy and The Unicorn - Anything Fantasy
2 Crafty Critter Crazies - Anything With A Critter
The Dream Factory - How To Train Your Dragon     Top 3

Friday, 11 September 2020

Heartfelt Thanks


      A new challenge starts today over at Not Just Cards. I have used a brand new stamp and embossing folder set from John Next Door.

     I love the media plates so I decided to use the heart on this card. I used some of the new I-zink Pigment Petals on the media plate and a hard brayer to smooth the ink.
     The stamp that comes with the folder is designed to be 'backwards', this is so that when you stamp inside the folder and then emboss the writing will come out the right way round. This backwards writing makes it perfect to use on a media plate too, so that's what I did. In darkish blue ink I stamped the media plate so the writing would only be within the heart.
     
     I then used the folder to emboss the large words across the heart, with a small stamp from stash that just seemed perfect for this, I'm sorry but I have no idea what brand it is.   
     To get a mat layer that co-ordinated with the soft colours on the heart I decided to use a piece of white card and the same inks to make my own. No matter how many sheets of coloured card I have, I never seem to have the perfect shade.
      There are lots of inspirational projects over on Not Just Cards so please pop over and take a look, why not join us with your project, we'd love to see what you've made.

Materials List
PCD303 - Embossing Folder with Clear stamp - Thank You
CAT054 - Pigment Ink Petal - Winter Colours
JLGP006 - Media Plate - Heart
S57410 - Finger Daubers
S57262 - 3D PVA Glue


I would like to enter this card in the following challenges:
Aud Sentiments - Anything Goes with A Sentiment
DL Art Thankful Thursday - #267 Thankful
Lemon Shortbread - #128 Anything Goes
Tuesday Throwdown - Anything Goes
Dream Valley - #232 Embossing Wet or Dry

Monday, 3 August 2020

Quilted Bauble


     This card is made using just one of three different centres you get with Sam's Circles die set from John Next Door, it's a new set for this year but it will co-ordinate with some of last years dies.
      I cut the lattice centre in gold mirri card, then using the same die I embossed a circle of purple pearl card. The circle die is included in the set so you will get a perfect match with the other centre pieces.
      Using your die to emboss is a great way of getting that quilted look, especially on pearl card, it seems to stand out more when the light catches the pearl sheen.
     You may have to play around with your 'sandwich' of layers in your machine but the main one you will need is some form of silicone mat, this will squish allowing the die to emboss but not cut.
      I did the same with the main lattice die to emboss it, this time on a piece of white pearl card.
      The gold layer was stuck on to purple with tiny pearls added to each star. A die cut bauble cap was added to the top of the circle and then it was stuck on to the quilted background with foam tape to give the impression that it's hanging there.
      The background was added to a narrow gold mirri layer and then stuck on to the white card blank. Using the new Pinstripe Poinsettia I cut some flowers in white card ready to be stuck over the pearl white solid poinsettia from 2018. A little bit of mini ivy in white and a couple of Lesley's Twigs in gold mirri and a tiny gold pearl finished off the small floral embellishment. A die cut greeting in gold mirri completed the card.

Materials List
JND183 - Sams Circles
JND187 - Lesleys Twigs
JNDCC017 - Poinsettia Die (solid shape)
JND190 - Pinstripe Poinsettia
JND129 - Mini Ivy
S57262 - 3D PVA Glue
Stix2 Pearl Card

I would like to enter this card in the following challenges:
The 12 Months Of Christmas - Shimmer and Shine
CraftyHazelnut's Christmas - Anything Christmas
Crimbo Crackers - Anything Christmas
Merry Little Christmas - Anything Christmas
Girlz Creative Crafts - Christmas In July

Friday, 27 March 2020

Leaf It Out


     Through all this chaos us crafters seem to be pulling together very well, an example to others I think. There are lots of Facebook Live videos, the craft channels are still broadcasting and lots of wonderful independent shops are hosting challenges or posting tutorials. The only thing I would like to see is a few more blog posts for those not on Facebook.
      This tag was made for a challenge set by a local craft shop, the theme this week was leaves. It's just a bit of fun and a nice way for us to stay in touch, but it's only on Facebook. For those of you out there that are not all over social media I would heartily recommend trying some of the blog challenges you can find listed on Paper Playful.
     This tag started as cream card, die cut with a Sizzix Bigz die. Using Distress Inks I coloured the tag with three shades of green and one brown. The droplets were stamped in Versafine black over the Distress Ink, then using a water brush I lifted the colour out of the droplets to lighten them.
      I ran the tag through a leaf vein embossing folder while still a little damp so I would get crisper creases. To get the gold across the veins I used gilding wax applied with the back of a blending foam square. Two things I learnt when doing this were the hard foam gives a great cover on raised areas only (thanks Dot) and if it does get on the card in the wrong place a glue eraser will get it off.
      The foliage was die cut from dark green card to go with the tatty white daisy, the centre of which was made using Flowersoft. I was going to put three daisies on but that didn't look right as the tag is quite short.
      Each tiny droplet has a white highlight spot added with a gel pen, I thought it looked alright at that point but still a bit flat, lightbulb moment, then I added Glossy Accents to each drop and now they look like real raindrops. The raindrops on a leaf is something I have had floating around in my head for ages, the first one didn't look too good so that's been filed for resurrection at a later date, throw nothing away unless it's a total disaster. To finish off I coloured a length of cotton ribbon with the same Distress Inks, dried it with a heat gun and added it to the top of the tag.

Time to Bash The Stash.

Materials List    Mostly available from your local craft shop
Sizzix Bigz die 38-0946   (very old)
Distress Inks - Sage, Olive, Moss, Corduroy.
Stamp - Water Effects 1 Designs By Ryn
Stamp Press
Versafine Onyx Black
JND118 - Tatty Daisy die
Creative Expressions - Evergreen Branches
Flowersoft - yellow   (also very old)
Strong PVA Glue
Embossing folder - Leaf Vein 8x8 Crafters Companion
Glossy Accents
Pebeo Gilding Wax - Empire Gold


I would like to enter this tag in the following challenges:
Stamping Sensations - Spring Florals
Use Your Stuff - Spring
Creative Fingers - Anything Goes
Southern Girls - Anything Goes

Wednesday, 8 May 2019

Snowflakes in May


     Where is this year going?! It's May already. It really is time to get those Christmas cards made and we have lots of inspiration for you over at Christmas At Sweet Stampin'.
      Snowflakes are one of my favourite images to use. They are great for masculine, general seasonal and traditional projects.
      Using Sizzix die Ice Flake I cut a shape from snowy acetate, then used alcohol inks to add a little colour to it. Another Ice Flake was cut from white glitter card.
      Sizzix Layered Snowflake was used to cut a shape from mirri card, then embossed with the  folder that comes in the pack.


      All three layers were then put together using Glossy Accents to glue them. I also put a brad through the middle just incase the glue gave out. I didn't have any snowflake brads so I used a silver flower and put a gem in the centre, coloured with an alcohol marker.
      I wanted a mat layer that matched the mirri card but was a little more subtle, so out came the Distress Inks. I have found I can match my layer colours to my project more easily by cutting a white mat and using the inks or pens used in the image to colour the edge that will show.
     The layer directly under the flake has been embossed with snowflakes to add more texture. The main snowflake has been stuck down with red line tape just to make sure it's stuck fast. Only the centre is stuck down, allowing the snowflake to look like it's just resting on the card.
      Please pop over to Christmas At Sweet Stampin' to see all the wonderful snowflake ideas we have for you, you don't have to use a snowflake to join our challenge but it would be fun if you did.


I would like to enter this card in the following challenges:
The 12 Months Of Christmas - #53 Anything Goes, Option-Creature Feature
CraftyHazelnut's Christmas - #436 Anything Goes, Option-Bells
The Holly and Ivy - #49 Anything Goes
Simon Says Stamp Mondays - Add Something Metallic


Friday, 21 December 2018

More Mistletoe Magic


     Mistletoe has featured quite a lot in my cards this year, all because Lavinia Stamps have a gorgeous stamp that is also available in a stencil and die from Sweet Poppy.
      The stamp is smaller than the stencil and die so makes for some easy batch making of A6 cards. When cards are batch made by hand they will always come out a little different so I don't feel it's cheating atall.
      Using watercolour card I stamped and embossed in white, then spritzed the card with water before lightly sprinkling Brusho over the card. Once dry I felt the edges needed a little definition, so I used Distress ink to add a touch of darker green all the way around.
      For the Brusho panels I used some gold paper and a little dark green card to mat and layer them.
     The panels looked a little odd on a plain white card so i used the stamp and some gold ink to stamp all around the edge before adding the panel.
      To finish off I added some tiny half pearls as berries and a small gold organza bow, after watching some YouTube videos I bought a nice fork in a charity shop that I now use just for tiny bow making.
      For the other two cards I stamped the same image on to white card and embossed with a dark green powder. I used the same card and paper as before but switched it around so the green was first and then the gold.
      Again I used the stamp to decorate the white card blank but this time using a very pale green. They also have tiny pearls and a little bow.
      Both card styles have the same greeting, just embossed with different colours and die cut with a small oval die, then mounted on thin foam pads.
      This is one stamp that won't be put away in the Christmas stash, upside down it looks like seaweed so I can use it all year round. I've really enjoyed making these cards so the Christmas stash will probably stay out for a while longer so I can get a head start on next year!


I would like to enter these cards in the following challenges:
ABC Christmas - Y~ Your Favourite Thing   (a stamp with multiple use)
      Christmas At Sweet Stampin' - Anything Christmas
The Holly and Ivy - Anything Christmas 
The 12 Months of Christmas - Anything Christmas