Friday 31 December 2021

Happy New Year


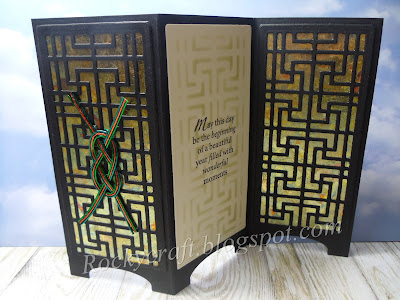
     Another card made with a die from John Next Door's new Art Deco collection, Kramer. The sentiment on this one makes it perfect to use in wishing you all a Happy Crafting New Year, let's hope we can return to workshops and shows soon.
     Using thick black card I cut the screen using John's latest Lantern die, I think it makes a great screen card because the feet just look right for it.
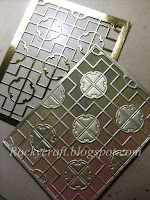
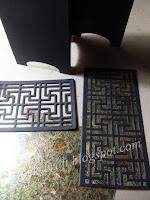
     With the Kramer die I cut two panels in the same black card and trimmed them down to fit the screen panels.
     To back these patterned panels I used a piece of thin card that had been covered with a d/s sticky sheet and then covered with guilding flakes. I've had these flakes for years, they're gorgeous but I can't 'save' everything.....it's time to use them.

    
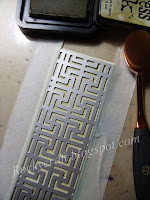
     For the centre panel I wanted to add my sentiment but plain cream card looked wrong, so out came the Distress Ink and a blending brush. Using the die as a stencil I coloured the cream card with the same pattern as the panels but left it pale enough to see the stamping.
     I cut the cream card panel to be the same size as the others and stuck it on the screen card.

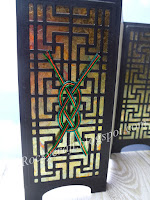
     The card looked good but not quite right, it was missing a focal point on the front. I searched through all my Mizuhiki cords to find colours that would go with the guilding flakes, stand out, but not too much. Finally settling on a mix of green, teal and copper, which can all be found in the flakes.
     The knots are simple but effective on oriental cards, adding a small touch of authenticity. 
     I hope next year sees us all return to sharing ideas and techniques in person, Happy New Year.


I would like to enter this card in the following challenges:
Creative Creases - #22 Use A Fun Fold
Time Out - #204 New
Modsquad - New.....include something new

Wednesday 29 December 2021

Art Deco Chinese


     This is made with a die from the second release of Art Deco dies by John Next Door, Kahn. These dies have a very oriental look to them so that's the way I decided to go with this card.
     I cut the die in satin gold card and kept the pieces that popped out. Then I cut it again in gold mirri card but left a wider border around the outside, again I kept the pieces that popped out but used the framework as a mat layer on this card.
     I used a piece of oriental patterned paper to back the satin grid, mounted this on the mirri grid, then paper pieced some of the popped out bits into the gaps. The small red and black centre piece was cut and added on top to give a splash of colour.
     Another piece of the same backing paper was added to a dark red card, then the grid layer was mounted on foam to finish off.
     A simple but effective card suitable for either man or woman, a greeting could be added at a later date when required.


I would like to enter this card in the following challenges:
Lemon Shortbread - #161 Anything Goes
International Art & Soul - #123 Dies or Punches
Happy Little Stampers - Anything Goes With Dies

Friday 24 December 2021

Merry Christmas


     I would like to wish you all a very Merry Christmas and a much Happier New Year. I am certainly hoping that 2022 is less challenging than this year has been.
     This simple little card was made using John Next Door's finger stamps, along with the antler set. The gift was stamped first, then masked before the flower pot was stamped, this was also masked before the next step.
     Using one antler stamp and brown ink I stamped the bare tree, then with a holly stencil and a pale green ink I made the background and the ground . Removing the masks and adding the stocking came next with a small gold embossed star on top.
     The mats and layers were die cut with a mixture of stitch dot and plain rectangles and mounted on a white card blank. A fun card that's nice and flat for posting.
      
Have a happy crafting holiday and see you all next year.


Wednesday 8 December 2021

Scenic Baubles


     This month's challenge at Christmas Craft Creations is to 'Make A Scene'. It doesn't have to be a card, any handcrafted project is acceptable as long as you follow the theme.
     To make the mask for this card I die cut three different bauble shapes using John Next Door dies. I then taped this mask over a piece of white card and started to add colour with a blending brush.
     The trees and deer are also by John Next Door, these were stamped using a dark blue ink as black would have been too harsh.
      Before removing the mask I spritzed the scene with a little water containing some pearl mica, it gave it a subtle sparkle and by doing it when the mask was still on it's only across the scene.
      Having kept the cut out shapes from the mask I taped the together and then placed them over the dry scene. Using a text stamp of Christmas greetings I used second generation ink to add a pattern all over the card.
      The scene was mounted on a piece of dark blue card to give it a border, then onto a narrow mat layer of silver mirri card cut with a Presscut stitch dot edge. To get the right blue for the card I went around the edge of a white card with blue Distress ink, then mounted the scene layers on top of that.
      The bows were die cut from thick double sided silver pearl paper and finished off with a tiny blue gem. There is no greeting on the outside because the text says it all already.
      Please pop over and share your winter scenes with us at Christmas Craft Creations, we'd love to see what you've made.


I would like to enter this card in the following challenges:
Jingle Belles - It's a Wrap
A Place To Start - #12 Anything Goes/ twist~blue
Peace On Earth - #5 Anything Christmas
The Paper Players - PP570 Winter Wonderland
Sweet Stampin' - Anything Christmas
Cardz 4 Galz - #161 It's Snowtime

Sunday 5 December 2021

Crackers Are Not Just For Christmas


     The challenge at River Of Creativity this month is all about Celebration, this doesn't have to be Christmas, it can be the celebration of anything. I have chosen to make a cracker because I like them and think it's such a shame they only get used at Christmas, they're great for any occasion.
     This cracker is actually a half normal size version, great for tea parties and other get togethers, it also means you can cut two from one A4 sheet of card.
     Glitter card makes for a very bright cracker and using the Craft Artist non shed, non shed because it's not actually glitter atall, means there's no mess.
     Using the new strip dies from John Next Door, JND235 Shiregreen, I cut several lengths of black card to decorate the cracker before assembly. Two strips with one side and the bar middle, then one strip with both sides and the bar middle. All the strips were attached with redline tape as it's good and strong.
     To make the rosette I cut two strips in black using only one side die and stuck them together to make one long strip. Then I scored the strip at every pattern repeat, each diamond point and each gap between diamonds.
     Once all scores were made I pleated the entire strip and glued the ends together to make a ring. After the glue had dried I gently pushed the straight side of the ring down on my craft mat to make it form a rosette, this took a little bit of encouragement but it's so worth the time spent. Happy that the rosette was alright I glued a small piece of black card under the centre of the rosette, placed a small weight on top to hold it and went away for a cup of tea while it dried.
      In my stash I found a nobly clear gem that would fit perfectly over the small hole in the rosette, but I didn't want a clear gem so I coloured it yellow with an alcohol marker before sticking it firmly in place with strong glue. As the rosette had a flat back because of the small card circle it was stuck to it was easy to fix to the cracker with redline tape.
      This cracker won't actually crack, I didn't put a snap inside but you could if you wanted to. I chose to use curling ribbon to seal the cracker  because I like the curls you can make with the ribbon ends, I have used two lengths on each end to get extra curls.
      You can make these crackers with any colour combination you wish and any decoration that suits the occasion, so why limit their use to Christmas. A cracker is not just for Christmas, it's a great way to wrap a small gift any time of year.


I would like to enter this project in the following challenges:
Winter Wonderland - Anything Christmas Goes
C.R.A.F.T. - Christmas Present
A Perfect Time To Craft - Anything Goes
Classic Design - Anything Goes
Creatalicious - Anything Goes/option Christmas

Wednesday 1 December 2021

Gnometastic Turkey Roast


     The new challenge at The Paper Funday has started, this month the optional twist is 'Holidays'. You can enter any papercraft project that you have made.
     This handsome fellow is a digi stamp from Polkadoodles, you can get him pre-coloured or line drawn like this one was. The original gnome is holding a very yummy looking cake on his hand but I chose to change that and have him hold a roast turkey. 
     I think he's great for a masculine Christmas card, which is why I kept it simple, no bling, just traditional colours. I have also added a holly sprig to his hat and to the turkey for a splash of added colour. Having a greyish moustache and wearing chef whites it needed brightening up a little, that's also why I fussy cut him, to cut down on all the white card around him. 
     Please pop over and join in with the holiday spirit at The Paper Funday, we'd love to see your projects.

I would like to enter this card in the following challenges:
ABC Christmas - Y-yummy, Z-zigzags
CraftyHazelnut's Christmas - #570 Anything Christmas 
Incy Wincy Designs - Traditional Colours/Colour on Kraft
Sunday Stamps - Mood Board ~ traditional colours

Wednesday 10 November 2021

Four Fold Fun


     Another new challenge this month, Christmas Craft Creations is all about a Fun Fold for November. I have used John Next Doors pop out card again, but this time with four layers.
     The die set comes with dies for three layers of 'pop' but I wanted to use four for a better balance on two rows of deer.
     I cut the base card and the top mat layers, then embossed the top layers with a snowfall folder. The only colour in this is the silver mat layer between the snowfall and the card, with a tiny bit of silver glitter card behind the greeting which was die cut into the front band.
     I prefer to cut the scenic bits into white card and then cut the folding layers, it takes a tiny bit of planning but it means very little has to be stuck on as it's all one piece of card.
     The top layer is trees, nice and simple. The second is a town skyline, also pretty easy as it's about the same length as the layer. 
     The third was positioned so that the deer's body wouldn't be on a fold, I then measured how long it would need to be to fit the card and trimmed it accordingly.
     The final layer is the band across the front, this had the greeting cut into it, then it was backed with some silver glitter card. Three trees were die cut and stuck onto the front of the band and one lone stag was cut and stuck onto the back of the band so he looks like he's standing in the snow.
      Adding another layer to the pop out design wasn't hard, it just took a bit of measuring to get it right. I could have avoided adding this layer if I had stayed with the three and placed the inside two a little lower but I enjoyed the challenge of seeing if I could do it.
     

     Please pop over to Christmas Craft Creations and join us with your Fun Folds, remember if you wish to be included in our vote you do need to display our badge.


I would like to enter this card in the following challenges:
Happy Little Stampers - Anything Goes With Dies November
Pearly Sparkles - #68 Merry Christmas
CraftyHazelnut's Christmas - #567 Anything Goes/option 'H'
The Holly and Ivy - #105 Anything Christmas Goes
Peace On Earth - #3 Anything Christmas Goes/optional mood board    (Win)
Unicorn Challenges - #71 Christmas / Winter

Friday 5 November 2021

It's A Gift


     River Of Creativity have a new challenge beginning today, this month the theme is Gift. It could be something you have made for a gift, a bag or box to hold a gift or any other way that you interpret the word Gift. 
     I love making 3D projects so it had to be a gift box for me. This box was made as a sample for John Next Door's new Belgravia Mandala die set show.
     The mandala made me think of Indian decor so I chose to use peacock type colours for the box, making the it up with kraft card.
     The mandala made up the decoration on the lid but I used a few circle dies and the sides of the heart box to make the basic carcass. The bottom circle was slightly larger than the the one that the sides were stuck around, it also helped cover up the tabs on the edge making neater.


     For the lid I used the same size circle but was a little looser with the sides, making sure that the lid would fit over the base.
     I cut the basic full size shape of the mandala in kraft, then cut the outer edge in gold pearl paper. I cut the next layer in turquoise but kept all the little bits that fell out and glued them into the gold layer.
     
     The next layer was cut in kraft card and set aside while the centre piece was cut in turquoise with a gold pearl layer underneath.
     The centre turquoise was stuck over the gold layer then with foam tape it was stuck onto the kraft layer, making sure to leave a gap in the middle. Then this centre layer was stuck on to the kraft layer with foam tape, again leaving the middle free of tape.    
     I then added a brown tassel to the centre of the lid by poking a whole through both raised layers and securing it firmly before adding this section to the large turquoise layer.
      To finish off the lid I added tiny gems around the mandala. For the box sides I cut a strip of turquoise card, making sure there was a gold pearl layer under the centre and stuck this all the way around the sides, this brings the decoration to the sides to finish it off. 
     I shall be making more of these for Christmas, not looking too seasonal will mean they can be left out on display all year round.
     Please come and join us at River Of Creativity with your projects, they don't have to be paper based, we'd love to see your artwork or mixed media too.


I would like to enter this project in the following challenges:
Country View Crafts - Christmas Gifting
Love To Scrap - #151 Anything Goes
Mix It Up - #55 Anything Goes/ option 3D project
C.R.A.F.T. - #616 Gift Bag or Box
Moving Along With The Times - #136 Anything But A Card
Through The Craft Room Door - Anything Goes 2.11

Wednesday 3 November 2021

Paper Funday Thanks


     This months optional theme at The Paper Funday is Give Thanks/Grateful, we are an anything goes challenge for papercraft projects so it doesn't have to be a card.
     
     To make the background I used a die cut mandala as a stencil, this gave me a lovely background and a pretty papercut to use on another card.
     The inks were a pigment petal set from Craft Artist which had a choice of colours that worked together perfectly. To blend these inks I used a make up brush, the bristles on these are so soft, they don't pull at the stencil even when it's paper.
      The background square was mounted on a narrow mat layer in lilac, with the sentiment cut from the same card and stuck flush to the front.     
     The flowers were die cut from a piece of card decorated with Brusho powders, that's why they have a mottled effect. Adding a little bit of silver mirri helped lift the whole card and with some small silver pearls the flowers were done.
     This type of card is always handy to have in your stash, you never know when you might need one. Please pop over to The Paper Funday to see all the DT inspiration, then come and join us with your project.


I would like to enter this card in the following challenges:
Clever Dexter - #22 Give Thanks/Thank You
Crafting Happiness - #117 Give Thanks
Shopping Our Stash - #457 You Don't Bring Me Flowers
Classic Design - #11 Anything Goes

Monday 1 November 2021

Stamping With A Die


      How do you stamp with a die? Use the die to cut a funky foam shape and stamp with that. This card was made using the latest mandala die set from John Next Door - JND243 Belgravia Mandala.
     
     Using the die as a complete set I cut some funky foam, it's around 1mm thick so it cuts very well.
     Once cut and all the tiny bits were removed I covered the back with strips of double sided tape and mounted it on a circle of Stix2 Non Slip Grip. This grip was originally sold for putting on your rule to stop it slipping when measuring, but it has a fantastic 'cling' ability. There is no adhesive on this product, it just clings to a smooth surface, which means it clings to the stamp press perfectly.


     For the first stamping I used Distress Oxides, the ink sits on the foam quite happily without the need to prime the foam first.
     Watercolour card was best for this as the next step was to spritz it with water and allow the colours to run.
     

     To encourage the flow of colour across the card I used a hand operated air brush type gadget, it's sold for use with marker pens but without a pen it's a great way of puffing air where you want it.
     

     After the first layer was dry I selected the same colours but in Distress Ink this time. I dabbed the foam with a paper towel to remove any excess Oxide before adding the Ink to avoid any possible issues.
     The beauty of using a stamp press is having the ability to stamp in exactly the same place again, so that is just what I did, having made sure to add the colours in the same places on the foam stamp.


     With the Ink stamped over the Oxide it now looked like the one image had bled but without loosing any definition.
     The next step, once dry, was to cut the image out with a large square die. With another slightly larger square die I cut an outer layer to be used in the mat and layer process.

     With the die set still taped together from cutting the foam I cut the stamped panel to get all those lovely little gaps to drop out.
     I had to be careful to keep the various pieces of the mandala together and the right way around in the square while poking out the tiny bits.
     I taped the layers together on the back to make it easier to stick down over a gold pearl circle, this gave me a warm shimmer of gold through all those beautiful gaps, it reminded me of a peacock tail.
     I wanted a mat layer but nothing I had was just right, so out came the Oxides and Inks again, this time to go around the edge of a white mat layer to tone it in with the image panel. This layer was just large enough to cover the whole left in the big square, then all I had to do was match up the colours and stick this on top of the large square. It all sounds complicated but it really wasn't, if it had been it would probably have ended up in the recycle box!
     A few small gold pearls added around the mandala lifted the image panel and the addition of four corners cut from the same gold pearl card finished it off. With the pattern and the gold I didn't feel it needed a greeting on the front, that will have to go inside when required.


I would like to enter this card in the following challenges:
Lil Patch of Crafty Friends - #168 Anything Goes
A Bit More Time To Craft - #146 Anything Goes
Creative Fingers - #218 Anything Goes
Love To Craft - #64 Anything Goes
Crafts Galore Encore - #93 Anything Goes
A Perfect Time To Craft - #11 Anything Goes
The Creative Crafters - #45 Anything Goes
The Crafters Cafe - #277 Anything Goes


Wednesday 13 October 2021

It's Not Just Black & White


     The new challenge at Christmas Craft Creations this month is a colour theme, use black, white and one other colour. A splash of red for Christmas and an idea that positive and negative might work well was what started these two cards.
      It took a little while to work out what had to be stamped where and in what colour but once I got going it all worked out. I also stamped some on kraft card to try later as this was the sample I had seen at HoneyDoo Crafts shop.
      White ink can be a bit hit and miss so I embossed with white to get a good coverage. Stamping with black was fine so these were not embossed. I asked Amanda at HoneyDoo how she had got that perfect red on her card and she very kindly told me it was paper pieced.
      I stamped enough for these cards and a few spare......just incase. 
     
      I found it easier to add shading to the main image before adding the paper pieces, this was done with a mixture of 4B pencil, white pencil and a white pastel pencil. Detail was added with a white gel pen and a black fineline pen.
      It was important when I cut the paper pieces out that I cut along the lines, this meant there were no red edges showing outside the stamped line.
      All off the paper pieces were stuck on with Stix2 3D PVA, it's a good strong glue that dries clear.
      There was a lot of open space around the image so I hand drew a wiggly line around the edge as a frame, I was going to add a few sprigs of holly but my drawing skills are not great and after all that work I didn't want to make a mess of it.
      The base cards are 7x7 so I had room for a mat layer or two. When adding narrow mats I tend to use an inexpensive white card and an alcohol marker rather than cut up my precious coloured card.
      The mat on the greeting is also a 'frugal' layer. All main layers were stuck down flush to the card blank but the greeting was put on with foam tape, just to give a little bit of a lift.
      These cards can go letter post as they are thin enough but sadly being over 6.5 inches wide they will be large letter. By making two similar cards I am managing to increase my card stash a little faster as well as stretch my imagination.
      Please pop over to the Christmas Craft Creations blog for lots of inspiration and remember it doesn't have to be a card, we accept other projects as long as they follow the theme.


I would like to enter these cards in the following challenges:
The Holly and Ivy - #103 Anything Christmas
CraftyHazelnut's Christmas - #563 Anything Christmas
Merry Little Christmas - #39 Anything Christmas
Peace On Earth Christmas - #1 Inspiration Board
Mix It Up - #54 Anything Goes / Paper Piecing

Wednesday 6 October 2021

Dead Gorgeous Kitty


      And now for something completely different, this month's project for The Paper Funday is all about almost Halloween. I say almost because it's not something we really celebrate here, but I do have a friend that loves all things black, purple and fantasy so this is for her.
      
      To make the coloured hexagon I used a stencil from Crafts Too that fits in my stamp platform and a few Distress Oxide inks.
      I cut a small circle in Stix2 masking sheet for a moon and placed it within the hexagon before starting to ink the shape. I started with the palest colour around the moon, working out with darkening shades of purple, I used a touch of grey at the bottom to add a bit more depth to the shape.
      
       Once the stencil was removed I stamped a tree branch by Lavina Stamps in Versafine black coming in from the side. I searched my stash for a tiny bat stamp but couldn't find one, something to go on the wish list.
      The cat skeleton is an old die by Sheena Douglass cut in black card twice, I then stuck both cats together to make him a bit thicker.
      When I put it onto a black card blank it looked a bit too crisp around the edges so before sticking it down I went all the way around with a Memento grey inkpad, then I touched a little grey ink onto the moon and that was that.
      The Paper Funday is an anything goes challenge but we do have an optional twist, this month it's Halloween or Purple, please come and join us with your spooky makes.


I would like to enter this card in the following challenges:
Crafting Happiness - #116 October colours Purple, Black
Crafty Calendar - Halloween
Just Us Girls - #604 Halloween
The Paper Players - PP561 Spooky

Tuesday 5 October 2021

Wildlife By The River Of Creativity


     I'm trying something different for this month's River Of Creativity, we may be a multi craft challenge but that doesn't mean you can't enter with a card project. So if you are making your Christmas cards you can join us as long as it has a wild animal on it.
     This trio started as a splodge background using Distress Oxides. I like making a few of these splodge backgrounds in a nice long, messy play session, no two are ever the same, even when using the same colours.
     To add a little sparkle to the background I used pearl mica water instead of just water when spritzing the inks, I have found that this means I can tip the stamp platform around mixing up the inks with no need for a brayer. You do need a heavy weight card so it doesn't buckle when wet or better still watercolour card, although that can be harder to stamp on than smooth.

     Tartan seems to be popular this year so I searched through my stash and found one that picked out the ink colours perfectly, more by luck than judgement. 
      I stamped with Versafine Black using Lavinia Stamps deer and trees, the beauty of a stamp platform is silhouettes are no longer hit and miss, these images were stamped three times to get a nice dark coverage.
      When I cut mat layers I am very frugal, why use a complete layer when a wide border will do, I can keep the inners for another project.

     Although each card has a similar background I wanted them to be noticeably different. The first one was cut as a stitch dot square, mounted on a thin black mat, then on top of the tartan layer using foam tape, with the tartan flush to the card. To finish off I used a white gel pen to add highlights, mixed results with this, then a few tiny silver peel off stars.
     The second one I cut with a stitch dot circle, matted on a black layer with foam onto the tartan layer that was die cut in the corners with a snowflake pattern. To keep the curve element I used a corner punch on both the tartan and the card blank.
     I have been admiring the eclipse cards popping up in blogland so decided to give it a try. The main panel was again cut with the stitch dot square but then die cut with a bauble die. I then cut four plain card layers with the same bauble and stuck them together to make a thick mat. I wanted to add a little sparkle so I coloured the edge of this thick mat with a silver Sharpie, followed by a silver glitter gel pen, then I stuck the top layer on.
      As the bauble was raised I chose to mat and layer all the other pieces without any foam tape. This image has a small Father Christmas and reindeer stamped in the sky and to finish it off I used a white Posca pen to add the snowfall.
      All three cards are 7x7 inches so will either be a large letter or hand delivered. It was challenging to make them all appear different while using the same stash and it adds three cards to the box ready for December.
      Please come and join us at River of Creativity with anything you have made, including cards, that features wildlife. 

I would like to enter these cards in the following challenges:
Christmas Crafts All Year 'Round - Something beginning with S or T
Sparkles Christmas - #129 Flora / Fauna
CraftyHazelnut's Christmas - #152 Anything Christmas
The Holly and Ivy - #102 Anything Christmas
Merry Little Christmas - #39 Anything Christmas
Peace On Earth Christmas - #1 Anything Christmas