Friday 12 March 2021

Kaleidoscopic Explosion


     Another sample made for John Next Door using the Deco Butterfly Collection, these dies really are pretty useful on their own.
     
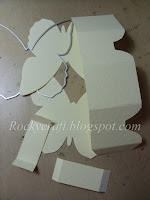
     This card is based on the traditional exploding box, it's just a butterfly shaped box.
     From cream card I cut two of the large solid butterflies and made an explosion box without any flaps. It's just the framework with a few tweeks so it sits behind the butterflies without being seen.
     
     As the back butterfly can be seen I decided to cut two filigree shapes in dark brown card to cover the solid cream shape, they are only attached down the body leaving the wings to stand out.
     It's just like a normal explosion box in that it will fold flat for posting, it will just need a large envelope to hold all the insects.
     All of the smaller butterflies were cut in coloured card, each one was then made with opposing colours of solid and filigree, no two are the same.
     To get the butterflies flying I have used some strong acetate, the thin one couldn't hold the weight of the card very well. They are all attached with redline tape at various angles so they all 'explode' out of the large shape.
     I did find that the back shape had to be trimmed down at the bottom by an eighth of an inch to stand correctly, the weight of the flying shapes was trying to pull the whole thing forward and they didn't stand tall.
     This is another of those cards that looks complicated but really isn't and with dies like this you can put your own twist on it by changing the look of the box.


Materials used 
JND212 - Butterfly collection Dec Large Butterfly
JND211 - Butterfly collection Deco Butterflies dies
S57320 - Thick Acetate
S57262 - 3D PVA glue
S57085 - Ultra Clear Tape 6mm  (Redline)
   Other items from stash


I would like to enter this project in the following challenges:
CCEE Stampers - #2110 Butterflies
Craft Rocket - #79 Use Dies and/or Spring
Mod Squad - Beautiful Butterflies
Through The Craft Room Door - Mar 9 Anything Goes 
Lemon Shortbread - #141 Anything Goes
Day Of The Month Card Club - #25 Learn About Butterflies

Wednesday 10 March 2021

Christmas Flowers


     This months challenge at Christmas Craft Creations is Christmas Flowers, it doesn't have to be a card either, we accept scrapbook layouts, ATC's or 3D projects.
     This card is based on an idea I saw on Pinterest by Lucy Abrams, thank you Lucy. 
     The card blank was covered with a patterned paper from stash, wrapping the paper over the spine for a neater presentation.
     I then cut a mat layer to fit the card and die cut two poinsettia shapes out of it.  The shapes were cut with a deliberate 'off the edge' look. I also cut the greeting in the red same card.
     Using a dark red and cream based backing paper gives the whole card a vintage look, especially after the addition of Distress ink.
    
     Using Distress ink I coloured all the edges of the red card to darken them a little and coloured over the greetings too.
     The idea was to mount the red panel on foam over the patterned paper, but I found it a bit too fiddly to get foam into the flower centre, so I opted to stick it flat on to the paper. The greeting was stuck flat on to the card, at opposite corners.
     Using a gold pen I ran around the entire red card layer with a stitch pattern, this was nice but didn't show up at certain angles. To make the stitching more obvious I then used a fine line black pen to run alongside each gold stitch.
     I also drew around each greeting to make it stand out more. There is a gold pearl in the centre of each flower to help pick out the gold in the stitching.
     It's almost flat so would go as standard post, I shall choose a more basic shape next time I try this so I can use foam tape to lift the top layer a little.
     It may a little early in the year for some of you to be making cards for Christmas but the more you do now the easier it will be come November, so come and join us at Christmas Craft Creations once a month....or more if you wish...to build up that stash of cards.


I would like to enter this card in the following challenges:
The Holly and Ivy - #90 Anything Christmas
Merry Little Christmas - #32 Anything Christmas
Fezziwigs Festive Frolics - Vintage Christmas
Christmas 24 - #029 Tic Tac Toe (Die Cut, DSP, Pearls)
My Time To Craft - Christmas Flowers     Top 3
CraftyHazelnut's Christmas - #532 Anything Christmas


Monday 8 March 2021

Moon Gazing Hare


     This is a birthday card I made for my friend, she loves hare's and fairies. I was so engrossed in making it I forgot to take any photos of the process, not that you need them as I'm sure you can see just how easy it was.
     It started with a square of white card, a large toadstool stamp and Versafine black ink. I have to say having a stamp platform has revolutionised my work, I can stamp a silhouette with confidence now, safe in the knowledge that if I miss a bit I can stamp again in exactly the same place.
     I then die cut a circular mask for the moon and placed it partly over the top of the toadstool. With the moon masked I used a stencil, a couple of blending brushes and some Distress Inks to create a subtle background in the centre of the card. This technique was picked up from the amazing Eileen Godwin.
     With the mask removed I stamped the fairy, the two small toadstools and the hare with Versafine black ink. Once dry I used a watercolour pencil to add a touch of yellow to the fungi and a little shadow beneath the hare and the toadstools to ground them.
     The sentiment was added, again in black, there is no reference to a birthday so she can frame it to add to her growing hare collection.
     A little thin black mat layer before going on a white card blank sets off the stamping. The final touch was to add some Stardust Geli glaze to the fairy's wings, just enough to catch the light but not to over power the image.
     I didn't know that a moon gazing hare is an ancient symbol of growth, abundance and good fortune, rather nice for a birthday card.
     

I would like to enter this card in the following challenges:
Animal Friends - Hare / Rabbit
Country View - Silhouettes
Just Us Girls - #574 Animals     Chick of the week
The Fairy and The Unicorn - Anything Fantasy     Top 3

Sunday 7 March 2021

Entomology Box


     John Next Door has some new dies out this weekend, this project is made with the Deco Butterfly collection. I am fascinated by these insect displays but don't like the idea of harming anything for the sake of art, so why not make it with paper.
     The large rectangular die has no outer cutting edge so it can be used to make a window, as luck would have it I already had a die for a shallow box that was just the right size. It's easy enough to make a box but using a ready made die is so much faster.
     The box was cut from dark brown pearl card, there is also a stand on the back cut from the same brown card. Each butterfly has a solid die cut gold shape stuck underneath to accent them.
     Adding the acetate to the inside of the lid proved interesting, I had to use very narrow redline tape on the 'bars' of the design to stop them bowing.
     
     The inside of the box was too dark without a backing paper, so I used a digi paper and printed it to be very pale, just enough to give a hint of a pattern.
     I cut three of the filigree butterflies in brown card and the three corresponding solids from ombre paper. Each butterfly has a stamen folded in half and stuck to the back to create the antenna. These insects were then added to the backing paper on thin foam tape, making sure they would appear in the centre window of the lid.
     For the added information about the butterflies I used a small ticket die, each one cut in kraft card and edged with brown ink to age it.
     The words on the tickets are from a script stamp in my stash, it's an acrylic stamp so I was able to ink just the word I wanted and carefully bend the stamp so only that word was in contact with the card.     
     The foliage is die cut using some of John's past dies, shaped and coloured before being added to the tickets. The other items are whole cloves, which give the box a great aroma, and two chopped down cotton buds to look like chrysalis.
     There is a ticket just below the largest butterfly with a greeting stamped on it. This was partly because the wording was right and partly because the script matched the other tickets.
     All the tickets were mounted on foam tape to give them a little lift inside the box.
     I now plan to trawl through my stash and find any insect stamps and dies I have, then I will make a larger project including a variety of bugs because I enjoyed making this one so much.
     These boxes appeal to both sexes, by changing the colours it can be tailored to suit it's recipient, imagine a box full of beetles for a young boy.


Materials used 
JND210 - Butterfly collection Dec Frame die
JND211 - Butterfly collection Deco Butterflies dies
JND120 - Foil Rose Leaves dies
JNDAD016 - Elderflower dies
S57320 - Thick Acetate
S57262 - 3D PVA glue
   Other items from stash


I would like to enter this project in the following challenges:
The Male Room - #148 Not A Card
Creative Uncles - #14 Wildlife
2 Crafty Critter Crazies - Anything With a Critter
Day Of The Month Card Club - #25 Learn About Butterflies
Crafty Catz - #541 Anything Goes/ Dies or Punch
Mod Squad - Beautiful Butterflies

Wednesday 3 March 2021

Mothers Day With Vectoria Designs


   The Paper Funday has two sponsors this month, Vectoria Designs is one of them. This gorgeous paper set is called Spring Crocus, it has three pretty papers and three collage style top sheets.
     The backing paper I chose to use has tiny butterflies all over it, I have used my photo package to manipulate the colours to pick out shades of green as a nod to the optional theme in the challenge of Irish Luck/Green.
      I'm not very tech savvy but I do like to play around and alter my digi papers and images to suit my project, thankfully my photo package is very easy to use.
      I covered a 7x5 card blank with the paper, wrapping the paper over the spine onto the back to stop it lifting when folded. To continue with the green theme I coloured the edges of the paper with a little Peeled Paint Distress Ink.

      The topper was also altered to have a green hue and printed out as a smaller image, it has a little purple in the flowers and butterflies so I chose to mat this panel on purple card.
      I made a small slit in the envelope before sticking to the mat layer so I could tuck a tiny tag into the envelope. The matted image was then put on foam tape and stuck down at an angle on to the backing paper.
     The words are die cut gold mirri card, the die is for a stencil cut so to get the letters to stay in the die I put some masking tape across the back of the die. With the letters in the die I carefully added tiny spots of glue to the back of the letters, turned the die over and placed it on the backing paper. Gently peeling away the masking tape I used a pokey tool to pop the letters out of the die and stick them to the paper, it's a bit fiddly but it works well and all the letters are perfectly placed.
      Come and join us at The Paper Funday, we're an Anything Goes challenge with a twist, some great sponsors and lots of DT inspiration.


I would like to enter this card in the following challenges:
Digi Choosday - #9 Anything Goes
CD Sunday Plus - #55 Anything Goes CD or Digi
Crafty Sentiments - Anything Goes