Monday, 1 October 2018

Coffee and Cousins In The House Of Cards


     Our challenge at the House Of Cards this month is for Autumn flowers and/or the colour on our photo swatch. I was inspired by the photo and a recent visit by my cousin who came bearing sunflowers, they really did brighten up the kitchen.
      I found a patterned paper topper with sunflowers all over it and decided it was just what I wanted to use. I die cut a scalloped oval in the centre rather than add a mat layer on top, it also gives me a gorgeous sunflower oval for another card.
     This flower layer was then mounted on dark brown pearlescent card before going on to a narrow layer of gold. I searched high and low for the right shade of green for the centre oval, why is it that you never have 'just' the right shade in all those greens?!
     Search over I used a stencil and Versamark to then gold emboss the coffee cup, then I cut it out, it is stuck flush to the card.
      The image panel and all it's layer were added to a 5x7 cream card blank but it lacked something, it needed a sunflower.
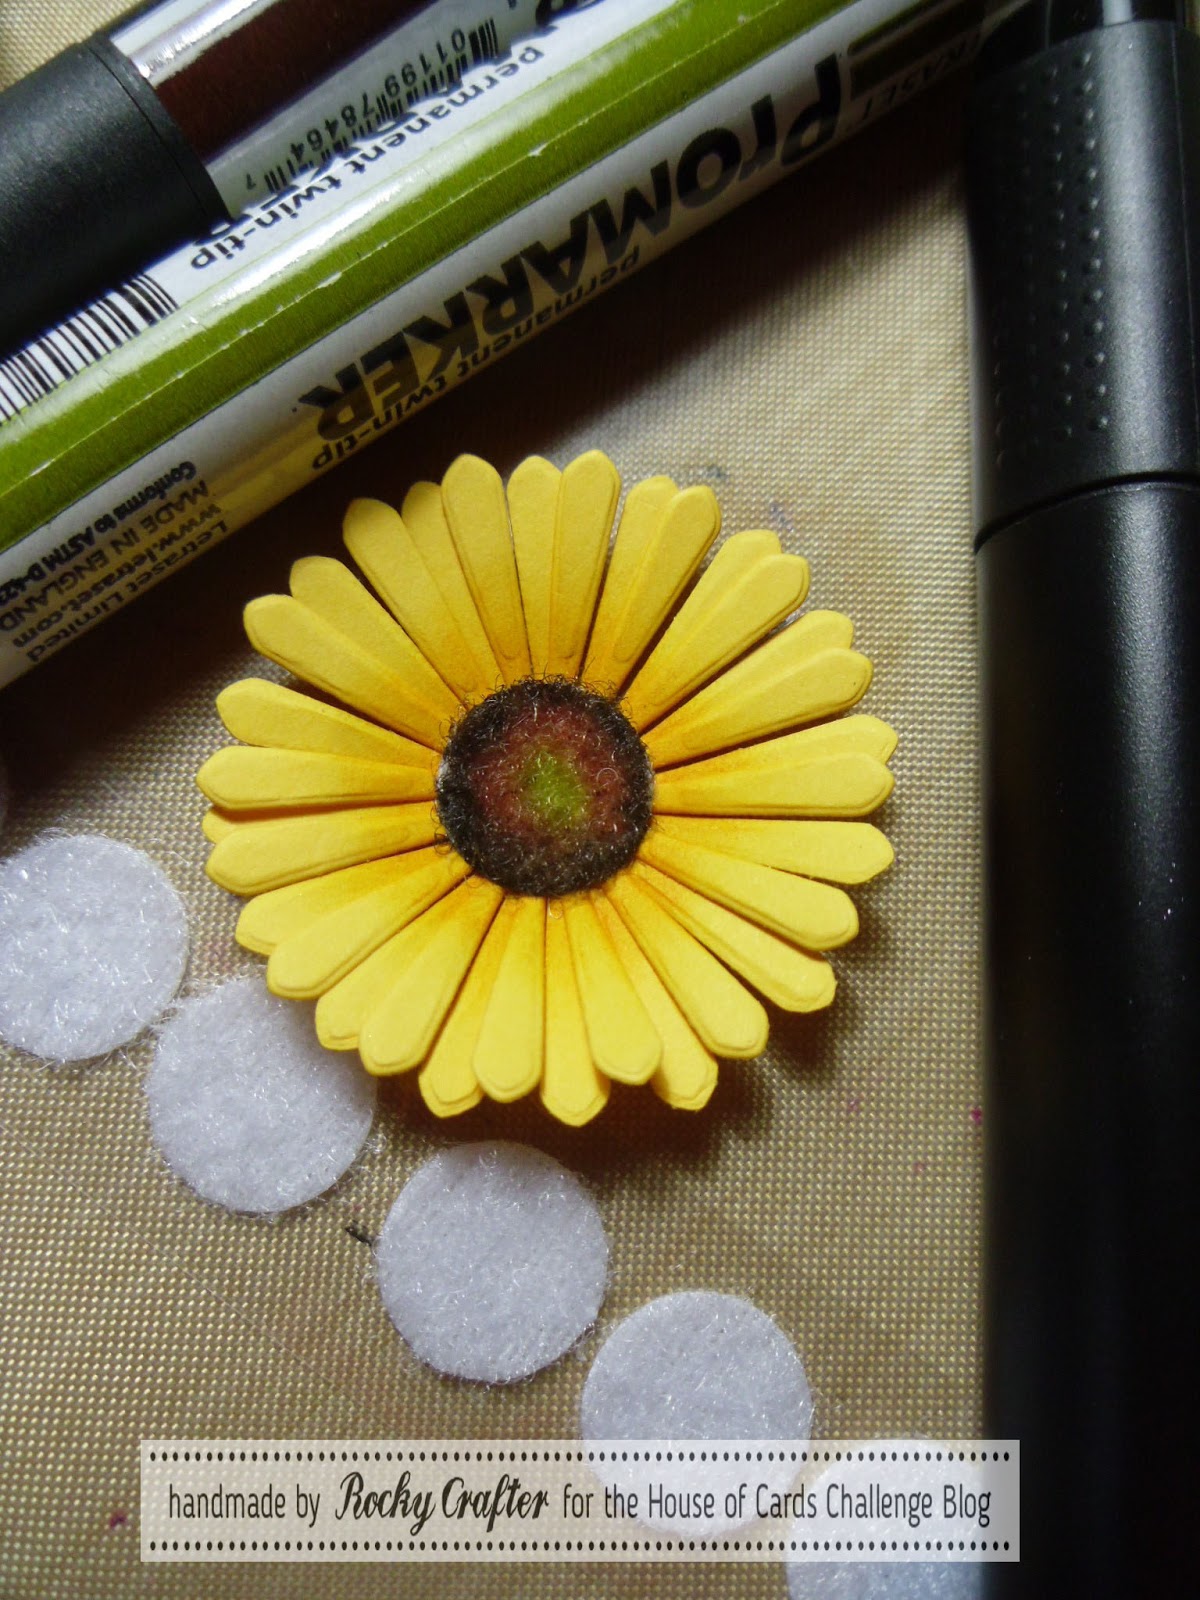
     The flower was die cut in thin yellow card, the centre darkened with Distress ink and the two layers of petals stuck together. For a nice furry centre I have coloured a loop disc of velcro with alcohol markers, it worked so well I shall be making more of these.
     The flower was stuck on with PVA glue, it will flatten for posting so it will still be a standard postage charge.
     Please come and join us at House Of Cards with your Autumn flower inspired cards, we would love to see what you make.


I would like to enter this card in the following challenges:
Allsorts - Autumn Glory
Crafty Friends - Autumn Colours
Crazy 4 Challenges - Anything Autumn
My Time To Craft - Food and Drink

Nina Journal, Birds Flyin' High


     A couple of months ago I began an art journal of sorts, these are the next few pages. My first page was used for Altered Eclectics DT so it seems only right that the next instalment should be for them also.
     I got so carried away with these pages that I forgot to take any pictures as I worked, I think you could say I was definitely 'in the zone' on this one. Following a theme has made my first foray into journaling a little easier, I have a rough idea of where I would like this to go.
     Distress inks over white card for the background got me started, then it was on to spritz and splatter for added detail. The doily was done using a stencil and Distress Oxides, as was the sun, these inks cover beautifully and having a mixture of the two types on the page adds to the effect.
     With the addition of birds and flowers the page was really coming together, all I needed to do now was to add the words. For the first few words of the song I used a Dymo tape machine and blue tape, for the repeated words I used some dies, I had to cut and edit them to make the words I wanted but once stuck down you can't see the joins.
     I am getting more adventurous with some of the pages, I have seen some stunning work out there which has given me inspiration, but as a slightly 'contained' crafter I still have a long way to go to let loose the inner creator.
     If you journal, make mixed media, anything but cards and ATC's then please come and join us Altered Eclectics and show us what you've created.


I would like to enter these pages in the following challenges:
We Love 2 Create - Anything Creative Mixed Media
Hiding In My Craftroom - Anything Goes
Crafting With Friends - Anything Goes

Wednesday, 26 September 2018

The Male Room Goes Outdoors


     The Male Room is going for The Great Outdoors as it's theme this fortnight. I was working on something else for this but it wasn't quite right so I have gone for a winter outdoors card.
     The coloured circle is made using Izink droppers on acetate, I dropped on a few spots of blue, purple and turquoise and squashed it with another sheet of acetate, then pulled them apart to get this amazing pattern.
     The trees are stamped in black on to a white card square and the edge coloured with Distress ink. Sticking acetate can be really tricky so I put double sided sticky over the whole sheet and then die cut the circle, it stuck down perfectly with no sign of how it was attached.
     Using a stencil and some Izink texture paste I added the snowflakes, once the stencil was removed I sprinkled iridescent glitter over the white paste.
     All that was left was to mount the panel on purple card and then on a white card blank. It has no greeting on the outside but I rather like it like that, I will just have to make sure the one inside is rather grand.
     Please pop over to The Male Room and have a look at all the DT inspiration, there are some great ideas to get your creativity going.


I would like to enter this card in the following challenges:
A Snowflakes Promise - Anything Christmas Goes
Addicted To Stamps - Christmas Comes Early
The Holly and Ivy - Anything Christmas

Wednesday, 12 September 2018

Geometric Blues


     The Male Room has a Geometric theme this fortnight, this one really had me rummaging through my stash.
     I wanted to stamp but couldn't find what I was thinking of, but I did have a small die of a geometric shape, so why not cut my own stamp?
     Using a small piece of thin foam I cut my shape, then stuck it to an acrylic block with a glue stick, one home made stamp.
     Using all the blue Distress Oxides I could find I then stamped all over an A5 piece of thin card. The original idea was to use the bit I liked best, but I ended up using the whole piece to cover an A6 white card blank. I have learnt when doing this to stick the front first, fold the card and then stick the back so it doesn't split when folded.
     With a small piece of silver mirri card I cut two shapes with the same die, this die has a thin outer frame that cuts at the same time so I stuck that flush to the card but stuck the main shapes on foam pads. The greeting was then added to the top shape.
     There's lots of inspiration over at The Male Room so please pop over and have a look, then come and join us with your geometric project.


I would like to enter this card in the following challenges:
heARTful Stamping - Anything Goes + A Stamp   (Top3)
Crafting From The Heart - Anything Goes
Crafty Sentiments - Dies and/or Punches

Monday, 10 September 2018

The Gift


      I thought I'd try my hand at a spotlight card and this stamp seemed a good one to try it with, it's from Chocolate Baroque, called The Gift.
         This was stamped on card suitable for alcohol markers using Memento black ink. I drew around the bauble die I was going to use so that I only coloured enough for that shape and not the complete picture.
     I trimmed and mounted the main image panel on Stix2 gold pearl card, then die cut the bauble from the coloured card. Mounting this on foam pads and adding some gold thread to the hanging loop it was stuck on to the image panel.
     This layer was then mounted on a green pearl mat before going on a 5x7 white card blank. I have used a peel off greeting because I knew if I heated anything once it was all stuck together it would buckle, next time I will add the greeting before mounting.


Materials list - available from your  local craft shop
Stix2 Anything -    Pearlescent Card - Gold
                             Tinted Card - Holly Green
                             Double Sided Tape
                             Foam Pads
                             PVA Glue
                             7x5 Card Blank

Other items -        Chocolate Baroque stamp - The Gift
                             Memento - Tuxedo Black
                             Alcohol markers
                             Bauble die
                             White Card suitable for alcohol markers


I would like to enter this card in the following challenges:
The 12 Months Of Christmas - Have A Tweet Christmas
The Merry Christmas - Anything Christmas
CraftyHazelnut's Christmas - Anything Christmas

Saturday, 8 September 2018

Tags To Die(cut) For


     At Christmas we need tags and for those special gifts we need special tags, what could be more special than handcrafted tags.
     These tags are pre-cut Kraft tags ready to be decorated and measuring 4.75 x 2.5 inches they are just the right size for some die cuts.
     For the snow I have used the white fabric spray paints, working outside I sprayed from about 18 inches above the tag to get the snowfall effect.   
    The village scene is a new die from Sizzix, cut in Stardust card with D/S sticky sheet on the back, one die cut will fit two tags. The greetings are also Sizzix dies and they are cut from Silver Tinted card stuck down with PVA glue.
     To get the silver edge I used a Stix2 2in1 glue pen, running it along the edge and smudging it with my fingers to make it random. The next step was to go over the edges with silver transfer foil which sticks perfectly to the glue.
     All that remained was to find some ribbon to add a splash of colour to a very neutral tag. These would look good on parcels wrapped in plain brown paper stamped with a very simple tree image and tied up with red and white bakers twine.

Materials list - available from your local craft shop
Stix2 Anything -    Stardust Card - White
                             Tinted Card - Silver
                             Shiny Transfer foil silver
                             Kraft Tags
                             2in1 Glue Pen
                             PVA Glue
                             Fabric Spray - White

Other items -        Sizzix Thinlit Dies - Landscape Border, TH Holiday Words
                             Ribbon


I would like to enter these tags in the following challenges:
Southern Girls - Tag, You're It
ABC Christmas - S for snow/T for teal
The Holly and Ivy - Anything Christmas

Wednesday, 5 September 2018

Getting A Head For Christmas


     This little deer is made using a Sizzix die and some gorgeous pearlescent card from Stix2, he will fit in a standard C6 envelope.
     One head was cut from Bronze card and the other from Tinted Cream, the cream one allows you to write your message inside with a standard pen.
     The antlers were cut in Copper and stuck onto the back of the Bronze head, while the muzzle, eyes and ears were cut from Oyster, eyeballs from Bronze and the nose from Red Fever and stuck on the front.
     The cream head was stuck at the top only to form the tent opening, I found just below the ears looked about right. To make it stand up I cut the bottom straight across with a sharp knife, going through both layers so it was even front and back.
     His nose has a shiny red foil dot made using a 2in1 glue pen and transfer foil, a small white pen dot on each eyeball makes them look shiny too.
    Made as a card or as a special gift tag I think this little chap is going to be a real winner this Christmas.


Materials list - available from your  local craft shop
Stix2 Anything -    Pearlescent Card - Copper, Bronze, Oyster Shell, Red Fever
                             Tinted Card - Cream
                             Shiny Transfer foil red
                             2in1 Glue Pen
                             PVA Glue
                             
Other items -        Sizzix Bigz Die - Reindeer #4
                             

I would like to enter this card in the following challenges:
Jingle Belles - Shape Up
The 12 Months Of Christmas - Anything Christmas/optional Tweet Christmas
The Holly and The Ivy - Anything Christmas
Merry Christmas - Anything Christmas