Showing posts with label journal. Show all posts

Wednesday, 6 December 2023

Paper Funday Christmas Has Landed


     December is upon us already, where did the year go?!  This month's challenge at The Paper Funday has begun, it's an Anything Goes challenge with an optional twist this month of Snowmen or Birds, but that's not all........there is also a chance to win a prize if you join us in our 5th Birthday challenge which is being run alongside the usual one.

     
     This is a small Christmas Journal made with greyboard covered with Christmas papers. I have made one very much like this before and it was such a hit I had to make it again.
     There is a small pocket on the back flap to hold the cover of a note book, this way the note book can be removed when full and a new one added. The note book was made with some copy paper covered with a patterned card overlay and stitched together.
     
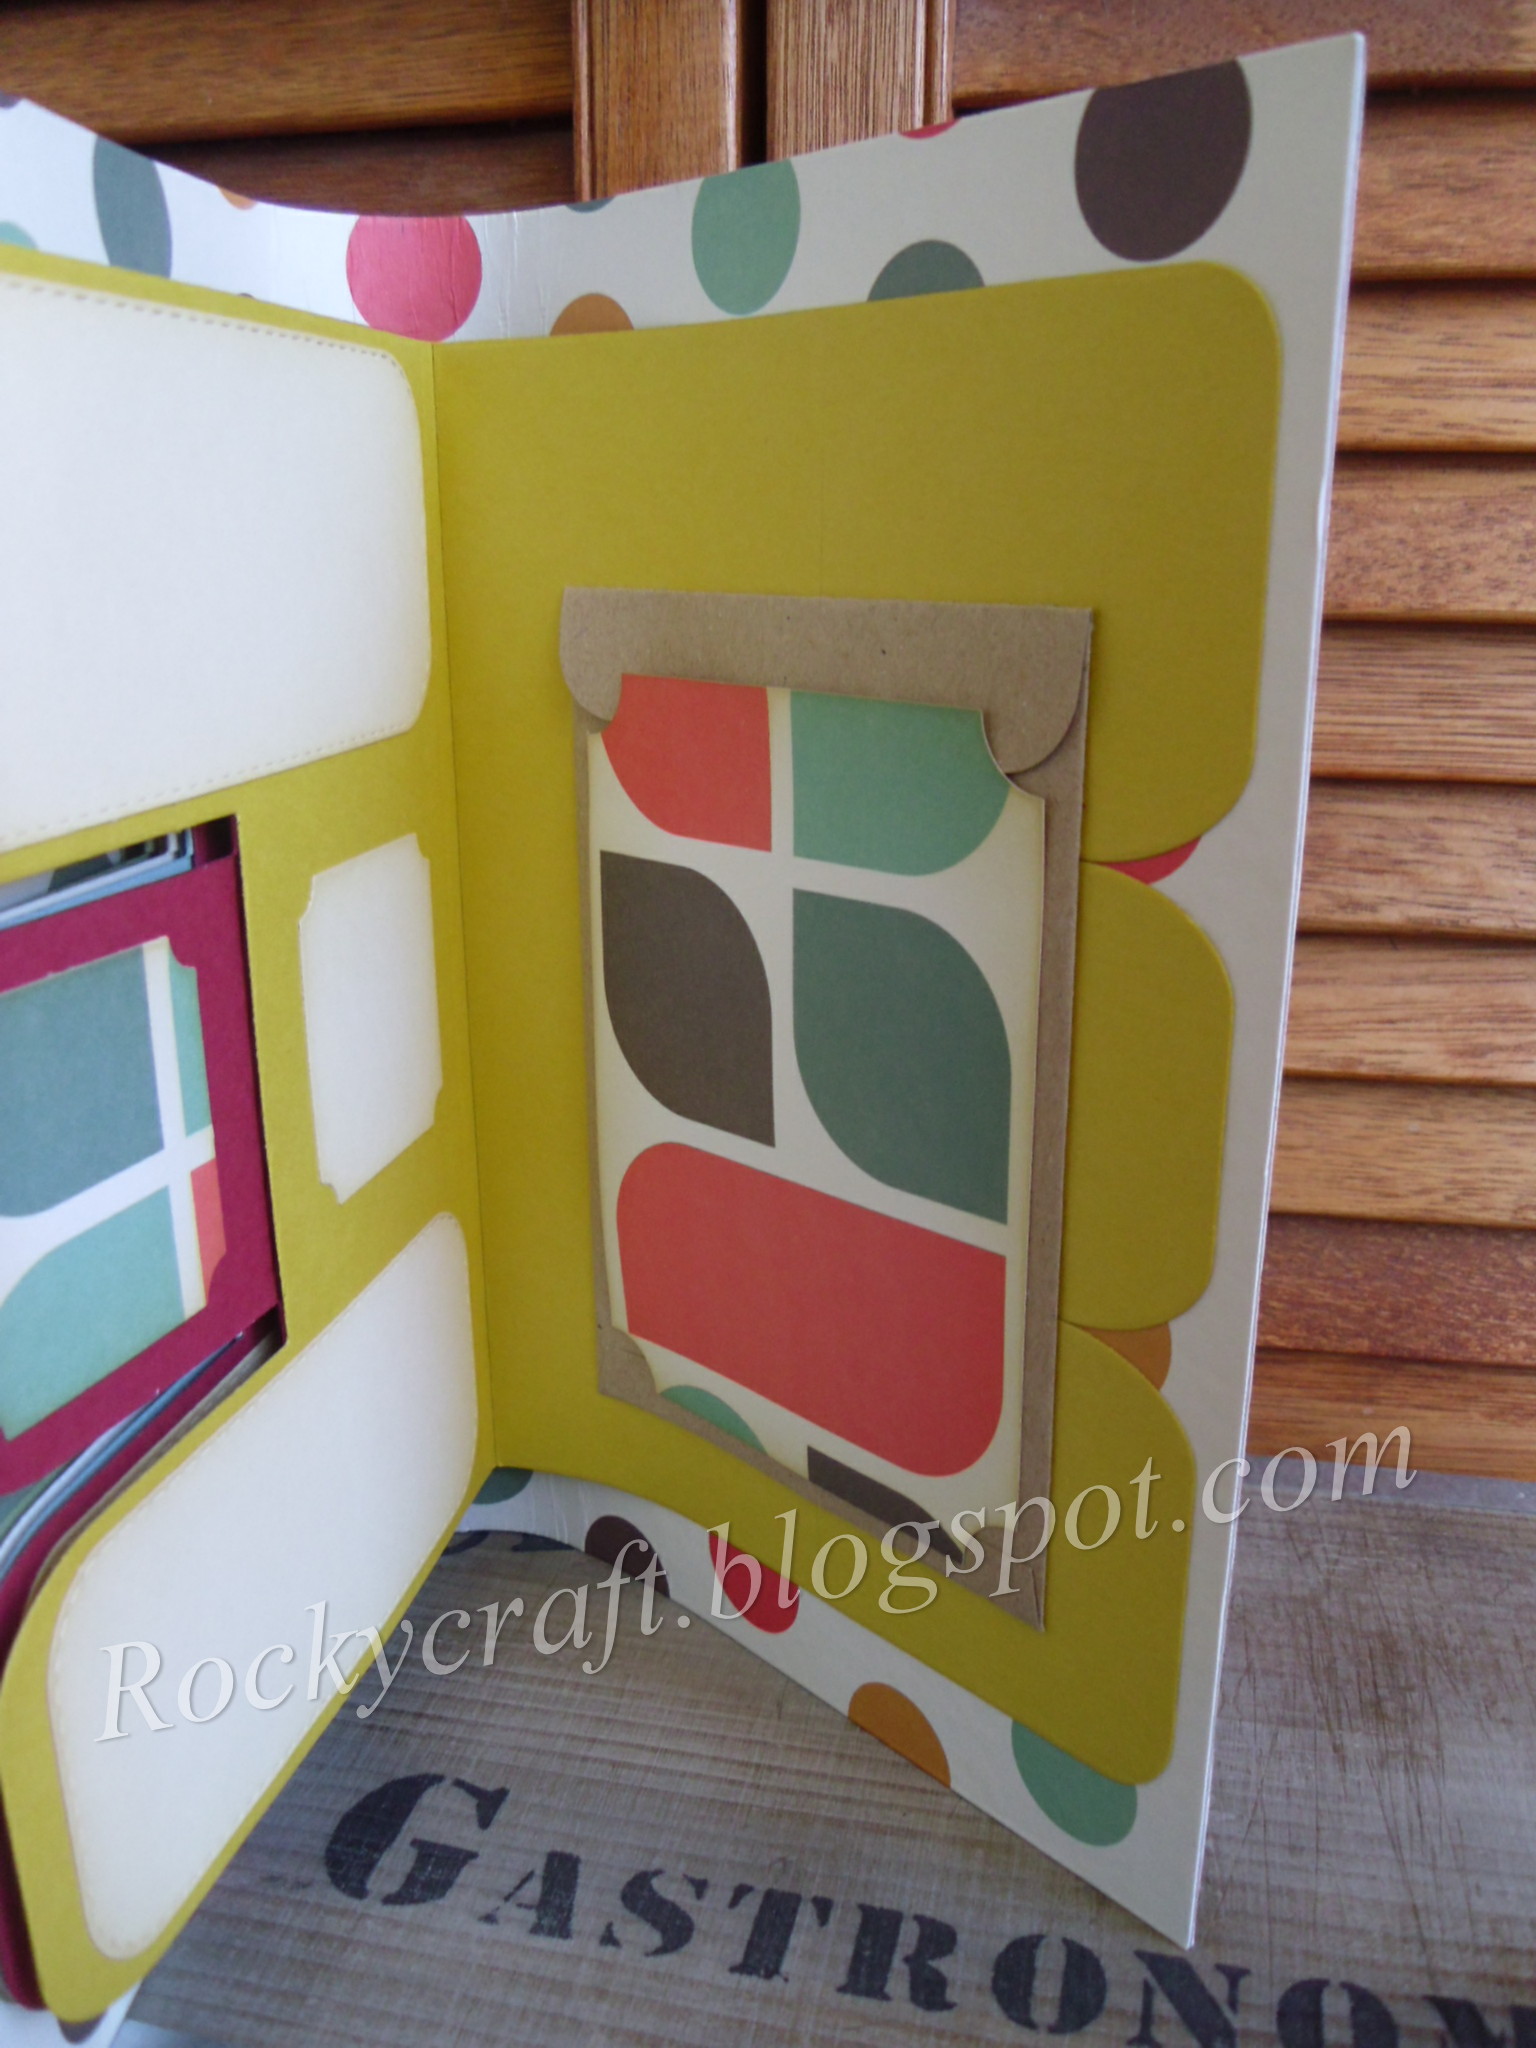
     Inside the front cover is a small pocket to hold a tag, next time I think I should add a larger pocket to hold receipts. Double sided papers are perfect for this type of project and I do happen to have just a few!!!
     This project was for our monthly challenge at The Paper Funday which you are welcome to come and join. 
     If you have the time then take a look at our 5th Birthday challenge which is running alongside the usual one, this one is for Birthday or Anniversary projects and there are prizes to be won, so come and join our celebrations.


I would like to enter this project in the following challenges:
Kraftin' Kimmie - Anything But A Card
Crafting From The Heart - Anything Goes
Crafts Galore Encore - Anything Goes
Creative Crafting Uncles - Foliage and Leaves

Tuesday, 6 December 2022

Christmas Mini Journal


     This little journal was made using the new Mini Living Hinge from John Next Door. The previous hinge made an A5 journal from an A4 sheet, this one is half the size so it makes a cute little A6 journal from an A5 sheet. 
     There are many options when making books with this hinge, this is just one of them, using it in it's most basic way to just cut a hinge into one piece of covered card and folding it over.
     The cover was made with a sheet of 1mm greyboard, covered both sides with decorative papers from a magazine freebie. This paper was glued onto the greyboard using a PVA glue and a brayer to smooth out any bubbles, before leaving the board to dry overnight weighed down under some books to stop it buckling.

     I have marked the centre of my hinge die on the back using a Sharpie pen, I found it helps me line everything up more easily.
     To encourage the fold I found easing it over a strong cardboard tube helped to prevent any sudden slips resulting in creases and cracks, the tube is from a roll of tinfoil.
     While I was planning the contents I left the folded cover with a couple of large rubber bands round it to hold it while the fibres settled down and got used to their new position.
     
     To put one booklet in the journal I chose to use an envelope type section on the back cover to hold it, this means the booklet can be changed once full without having to discard the whole journal.
     The flaps on the sides were folded over the outside rather than inside to make it easier to slide the booklet in and out, with a bracket style cut to make it look nice and to ease the placing of the booklet. This pocket was then stuck onto the back cover with redline tape.
     To make the booklet I used 10 sheets of copy paper cut in half, giving me 20 leaves. The booklet cover is a piece of double sided scrapbook paper which was nice and firm. I have been shown how to make these booklet by Clove Bindery, it's a great way to make custom sizes with whatever cover you wish, please feel free to pop over and ask Wendy how, she's very helpful.
     Inside the front cover I have added a small wallet for odd little bits like receipts or tickets. The outside is decorated with one of John's baubles dies stuck over a long length of green ribbon, there is double sided tape under the ribbon on both back and front to keep it in place but not on the hinge as it needs to move a little.


I would like to enter this project in the following challenges:
Jingle Belles - Anything Christmas Goes
International Art & Soul - Ch#148 Winter
The Holly and Ivy - Anything Christmas
Country View - Anything Christmas
Die Cut Divas - Anything Winter or Christmas
Sparkles Forum - #158 Dies and/or Punches
Kraftin' Kimmie - Anything BUT A Card

Friday, 10 June 2022

Living Hinge Pocket Journal


     A simple pocket journal made with envelopes and the new Living Hinge die set from John Next Door. This was a great way to use some of the large stack of 12x12 papers I have in my stash.

    All the envelopes in this journal were made using scrapbook papers but you could easily use ready made envelopes instead, decorating them with stamping or stencils.
     For this journal I made 8 envelopes, joining them together with one length of tape across the middle width on each one, forming a concertina of pockets.
     Each pocket has a white card that slides inside, edged with the bracket die from the set. These could house some favourite photographs from a special occasion making it a tailor made photo album.
     To house these pockets the album was made using 1.5 A4 sheets of 1mm greyboard, covered with scrapbook papers using PVA glue. Once dry the full A4 sheet was die cut down the middle with the Living Hinge, the A5 piece was cut with the Bracket die, then the hinge die allowing enough on the straight side to attach to the large piece. Remember when bending the hinge to use something round as a support underneath so it doesn't fold in the wrong place and leave you with a buckled spine. Both parts were taken outside and given a couple of light coates of spray varnish to seal the paper.
     Using redline tape the bracket flap was attached to the A4 cover to form a wrap round cover, these were then held together with a Velcro type disc under the flap. The Velcro didn't like sticking to the varnished cover very much so I had to add some redline tape to the back of the discs.
     The pockets were placed in the cover and held in place with pegs until I was happy with their placement and the book opened properly, using redline tape they were then stuck in place one side at a time. As the cover is opened the pockets all fan out, you could use more than 8 envelopes to give you a fuller book if you wish.


I would like to enter this project in the following challenges:
Love To Scrap - #155 Anything Goes
Crafty Gals Corner - #232 Anything Goes
Get Creative #112 At Least Two Patterned Papers
Craft Rocket - #93 Girls
Through The Purple Haze - #193 Anything But Square

Monday, 6 June 2022

Living Hinge Flip Flap Journal


     This has been made with the new Living Hinge die from John Next Door and his older Tag Card die set. Journals are very popular and so very useful, now with this die it's easy to make your own.
     The die is thicker and the 'cutting' edge is deeper so it will go through thicker materials, all you will need to do is work out the best 'sandwich' for your machine.
     The cover was made using an A4, 1mm thick piece of greyboard and two double sided 12x12 papers. The greyboard was coated with PVA glue, then placed on to the scrapbook paper and smoothed down with a clean brayer, this gives a good even pressure all over to stop any air bubbles appearing, repeat for the inside cover. If you use a directional pattern always double check this second cover is the same way up as the first.
     With the chosen outside facing up the die was fixed with tape across the middle of the sheet and run through the machine carefully. Each machine is slightly different so it's a case of gently trying until the correct 'sandwich' is found for a good clean pass, various layers of thin card can be added or removed to reach this, never force the die through.
      To get the even curve across the spine I gently bent it around a strong cardboard tube from the middle of a tin foil roll, this meant it had support as it curved and didn't buckle and fold. Once curved the cover was taken outside and sprayed with a couple of light coates of varnish, this will protect the paper and keep it clean.
     The inside was made using the Large Tag Card die set from May 2020. Each section was cut in a different colour, one that matched the colours in the cover pattern. Shapes to write on were cut in cream for the coloured pages and taupe for the cream page, all edged with Distress Ink and glued in place. For the small square tabs the offcuts from the cover papers were used to keep the continuity of colour and pattern.
     On the last page there is a small envelope to hold little trinkets like ticket stubs or labels, it's covered with another piece of the cover paper for decoration.
     Working out how to glue the pages in took a few minutes, I pegged it in place to see if the book would open correctly before making the final decision. I found that it was best to leave 1.5inches from the spine edge clear of glue, this left enough of the flip flap pages to glue down but also left a free moving area at the spine for the book to fully open without buckling the pages.
     I can honestly say that this was a joy to make and, like most crafters, I have a stash of papers I can now use to make journals for all manner of things. 
      This was made with 1mm greyboard, covered with two sheets of ds paper, it bent with gentle persuasion, I also tried a 1.25mm mount board that did not like to be bent. I think the composition of the board you are bending will make a difference so take a little time to experiment before you use your favourite papers.


I would like to enter this project in the following challenges:
Crafting Happiness - #124 Anything Goes
Get Creative - #112 At Least Two Patterned Papers
Pammie's Inky Pinkies - #2223 Anything Goes
Gem Of A Craft - #12 Anything Goes
Crafty Calendar - Anything Goes
Mixed Media Lovers - #14 Anything Goes

Friday, 22 May 2020

Tag Card Nature Journal


     Another use for John Next Door's new Tag Card die is to make a journal, this one is only three pages long but you can make it as long as you like. There is a basic assembly video by John HERE.
     For this project I cut one cover in Kraft card and three pages in off white card.
     Using another piece of Kraft card I die cut the corners and leaves to make the decorative cover, this was stuck onto a piece of gold mirri card. To fill in all the gaps I die cut the corners and leaves from gold pearl card and then glued them into the gaps. To finish off I added a die cut circle with a letter embedded in it, just like the rest of the cover, to the centre.
      Each page was decorated with a stencilled design in pastel inks with a rough theme to each page. I clipped the pages together to see if I was happy with the overall look when fully open.
     There are two panel dies in the set, one straight edge and one stitched edge. I used the straight die to cut a couple of panels for each page, then stamped them with a script design and edged them with pastel inks.
      Each page has a selection of die cuts and stamps, you can decorate as much or as little as you wish, leaving spaces for things to be added as you find them.
      Two of the pages have an envelope to house a tag, this tag die is in the set as well but the envelope, Sown With Love by Sheena Douglass, was from my stash.
     I chose not to stick the last page to the cover, this means it will open out, plus it can be added to if so desired.
     Inside the back cover are two die cuts, one is a pocket for tags and tickets, the other is a small envelope for little treasures, both are Sizzix dies.
     With more pages it may be necessary to create a spine to the cover, this is relatively easy to do but does need to be done before you glue in the pages.
     A journal like this would make a nice gift for a someone going off on a walking holiday, or bird watching, it's almost like a mini scrapbook. It's much easier to put together than it looks and is sure to deliver the wow factor to it's recipient.


Materials List    Available from your local craft shop
JND100 - Large Tag Card die set
JNDAD014 Regal Flourish die set
JND094 Decorative Corners die set
Strong PVA Glue
Sheena Douglass die Sown With Love
Sizzix 662697 - Stitched Slot & 657843 Pocket Envelope
Stencils, card and inks.


I would like to enter this project in the following challenges:
Fab 'n' Funky - Anything But A Card
The Sisterhood of Stampers - Birds, Bees and butterflies
613 Avenue Create - Anything Goes/option Diamonds & Lace
The Artistic Stamper - Journaling
Blank Page Muse - Stencil It
Creative Crafting Uncles - Anything But A Card

Monday, 1 July 2019

Simple Wrapped Journal


     This is based around the Eileen Hull Sizzix die for a Wrapped Journal, with a few adjustments to suit my stash. As this project is built from scratch it makes an ideal item for Altered Eclectics, where all things altered, recycled and mixed media are welcome, anything but cards and ATC's really.
 
     The base was cut from greyboard using the die, it's a Bigz die so it will cut through most materials.
     For the papers I found an A4 booklet of double sided papers in my stash. Using PVA I covered both sides of the greyboard, but when I folded the board the paper split. Now this I think was partly the papers are not all that thick and partly I was too impatient to let the glue dry completely so the paper was still damp, a silly mistake. I did not want to start again so out came the washi tape, a strip of this over all the joins and all was well.


     A little ink along the edges to add to the distressed look made quite a difference too.
     To close the book I chose to use a ribbon tie but it needed to be fixed to the journal, I didn't want a hole in the spine to pass it through so I die cut a label to go over it.
     The ribbon was stuck to the cover with red line tape, then the label was stuck over it also with red line tape, this is the strongest thing I could think of to hold the ribbon firmly in place.
     The cover die cuts holes for you to thread cord through to hold booklets, but this one wasn't having those so I had to make a spine to stick my pages to. I planned for four pages in this book, two flat and two with pockets.
     The spine was glued in place with a very strong PVA and left to dry thoroughly.
     I cut and folded my pages using the same paper pack, for the flat pages I also cut labels to stick on for somewhere to write. These labels were inked around the edges to soften them, allowing them to blend into the page.   
     A panel added to the front cover matted on a die cut label finished off the outside. Another panel added to the inside front cover and a die cut ticket slot pouch on the inside back cover, complete with tags finished off the inside.
     There were topper panels in the pack so I cut some of these out and added them to tags, these also have inked edges and a tiny organza ribbon coloured pink with an alcohol marker.
     The pages are alternated pouch, flat, pouch, flat and there is enough space between pages to stick a few items on and still be able to close the journal.
     These would make ideal little keepsake gifts you could theme to special events. This has been a learning experience so hopefully as I make more of these they will continue to improve.
     Don't forget to come over to Altered Eclectics and show us your creations, we would love to see them.


I would like to enter this project in the following challenges:
Crafting From The Heart - Anything Goes
Creative Fingers - Anything Goes
613 Avenue Create - Anything Goes optional More Than One Fold


Monday, 1 October 2018

Nina Journal, Birds Flyin' High


     A couple of months ago I began an art journal of sorts, these are the next few pages. My first page was used for Altered Eclectics DT so it seems only right that the next instalment should be for them also.
     I got so carried away with these pages that I forgot to take any pictures as I worked, I think you could say I was definitely 'in the zone' on this one. Following a theme has made my first foray into journaling a little easier, I have a rough idea of where I would like this to go.
     Distress inks over white card for the background got me started, then it was on to spritz and splatter for added detail. The doily was done using a stencil and Distress Oxides, as was the sun, these inks cover beautifully and having a mixture of the two types on the page adds to the effect.
     With the addition of birds and flowers the page was really coming together, all I needed to do now was to add the words. For the first few words of the song I used a Dymo tape machine and blue tape, for the repeated words I used some dies, I had to cut and edit them to make the words I wanted but once stuck down you can't see the joins.
     I am getting more adventurous with some of the pages, I have seen some stunning work out there which has given me inspiration, but as a slightly 'contained' crafter I still have a long way to go to let loose the inner creator.
     If you journal, make mixed media, anything but cards and ATC's then please come and join us Altered Eclectics and show us what you've created.


I would like to enter these pages in the following challenges:
We Love 2 Create - Anything Creative Mixed Media
Hiding In My Craftroom - Anything Goes
Crafting With Friends - Anything Goes

Wednesday, 1 August 2018

Feelin' Good About Journalling


     This is my first venture into the world of journaling, so I've chosen to use it as my DT project for Altered Eclectics. I have always been a little worried about starting something in a nice new book, what do I do if I don't like it? The answer is make a loose leaf journal, that way I only keep the pages I'm happy with.
      I had a Bind-It-All machine as a gift and decided this was a perfect opportunity to use it. I have cut all my pages using various types of card and punched the holes ready for binding. I thought if I had the holes done at the beginning it would help me keep any important decoration away from that area.

     To ease myself into this journey I chose a theme for my art journal, one of my favourite songs.
     This page is cream, coloured around the edge with Distress Ink Old Paper, then I used a crackle stamp and the same ink to add pattern.
     I printed a copy of the music, tore the edges and folded it up a little,then coloured it with Old Paper, adding some stains through a stencil. Once dry I stuck it to the aged page.


     I found some images of Nina Simone on line and printed one out in sepia tones, this I fussy cut and stuck over the music score.
     Using an alphabet stamp set I added 'Nina' to the bottom corner and embossed it with Wow Perissa, which has a lovely metalic mix of bronze, gold and silver.
     Two of the corners are stamped with a tatty corner design and covered with bronze mica powder, a quick blast of hairspray over this keeps it in place and stops it rubbing off. To finish the aged look I went around the outside edges with an edge scuffer, leaving the binding edge smooth.
     It's quite a simple page but for my first one I am pleased with how it turned out, I dare say I shall become more adventurous as I progress through the song. The covers are cut from mountboard which will lend themselves perfectly to some mixed media, but I plan to complete the song before starting on them.
     Altered Eclectics is a challenge for anything altered or mixed media, just no cards or ATC's, so please come and join us with whatever you're working on.