Thursday, 16 January 2025

Let It Bee Tag


      My first project for Affordable Crafting is a large MDF tag, there is a pound coin in the photo for scale.  My efforts at mixed media are rather tame as I'm a 'less is more' kind of crafter, I struggle with adding lots of layers and bits and bobs, but I'm getting braver.

     
     I hunted high and low for some mustard colour paint I thought I had.....no luck, it's somewhere here I think!   So I chose a suitable paper as my base layer, this was stuck to the tag with a good PVA glue, brayered flat and left to dry.   Once dry I used an emery board to go around the edges and sand them off.
     Next was to hunt through my stash for anything Bee related, stamps, dies and odds. A torn strip of patterned paper added to one corner lifted the colour, then a die cut honeycomb gave it a more Bee related look. Using brown ink I stamped some hives in the other corner and coloured them in with watercolour pencils.

 
      Using a honeycomb stamp I added some pattern to the top corner but it was a bit too vague, so out came a stencil to add over the top, still not quite right. To add a stronger colour over the top I used another stamp that reflected the colour in the patterned paper on the opposite corner.....better.
     A couple of words stamped and embossed in gold lifted the whole look, just that splash of shine made all the difference. To frame the tag I used a Stix2 glue stick, dabbing the glue onto the tag with my finger, then dabbed the glued areas with gold foil, it gives a random distressed look when dabbed by hand.
     The big bee was stamped on cream card, coloured with the pencils and die cut before being shaped and stuck onto the tag with Glossy Accents, The button had a sting bow added before that too was stuck down with the Glossy Accents.
      I had the spotty mustard ribbon ready to add, a piece of the same string was lying on my desk but I couldn't find the right shade of narrow ribbon to pick out the rusty colours, then it dawned on me that I had white organser ribbon, so out came the Promarkers, result.  There is also a sting loop in with the ribbons so that the whole thing can be hung up.

     Please take a look at the Affordable Crafting website, you will find all manner of things to go with your stash making crafting exactly what they say, 'Affordable'.

I would like to enter this project in the following challenges:
The Paper Funday - #72 Anything Goes with paper
Creative Fingers - #292 Anything Goes
Pammies Inky Pinkies - #2502 Anything Goes

Thursday, 7 November 2024

New Beginnings


     Hello, I know, it's been a long time. I've been working on my PHD......Projects Half Done!!  Not finished by a long way but it has been an interesting year with lots of twists and turns.
     I have some news......there will be more activity starting in the New Year.  I have been chosen to join a new design team, working for Affordable Crafting. I have known Mandy for many years and so look forward to creating projects for her along with several other crafters. Affordable Crafting stocks many brands so hopefully there will be something to appeal to everyone as we all showcase some ideas.
     Have a wonderful holiday season and see you in the New Year with some interesting projects.

     These crackers were made at a recent craft group using an old cracker die from John Next Door, sorry about the boring background, the craft room is undergoing a revamp in preparation for 2025. If you would like further details on the crackers then you can find them here.

Wednesday, 7 February 2024

The Paper Funday Gifted Gnome


     A new month means a new challenge at The Paper Funday. An Anything Goes papercraft challenge with an optional twist, which this month is No Patterned Paper......which I sort of forgot, oops, although strictly speaking it's coloured paper, not patterned.
     He's been printed onto white card and also onto the coloured paper. Using alcohol markers I coloured his hands and nose, then using a glitter Gel pen coloured the gift with silver.
     After cutting out all of the clothing and colouring the shaded areas I began to stick them onto the white card using a good strong PVA glue. Once all the glue was dry I ran a clean, dry brayer over the image to make sure it was all nice and flat.
     Using another piece of the coloured paper I cut a mat layer and mounted the image panel onto it, then onto a white card blank. The centre of the flower has some orange flock added to give it a little pop of bright colour. I found a greeting disc in my stash but it needed a little something, so I die cut a disc from the coloured paper and mounted it on foam pads. 
     If you haven't already seen the team inspiration on The Paper Funday then please pop over and have a look at all the great ideas, once you've made your project come and join us.


I would like to enter this project in the following challenges:
Lil Patch of Crafty Friends - #223 Anything Goes
Inkspirational - #308 Paper Piecing
Gem of a Challenge - Wk3 Anything Goes

Wednesday, 6 December 2023

The Paper Funday's 5th Birthday


     The Paper Funday is celebrating it's 5th birthday with a separate challenge to the usual, please join us in our celebrations, you might even win a prize.
     For my birthday card I have used a flower die to cut out the centre of a white layer, then mounted it on foam tape above a piece of patterned paper.
     The greeting has been heat embossed in gold across the centre bar which does not cut the card.
     To add a tiny bit of interest and to tie the whole thing together I have added some small pearls in each corner of the top layer.
     The card is still thin enough to go standard post and by facing the pearls to the back when in the envelope, it should run through their machinery without causing to much fuss.
     Come along and join in the celebration at The Paper Funday. Follow the link to join in the fun.


I would like to enter this card in the following challenges:
Crafter's Cafe - #303 Feminine
Creative Fingers - #267 Anything Goes
Pammie's Inky Pinkies - #2248 Anything Goes
Beautiful Blossoms - #11 Anything Goes or Mood Board
Die Cut Divas - Flower(s)

Paper Funday Christmas Has Landed


     December is upon us already, where did the year go?!  This month's challenge at The Paper Funday has begun, it's an Anything Goes challenge with an optional twist this month of Snowmen or Birds, but that's not all........there is also a chance to win a prize if you join us in our 5th Birthday challenge which is being run alongside the usual one.

     
     This is a small Christmas Journal made with greyboard covered with Christmas papers. I have made one very much like this before and it was such a hit I had to make it again.
     There is a small pocket on the back flap to hold the cover of a note book, this way the note book can be removed when full and a new one added. The note book was made with some copy paper covered with a patterned card overlay and stitched together.
     
     Inside the front cover is a small pocket to hold a tag, next time I think I should add a larger pocket to hold receipts. Double sided papers are perfect for this type of project and I do happen to have just a few!!!
     This project was for our monthly challenge at The Paper Funday which you are welcome to come and join. 
     If you have the time then take a look at our 5th Birthday challenge which is running alongside the usual one, this one is for Birthday or Anniversary projects and there are prizes to be won, so come and join our celebrations.


I would like to enter this project in the following challenges:
Kraftin' Kimmie - Anything But A Card
Crafting From The Heart - Anything Goes
Crafts Galore Encore - Anything Goes
Creative Crafting Uncles - Foliage and Leaves

Wednesday, 1 November 2023

Thank You


     A new month means a new challenge at The Paper Funday, an Anything goes challenge with an optional twist and this months it's Thank You.
     In the UK November is a month of remembrance for all our armed forces and others who were lost fighting for freedom, their symbol is the poppy.
     I already had this image stamped and embossed after borrowing the stamp from a friend, all I had to do was mount it on a red mat layer and add a die cut poppy. I felt that no words were necessary, none would have been enough.

I would like to enter this card in the following challenges:
Festive Friday - #FF0146 Remembrance Day
Use Your Stuff - #496 Anything Goes

Wednesday, 4 October 2023

Cats and Bats


     Another month, another project for The Paper Funday. This is an Anything Goes papercraft challenge with an optional twist, for October the twist is use yellow, orange and green. 
     This card is a CASE of a card by Shelly Matteson, her card is a bit more orangey than mine but in my defence I was using up some gorgeous papers I inherited from my mum.
     The background paper already had a sun/moon type look to it so I cut a moon in vellum and stuck it over the lightest area of the background.
     The colourise pumpkins were cut from some Clarity papers mum had in her stash, I chose a greeny purple one to fit the twist. The leaves come from another sheet of Clarity paper that had amazing Autumn colours on it. Shaped leaves give a bit more texture and depth to the overall picture with bats and cats in black card being set off by a black mat layer. To make the whole thing a little more magical I mounted the picture on some pearlescent orange card. 
      I won't be giving this one away for two reasons, one being I really like it and the second is we don't tend to celebrate Halloween even though the colour are amazing. It will grace the walls of my work area until next year at least.
     Please come and join us at The Paper Funday, it doesn't have to be Halloween and it doesn't have to be a card, as long as it's made with paper or card that's fine with us.


I would like to enter this project in the following challenges:
Two Old Bats Halloween - Anything Halloween
Inspiration Station - #54 Halloween colours
Get Creative - #126 Purple, green black and orange
Unicorn - #92 Autumn/Halloween

Friday, 8 September 2023

Snowflake The Winter Dragon


     When is tree shaped treat box not a tree shaped treat box?......When it's a dragon of course!
   The new Charles Treat Box from John Next Door makes a great gift box, but when I started to make one it fell over on my desk and looked just like a dragon's head with perfect spikey teeth. Not very Christmassy?  it is if you like dragons....a dragon is for all seasons......a table decoration with a difference. Make in another colour scheme for Halloween, a special gift or just for fun.
     
     I made a dragon in plain card as a prototype, no point in wasting the good stuff to start with, it meant I could fold and chop it around until it looked right without a worry.
     The body is made from the main part of last years Hexacracker with two hexagons for end caps.

     For the tail I made the treat box into a triangular shaped tree and glued it to the hexabody, making sure that the spines of one edge were pointing upwards and lined up with the peak of one edge on the body.
     With the remaining tree from making the tail I folded it in half and glued the spinney edge. Cutting the tree in half I discarded the folded part and glued the spine along the ridge of the body in line with the tail spines.
     For the head I made the box as a tree but left one side open, the inside of this flap was lined with some marbled effect wallpaper and the spinney edges were folded inward to form the lower row of teeth. To stop the jaw flapping about I glue the largest tooth at the back of the mouth to the corresponding tooth on the upper jaw, the mouth stays open but doesn't drop too low.

     The head was glued onto the body to be higher than the tail, then a spine was added to the head, made in the same way as the main body spine but shorter and glued in the middle to line up with the rest of the spines.
     Wings were made from one tree shape each, the bottom edge was cut with the box die to get a spikey edge, then scored and pleated to give folds. These were glued onto the body at an angle to give a nice sweeping wing that stands up. Wing tips can be glued together so it can be hung up, but you will need to find the centre of balance for your own dragon as it will vary depending on card and embellishments added.

     All that remained were the legs, what better way to stand firm than using four trees. Three tree tops for each leg were cut, I only cut the top part that I would need rather than wasting card. The little trees were cut with an angle to the base so that Snowflake would stand level, having the slightly shorter edge on the inside as well as a flat side to glue to the body.
     Once the dragon was built it was time to cover it in snowflakes and gems for added sparkle and some large blue pearls for eyes. Using a patterned pearl card made it much easier to incorporate sparkle and shine, embossing would have made it harder to assemble and painting might have made it soggy.
     It may sound complicated but it's not really, pick up some inexpensive card and have a play. Dies should be versatile giving value for money, it's NOT just what it says on the packet, it can be so much more.


I would like to enter this project in the following challenges:
Kraftin' Kimmie Stamps - Anything BUT A Card
Peace On Earth - #47 Photo (Snowflakes)
Christmas With The Cuties - #73 Something Snowy
Die Cutting Divas - Anything Goes
The Holly & Ivy - #147 Anything Christmas
Fab 'n' Funky - #579 Wings or Scales

Wednesday, 6 September 2023

Wild Flower Gnome in the Spotlight


     A new month means a new challenge at The Paper Funday, an Anything Goes papercraft challenge with an optional twist.
     For this card I have used a SheepSki design called Wild Flower Gnome. I chose to make a simple card with the spotlight method.
     Two copies of the image were printed at the same time, making sure they were the exactly the same size. One image was kept for the base layer and one was cut with a circle die to give two spotlights.
     Using alcohol markers I coloured the two discs and added a little gold pen to the flower centres. For the mat layer I used the same marker as the disc background on a piece of white card, only the outer edge was coloured which gave me the perfect colour match.
     I mounted the discs onto the background before layering up, just incase it went wrong I would only need another background layer. To give wiggle room to the discs I added a little PVA glue to the foam tape when I was lining them up, you get a few seconds to move them around.
     Once the discs were added I layered up the card, I felt it was a little too bare so I added a small greeting to the bottom corner. Inside is still blank so it can be made to suit the occasion when it's needed.
     If you haven't visited The Paper Funday yet then please do, there's lots of inspiration over there from my creative team mates.

I would like to enter this card in the following challenges:
Di's Digi Designs - Die Cuts/Punches
Pammie's Inky Pinkies - #2335 Anything Goes
Lil Patch Of Crafty Friends - #213 Anything Goes
Stamping Sensations - Garden Delights

Wednesday, 2 August 2023

The Paper Funday Maiko


     Welcome to this month's project for The Paper Funday, a digi stamp from StarStampz called Maiko In Spring
     
     I printed the stamp twice on smooth card, I should have payed more attention to the size as the finished card ended up being A5, so that's by hand delivery on that one!
     I cut out one Maiko ans set her aside while I coloured the background piece. Using a sponge and some Distress Inks I added blue and greens to the card, a colour wash would have buckled the card so it had to be something dryer.
    
    As the edges of the Maiko might be visible I coloured her with the same alcohol pen I was going to use on the top image, but only arouns the outside edges. I coloured the cutout Maiko and added a few touches of silver to her kimono, which sadly don't show up in the photograph.
  To add some texture and make the tree more interesting I dug out my stash of Flowersoft. Using tiny dabs of PVA i aimed for where I thought the flowers might be.
     Once the glue was dry I tapped off any excess Flowersoft and mounted the background on to some dusky mauve card, then on to a thin layer of dark blue. I was going to put this on to a white card blank but the white blank took away from the image so I chose to use a piece of dusky blue card to make a card blank.
     The Maiko cutout was then mounted on foam before going onto the background, like this she now stood out from the blossom on the tree.
     The card looked a little empty around the edges so I added a knot made with Mizuhiki cord to lift it slightly.

The Paper Funday is an Anything Goes with paper challenge, it also has an optional twist, so please pop along and join us with your papercraft project.

I would like to enter this card in the following challenges:
Crafting Happiness - #145 Anything Goes
Creative Fingers - #259 Anything Goes
Gem Of A Challenge - Wk15 Anything Goes

Wednesday, 5 July 2023

Summer Rain


     This month at The Paper Funday we have two sponsors, this design is from Sheeski Designs - Shopping In Yorkshire.
     I saw a sample on Sheepski's Etsy page that caught my eye, the simplicity appealed to my level of colouring skills, I chose to use blue instead of black but the basic idea is similar. This was done with a mix of alcohol marker brands, it doesn't seem to matter how many pens you have, finding the right shade is a task in itself.
     A simple mat layer cut with nesting dies helped give the card some curves and finding a fabulous piece of patterned paper from Clarity really finished it off. There is no greeting at present, this will be added when it's needed, although I quite like it without.
    Please pop over to The Paper Funday to see all the inspiration from the team and have a look at some of the great images from our sponsors.


I would like to enter this card in the following challenges:
Creative Fingers - Anything Goes
Pammie's Inky Pinkies - Anything Goes
Love To Craft - Anything Goes

Wednesday, 7 June 2023

Bowled Over By Paper


      The Paper Funday's challenge this month is as usual Anything Goes, but the twist is to make something that is neither square nor rectangular. A 3D project seemed the way to go for me, so I broke out the Spellbinder die set Vintage Hexagon Bowl. There is a really good video tutorial on You Tube to walk you through assembly which I found very useful, especially when it came to the stitched edges.
    
      To start with I cut out all the panels using two 12x12 sheets of double sided thick paper. At this point I began to think about durability, after all the work I was going to put into this bowl I wanted it to last.
      To make my bowl stronger I used project acetate on both sides of each panel. As this acetate is thin I was able to cut two sheets at a time but the holes didn't punch out cleanly so I had to use my Crop-A-Dile. A bit tedious but well worth it and it did punch through four layers at a time.

     
     With the paper sandwiched between two sheets of acetate I started to crochet around the edge of each panel, it didn't take as long as I thought it would. I used a #20 crochet cotton on this one as that's what I had to hand, I would say if you are using a larger thread number you may need to make sure you have plenty. 
     Sadly I don't think the tutorial tells you just how much thread you will need as it may vary, just make sure it's a full ball or several matching skeins.
     To make up the bowl I set it out on the worktop and moved the side panels around until I was happy, then took a picture to refer to.
     Sewing up was very quick and easy as I had left long tales as advised in the tutorial
     This bowl came out around 4inches tall, 5inches at the bottom and 8inches at the top, perfect for sweets, pot pourri or as a small hamper.
     The Paper Funday is a papercraft challenge, not just cards, so please pop along and join us with your papercraft projects.


I would like to enter this project in the following challenges:
A Place To Start - Anything Goes
Crafting From The Heart - Anything Goes NO Cards
Crafting Happiness - #143 Anything Goes
613 Avenue Create - Anything Goes
Creative Fingers - #256 Anything Goes     (Top 3)

Wednesday, 3 May 2023

Embossing With The Paper Funday


     Welcome to my contribution to this month's The Paper Funday Challenge, this month our twist is Embossing - Hot or Dry, or both if you wish.
     I chose to dry emboss with a Tim Holtz embossing folder - Elegant. I have inherited a large craft stash for my mum so it seemed right to use some of it on this project, Clarity papers caught my eye but I can't tell you which set it comes from, sorry.
     There were a few areas of damage on the piece I chose, so I cut it down to a 4inch square and ran it through the embossing folder. I have a Bigshot so for my machine I used the base plate, the folder and one clear plate, the 3D folders are much thicker than the ordinary ones so you'll need to adjust your sandwich according to your machine.
     Once embossed I used a little silver Pebeo gilding wax on a hard foam pad to add highlight to the raised areas. I left it for a few minutes then gave it a gentle buff with a soft cloth to get a nice shine.
     I wanted to have a coloured mat layer under my patterned paper but nothing in my stash was the right shade, so I made my own. I cut a square of white card and used an alcohol marker to colour the edges, no need to do the whole card as only the edge will be seen.
     After sticking the embossed topper to the mat layer I then cut another mat layer in silver paper and mounted that underneath on foam tape.
     Once stuck onto the white card blank I went in search of a suitable greeting. My card stash needs lots more birthday cards so after a little rummage I found some greeting toppers, the birthday one wasn't quite right so I used a Best Wishes instead. Mounted on foam tape and tucked in the top corner finished this card off and with the colour scheme it could be for a man or a woman.
     If you haven't been to The Paper Funday then please pop over and take a look at all the lovely inspiration you'll find there, then come and join us with your project.


I would like to enter this card in the following challenges:
The Paper Players - PP638 Tic-Tac-Toe  (last row down)
Can You Handle The Pressure - Anything Goes Embossing     (Top Winner)
Pammie's Inky Pinkies - #2317 Anything Goes     (Honourable mention)
Love To Craft - #74 Anything Goes

Friday, 10 February 2023

Taking A Break


      I'm taking a little break at the moment, sadly crafting has to take a back seat for a few weeks but I shall return soon. 

Wednesday, 7 December 2022

Doodle Wreath


This months challenge at The Paper Funday is as always Anything Goes with a December twist of Holiday Time. This great digi stamp is from Varada Sharma, called Doodle Wreath.
     The larger card was made by fading the image to 50%, then laying the full strength image over the top and turning it 90degrees. Sounds complicated but believe me it's not, I'm not very tech savvy atall, all done in a basic version of Photoshop.
     The faded image I coloured in light green and the darker in dark green, I think it gives it some depth. A little Distress Ink Bundled Sage around the edge helped knock back the bright white. All the berries were coloured with a Christmas Red Stickles.
     A thin mat of red mirri card helps the red berries stand out a little more, this was then mounted on foam on a white card blank.

     The small card was inspired by the way a png image has a black background when viewed in my photo package, I rather liked it for a more masculine card. Again changed in Photoshop with a little tech support from my son, once he explained about a paint bucket symbol it made sense, choose the bucket, choose the colour and click where you want to tip the bucket!
     The berries on this one were coloured with red Liquid Pearls but this time I used plain red card for a mat and a silver peel off greeting to finish it off.
     Digital images are great, you can change the size, orientation and play around with them to achieve different effects. To see what else can be done with them pop over to The Paper Funday and have a look at the DT samples.


I would like to enter these cards in the following challenges:
Winter Wonderland - Anything Christmas Goes
The 12 Months of Christmas - #95 Anything Christmas Goes
CraftyHazelnut's Christmas - #623 Anything Christmas
The Holly and Ivy - Anything Christmas

Tuesday, 6 December 2022

Christmas Mini Journal


     This little journal was made using the new Mini Living Hinge from John Next Door. The previous hinge made an A5 journal from an A4 sheet, this one is half the size so it makes a cute little A6 journal from an A5 sheet. 
     There are many options when making books with this hinge, this is just one of them, using it in it's most basic way to just cut a hinge into one piece of covered card and folding it over.
     The cover was made with a sheet of 1mm greyboard, covered both sides with decorative papers from a magazine freebie. This paper was glued onto the greyboard using a PVA glue and a brayer to smooth out any bubbles, before leaving the board to dry overnight weighed down under some books to stop it buckling.

     I have marked the centre of my hinge die on the back using a Sharpie pen, I found it helps me line everything up more easily.
     To encourage the fold I found easing it over a strong cardboard tube helped to prevent any sudden slips resulting in creases and cracks, the tube is from a roll of tinfoil.
     While I was planning the contents I left the folded cover with a couple of large rubber bands round it to hold it while the fibres settled down and got used to their new position.
     
     To put one booklet in the journal I chose to use an envelope type section on the back cover to hold it, this means the booklet can be changed once full without having to discard the whole journal.
     The flaps on the sides were folded over the outside rather than inside to make it easier to slide the booklet in and out, with a bracket style cut to make it look nice and to ease the placing of the booklet. This pocket was then stuck onto the back cover with redline tape.
     To make the booklet I used 10 sheets of copy paper cut in half, giving me 20 leaves. The booklet cover is a piece of double sided scrapbook paper which was nice and firm. I have been shown how to make these booklet by Clove Bindery, it's a great way to make custom sizes with whatever cover you wish, please feel free to pop over and ask Wendy how, she's very helpful.
     Inside the front cover I have added a small wallet for odd little bits like receipts or tickets. The outside is decorated with one of John's baubles dies stuck over a long length of green ribbon, there is double sided tape under the ribbon on both back and front to keep it in place but not on the hinge as it needs to move a little.


I would like to enter this project in the following challenges:
Jingle Belles - Anything Christmas Goes
International Art & Soul - Ch#148 Winter
The Holly and Ivy - Anything Christmas
Country View - Anything Christmas
Die Cut Divas - Anything Winter or Christmas
Sparkles Forum - #158 Dies and/or Punches
Kraftin' Kimmie - Anything BUT A Card

Sunday, 27 November 2022

Mica Magic Northern Lights


     Mica Magic is mica powder in an almost cream like form, a bit like eyeshadow but please do not use it as makeup. It can be applied with a sponge or on your finger, a brush would work but tends to hold onto the powder so you end up using more. The effects you can achieve with this product are many and varied, this one is a Northern Lights background inspired by a You Tube video from Kevin Nakagawa, he used ink pads for his background.
     All but the black came from the new Dawn Aurora pallet and were applied using the reverse of a piece of  Cut N Dry Foam. The back of the foam is quite firm and doesn't bend so it applies the mica perfectly over embossed surfaces as well as smoothly onto flat card, this is a tip I picked up from the talented Dot when using gilding wax.
     Starting with the lightest colour first I added streaks of yellow and lime green in one direction across my white card, building up with darker green and black.
     The white stars were made using a Posca pen held over the card and tapped with the edge of a ruler to make it splatter.
     Once complete the background was buffed gently with a soft cloth to get a subtle shine. The scenic layer was die cut using a die from JND Snow Scenes in black card, then stuck onto the background with redline tape to make sure it didn't fall of the shiny surface. The scenic background was then matted onto a black layer.
     To find a perfect match for the green mat was almost impossible so I made one using the same green Mica Magic used in the background to colour a piece of white card, only the edge needs to be coloured as the rest is covered.
     My green mat was then added to a black card blank, I tried it on white but it didn't look right, with the scenic layer being added with 2mm double sided foam tape to give a little lift.
      All that remained was to add the die cut Silent Night in black, which was actually cut from the centre of the black mat layer, and embellish with a couple of amber gems. I would love to see the Northern Lights but until I do then trying to make them on card will have to do.
      

I would like to enter this card in the following challenges:
ABC Christmas - W~white/X~xtra special  
The 12 Months of Christmas - #94 Anything Christmas
CraftyHazelnut's Christmas - #622 Anything Christmas
Merry Little Christmas - #47 Anything Christmas
The Sisterhood Of Crafters - Anything Christmas

Wednesday, 2 November 2022

Autumn Butterfly


     This months challenge at The Paper Funday is Anything Goes with an optional twist of Autumn Colours. I love the colours of Autumn so I chose to use them on a butterfly.
     The butterfly was stamped using a John Next Door media plate and a selection of dye based inks, the main body of the silhouette being in yellows with a touch of rusty orange around the outside.
     To get the shimmering flowers the inked image had to completely dry then using the same media plate a stencil was laid on top and a generous layer of Versamark was added to the media plate. This was then stamped on top of the coloured shape and dusted with pearl mica powder. A very light spray of an in-expensive hairspray was used to fix the mica.
     To finish of the image panel some silhouette stamps were used with Versafine black ink and then the sentiment was added.
     To get the same shade of orange as a mat layer a plain white layer was coloured but only around the edge that would be seen, then a black mat layer before going onto a white card blank.
     You will see that the card changes with the angel of view, the mica is always there but when it catches the light it really shines.
     Come along and join us at The Paper Funday with your creations this month, we have lots of inspiration to help get you started.


I would like to enter this card in the following challenges:
Try It On Tuesday - Sparkle and Shine
Sunday Stamps - SSC295 Autumn Bounty     (Top Cup)
Art Impressions - #339 Stencil or Mask

Wednesday, 5 October 2022

Signs Of Autumn


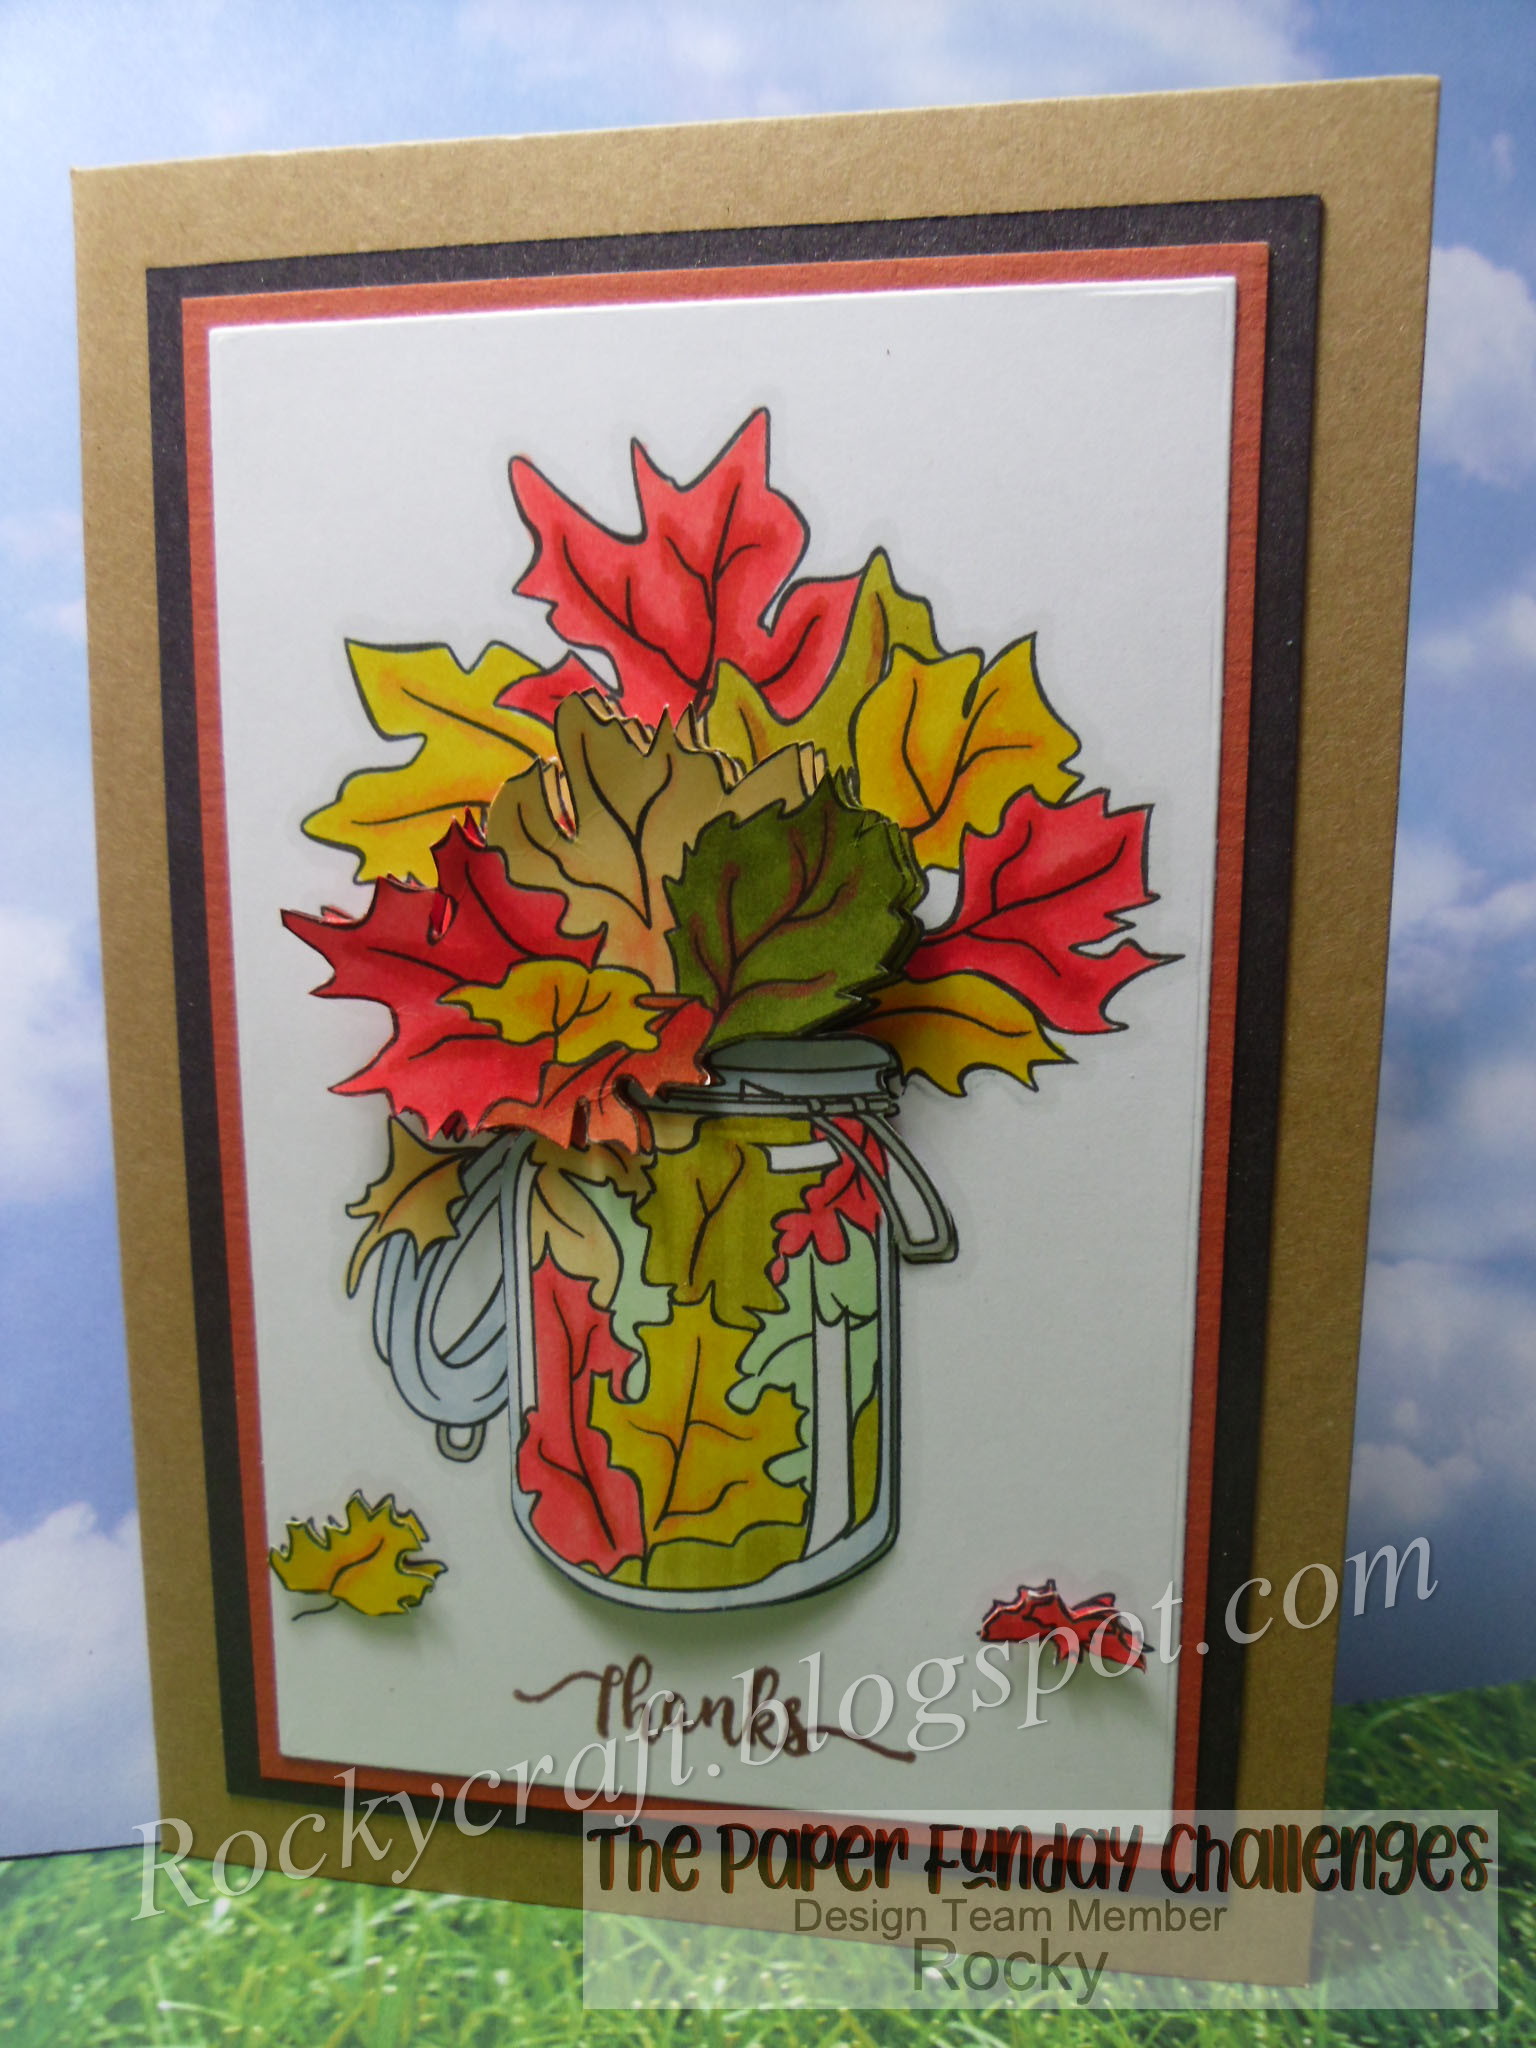
     A new challenge has started at The Paper Funday this morning, this month's twist to our Anything Goes challenge is All About The Candy. I have chosen to stay with an Autumn theme by using one of our sponsor images, Signs Of Autumn by Jan's Digis.
     This digi comes blank or pre coloured, I chose to colour a blank image but used the pre coloured as a guide to help me see where one leaf stopped and another started.
     The blank image was printed four times on smooth white cardstock, this gave me one image to die cut with a rectangle, two to trim and layer, with one left to experiment on. I planned my colours on the play piece and tried out various combinations before colouring my main image with alcohol markers.
     Using foam pads I layered the jar after giving it a little curve and added the leaves on top. A small Thanks stamp added to the bottom makes it a useful little addition to my card stash.
     The main image panel was matted on a dark orange card then a very dark brown before going on a 7x5 Kraft card blank.
     Pop over to The Paper Funday to see all the fabulous inspiration the team have come up with, then come and join us with your project.


I would like to enter this card in the following challenges:
(PIN)spirational - #294 October
Everybody-Art - #521 Autumn
Shopping Our Stash - #480 Leaf Me Alone
Try It On Tuesday - Autumn     (Top 5)
Use Your Stuff - #468 Autumn/Fall