Saturday, 16 March 2019

Golden Camellias


     A foray into die cuts this time, using dies by John Lockwood. My craft mojo had gone missing but thanks to a good friend and her new dies I found where it was hiding. This card is for my Mother-In-Law's birthday so it's in her favourite colour pallet.
 

     I cut the Oakham die in white and the Camellia flowers too, then cut the leaves  and flower centres in black. I brought them all home and set about assembling the card.
     I was going to mount the lattice on black but it all looked a bit too dark, so I changed it for gold mirri to give it a lift. I had to paint the thin frame with black paint as it was cut out in white, thank fully I had used a strong card so it took the paint well, without buckling.


     The flower petals looked a little flat just white, so I painted the edges of them gold, the paint gives a slightly distressed look but I prefer this to a pristine straight line. The tiny star centres are painted with the same gold before working the petals and assembling the flowers.
     A small gold half pearl added to the centre really finished them off. I made three flowers but decided only two would go on the card, less is more as they say.
     Sticking the lattice to the mirri was a challenge but my Stix2 PVA glue did the job with very little fuss.
     It was time to mount the panel on the card, as this would be more difficult once the flowers were added. A black mat on a white card set the whole thing off perfectly.
     I cut the greeting in black but it looked a bit lost, then I remembered a conversation we had Thursday night about shadowing greetings, so I cut a white one and stuck them together shadow style. Mounted on foam pads in the middle of the card it made quite a nice card just like that, but the flowers were a must for this card.


     A medium sized gold half pearl in each hole around the centre panel added a little bling and matched the pearls in the flowers.
     All that was left was to add the leaves and then the flowers, I lay these on several times in different positions until I liked the look, then I glued them on with my trusty PVA.
     Once all the glue was dry I tweaked the petals a little so they sat neatly, checked for any stray marks or bits of card and made sure it was clean and tidy. This will be hand delivered so it won't get squashed in the post.
     I think it's high time I got back into making die cut flowers, it's so calming just colouring and shaping, then building all those beautiful blooms.


I would like to enter this card in the following challenges:
As You Like It - Dies or Stencils (love them both but building flowers is fab!)
Craft Rocket - Flowers
Dragonfly Dreams - For A Special Female
Creative Moments - Anything Goes
Crafty Creations - Anything Goes
Southern Girls - Flora and/or Fauna

Wednesday, 13 March 2019

Christmas Shanty


     Is it really a month since the last card post for Christmas At Sweet Stampin'? Where is the time going?
     This one is another Lavinia Stamps image called Shanty. It has been stamped with Memento Rich Cocoa on Kraft card, black was too harsh on Kraft.
     The snow is texture paste dabbed on and a little iridescent glitter added before it dried, sadly that doesn't show up n the picture. The tiny snowflakes and small drifted snow areas are drawn on with a white gel pen.
     Lamps and windows should have a glow about them so they are coloured with a yellow alcohol pen.
    Keeping it fairy simple it was layered with a white mat, then straight on to a Kraft card blank. The greeting is stamped and embossed in white to keep to the colour pallet.
     There is a lot of inspiration from the DT over on the blog to get you in the Christmas spirit so please pop over and take a look, it's never too early to make your cards.


I would like to enter this card in the following challenges:
Sparkles - Vintage  (hope this qualifies)
The 12 Months Of Christmas - Anything Christmas/optional brads/buttons/bows
CraftyHazelnut's Christmas - Anything Christmas/optional Father Christmas
The Holly and Ivy - Anything Christmas

Monday, 11 March 2019

Coffee and Cork


     A Mothers Day gift made with Stix2 Cork Sheet and an empty coffee tin.
     I measured the cork sheet against the tin to get the right height, then cut it making sure to cut a little extra in the length to go around the tin.
     Using the ultra (red) sticky tape I put a line of it from top to bottom and all the way around the top and bottom. I only removed the protective film from the top to bottom line, carefully lining up the cork half way across it so it would stick the beginning and the end.
     Once happy with the vertical placement I began to wrap the cork carefully around the tin removing a little of the tape cover at a time. Once back at the beginning I stuck the end onto the remaining half of the vertical tape. There was a little overlap that I trimmed off by running my finger nail down the cork to break the fibres.
     Using Gingham card I cut one large Sizzix flower and a couple of leaves, a cork daisy type flower and a plain card small flower, with a plain green leaf. Assembling the flower was easy using Stix2 PVA to fix it all together, this could be done with hot glue if any of the surfaces are being troublesome. All that remained was to stick the flower to the tin and add a small silver pearl to the flower centre.
 
     With the exception of the tin and the die all products are available from Stix2 Anything, either direct or at your local craft shop.

Materials List
 S57421 Cork Sheet  (New product)
 A4250LEMON - Gingham Card
 A4250GREEN - Gingham Card
 Tinted Card - Holly Green & Intense Yellow
 S57262 3D PVA Glue
S57091 Ultra Clear Tape 12mm


I would like to enter this gift in the following challenges:
Get Creative - Anything Goes/optional Not A Card
Make My Monday - Anything New
Crazy 4 Challenges - Include A Flower 

Saturday, 9 March 2019

Splat Cat


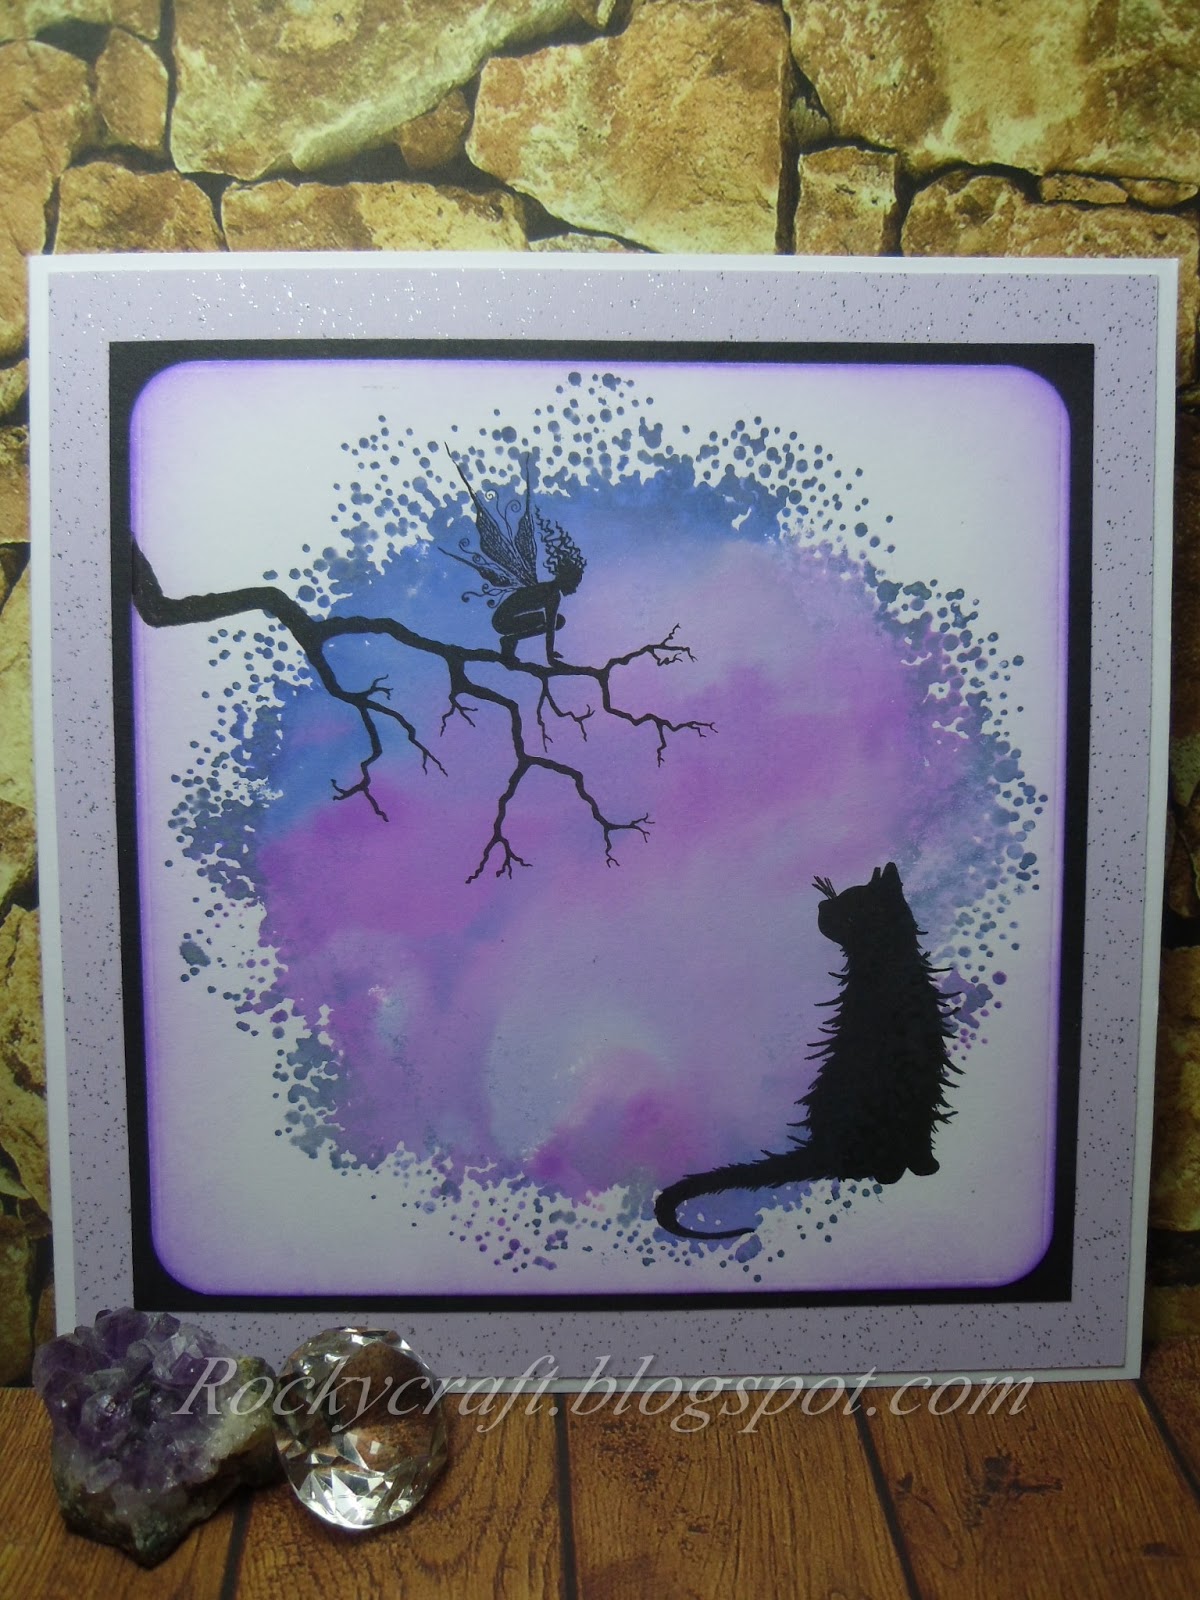
     I know, another splat card, I can't promise not to post more but I will try and show some other work too....honest. This one is for a friends special birthday, let's just say it's a bit of a Saga and today's the day, it was delivered last night so it's alright to post now.
     Using my stamp platform and my splat stamp I inked up with Distress Oxides, spritzed with water containing pearl mica powder and stamped.
     A lot of my friends are cat lovers, as am I, so it just had to be one of Lavinia's silhouette cats. As he seems to be looking up, a tree branch with a tiny fairy squatting on it completed the picture.
     A little colour added to the edge after rounding the corners knocked back the white and a black mat layer makes the silhouettes stand out.
     A gorgeous lilac Stardust card layer was added before going on to a white card blank to finish off. There is no greeting on the outside as I felt the image was enough on it's own, there is a short message inside but that's staying a secret.


 Another of our group has made the cake so I have made a small needle felted cat to go on top. By the time this is published the cake will be gone, but hopefully the cat will have survived. This little fellow is my third felting project so he's quite basic, if I progress with felting I hope to make another cat or two.


I would like to enter this card in the following challenges:
Show Us Your Pussycats - Anything Goes/St.Catricks Day
   Little Red Wagon - Animals
Dream Valley - 4 Legged Friends

Friday, 1 March 2019

Pin Painted Pebbles


     This months project for Altered Eclectics is a simple painted pebble. Have you ever tried to find a perfectly round, flat pebble before?  Easy?  Oh no it's not. You'd think on a beach piled high with thousands of pebbles you could find just one.  It's at that point you realise just how amazing nature really is, it's not just a pile of stones, they are all unique.
     So I settled on a couple of pebbles that are almost round and almost flat. As they are both quite small I had to find a way of adding paint that was also small. A pin head is ideal but difficult to hold, out came the jar of corks. If you keep something long enough it will come in handy!
     I tried to make pretty patterns on my stone but as you can see I need much more practice, it's not a easy as you think. The paint is Pebeo pearl in various colours, I have to say I prefer the pale pattern on the small stone, the dark colours are really dark.
    We all see amazing things made by others and think 'that's nice, I can do that', well yes you can but when you try it you appreciate just how much time and effort, as well as practice, they must have put into it. Maybe with my eyesight I should go for a bigger pebble!
     The larger one is now sitting in a flower pot with other unpainted pebbles surrounding a patio rose, the small one is on the bathroom windowsill.
     Whatever your project, as long as it's not a card or an ATC, you can come over and share it with us at Altered Eclectics, we would love to see you creations.


Monday, 25 February 2019

Media Plate Cat


     Having made so many cards with the gorgeous splat stamp I thought I'd try and get the same, or at least similar, effect with a media plate. I discovered two big differences, one is the obvious crisp edge of a media plate is nothing like the random edge of a splat and two is the less obvious type of acrylic that the plates are made of.
     Inks on the media plate tend to pool in small blobs unlike the splat but all is not lost. By adding a layer of Versamark on the media plate to begin with the inks bobble much less and a very similar effect to the splat can be achieved. The other thing to remember is that while the splat holds moisture well, the media plate does not, so only spritz the inks once or twice at most.
     So for this card the Versamark was applied to the media plate once placed in the stamp platform, then a layer of Distress Oxide Inks. A minimal spritz of water to get the inks moving and then the platform was shut on to the card. As previously mentioned it is sometimes best to shut the card onto the stamp so the ink doesn't run off the media plate or stamp.
     The water used on this card had some pearl mica in it so there is a subtle sparkle to the stamped media plate shape, unfortunately it doesn't show up well in this picture.
      These backgrounds are so pretty in there own right, they need very little else to go with them so silhouettes are perfect. I have several cards to make for next month which means the cats are most definitely out of the bag.
      A simple black mat layer was enough to make the stamping stand out but when I tried it on a white card blank the image panel seemed to fade, the answer was to use a Kraft card blank which keeps the image panel as the focal point. A tiny addition in the corners seemed to finish it off completely. There is no greeting on the front as I didn't want to take away from the image.


I would like to enter this card in the following challenges:
Show Us Your Pussycats -  Furrything Goes
613 Avenue Create - Anything Goes/ optional Use A Critter
Sparkles Monthly - Include An Animal


Wednesday, 13 February 2019

Twinkle, Twinkle Little Star


     I am pleased to say that I am now a member of the Design Team for Christmas At sweet Stampin', which means that at least once per month I can bring you a festive project. Please don't groan, I know it's only February, but if you start now you'll have everything sorted by December!
      I have used the splodge stamp quite a few times recently but that's because it's such a great stamp for backgrounds, especially with Distress Oxide Inks,it's from Inkylicious.
      The inks were dabbed direct from the pad across the stamp, then spritzed with water to make it all run and blend a little before being stamped on to good quality card. The card needs to be quite thick as the moisture will make it buckle a little.
      Once dry I used a white paint pen and tapped it hard while holding it over the image, this made lots of tiny white stars. The large star was stamped and embossed in silver.
      The stag is a Lavinia Stamps image stamped in Versafine black, using a stamp press really helps with silhouette images as you can go over them several times to get a perfectly solid black image.
      I haven't added a greeting to the outside of the card as I feel it doesn't need it, plus I have some friends who like to frame their cards and adding a seasonal greeting would limit when they could display it.
      Please pop over to CASS to see all the lovely DT inspiration, I'm so happy to be part of this team and looking forward to having lots of Christmas cards and decorations made before we reach December.


I would like to enter this card in the following challenges:
Christmas Crafts All Year 'Round - Carols and Songs
Winter Wonderland - Anything Christmas for Eileen
The 12 Months of Christmas - Anything Christmas, optional penguins
CraftyHazelnut's Christmas - Anything Christmas, optional cute
The Holly and Ivy - Anything Christmas