Wednesday, 19 July 2017

Male Room Fossil


     Our new challenge at The Male Room is mixed media, you can make a card or any other project as long as it's masculine mixed media. I didn't want to use a canvas so I die cut a tag from mount board for my base.
     Using some stencils I added Henry and a couple of ammonites with texture paste, Then the tag was coloured with Distress Oxide in Fossilised Amber, Broken China and Vintage Photo. I used a wet stencil to remove some ink, which doesn't show all that well, then spritzed and flicked to get more variation.
     The edges are darkened with Distress Ink in corresponding colours but Henry is coloured with Black Soot because he just didn't stand out enough, I rather like the pale lines around him as it gives him a feint glow.
     Using the Distress Inks I have stamped a pebble texture type pattern to add interest to the background, there is also a fossilised fish stamped above Henry's head.
     The word 'dig' is die cut in dark brown card and stuck on near Henry. There are also some interesting beach finds stuck to the tag, the stone may or may not be a fossil, but it looks like it could be so that's close enough for my tag.
     The label is die cut from the same mount board, inked dark brown and then covered with gold gilding wax and polished. I did have a dictionary definition but I messed it up, so had to type this one instead, it's on white card stamped with a craze pattern and covered with acetate.  All that remained was to add some twine to the top and Henry's tag was finished.
     Our challenge runs for two weeks, so hopefully that will give you enough time to come up with a masculine mixed media project to show us. Please have a look at the DT inspiration for a few ideas.


I would like to enter this tag in the following challenges:
2 Sisters On The Blog - Beach   (M)
Delicious Doodles - Beside The Sea   (M)
Eclectic Ellapu - Seaside or Summer Colours   (M)
Take A Word -Sea Creatures   (I hope fossilised ones count)  (W) 

Tuesday, 11 July 2017

Floral Shaker


     It's been some time since I made a shaker card so I thought I'd use this tangled flower stamp to make one. The flower comes with three different patterned leaves so you can build up your own design.
      I measured out a square of card and stamped the flower in each corner, turning it slightly to appear more random. Then using masking sheet I covered the flowers and stamped some leaves to fill the gaps and make a full border.  I left the centre open as this was the area I wanted to cut out.
     Using alcohol markers I coloured the leaves and flowers as well as the white edge, this edge was coloured in grey green because the white looked too bright.  The stamen dots have been foiled using the 2in1 glue pen and transfer foils.
      Around the outside of the square I scored each side 5mm and 10mm in from the edges to make fold lines. This is because I prefer to make a shaker box card so the foam cannot be seen and there is less chance of the contents escaping.
     The next step was to cover the opening with acetate, then surround the opening with foam tape to build the bead enclosure, with some extra foam in the corners of the box for support.
     I wanted to add some tiny butterfly sequins to the micro beads but couldn't find any so I used some tiny flower gems instead.
     I stamped my greeting on a piece of square card that fits just inside the fold lines. Once the beads and gems were added I took all the backing off the foam and carefully placed the card on top to seal them in.
     With the card in place I folded the edges over to form the box and stuck them down. To tidy it all up I cut a backing card to cover all the edges and added a small card stand so it will sit up just like a small picture frame would.
     The backing is white so it could be written on or you could add a small tag to the back so it can be removed and the card kept for display.
     While I have all the bits and bobs out I think I will make a few more shaker cards ready for the Christmas card stash.


Materials list - available from your  local craft shop
Stix2 Anything - S57361 2in1 Glue Pen
                            S57111 Transfer Foil
                            S57131 Project Acetate

                            S57268 Masking Sheet
                            S57075 Seed Bead Pack 
                            Double Sided Tape
                            Foam Tape

Woodware  from Creative Expressions  - JGS511 Bold Bloom Mildred

                                                                  JGS521 Imagine Verse


I would like to enter this card in the following challenges:
4 Crafty Chicks - Stamping, No Digis #358    (W)
Brown Sugar - Anything Goes #258  (W)
Crafty Calendar - Anything Goes   (M)
Lost Coast Portal - Anything Goes #38   (M)
Stamping Sensations - Anything With Flowers   (M)

Friday, 7 July 2017

MHK Designs Monthly Inspration


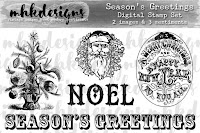
     This month we are celebrating all things seasonal so I have chosen to make a special tag for a special gift. For this tag I have used two image sets, Season's Greetings and Deck The Halls, along with a paper set Christmas Past.
     To begin I covered a tag with a paper from Christmas Past and coloured the edges, then printed the stocking from Deck The Halls and Father Christmas from Season's Greetings. The stocking I die cut tag shaped, coloured and then used embossing powder to decorate the edge. Father Christmas was die cut on a circle and mounted behind a die cut frame.
    Father Christmas was stuck flush on to the large tag but the small tag was stuck on using foam pads, making sure the holes lined up. To finish I have added ribbons, twine and a gold bell.

Season's Greetings
Deck the Halls
   

Christmas Past

     Don't forget our challenge gives you the chance to win some MHK Designs sets and you don't even have to use our images to enter!

I would like to enter this tag in the following challenges:
Merry Monday Christmas - Summer Link Up  (Aug 31)
Christmas at Sweet Stampin - Anything Christmas   (F)
Try It On Tuesday - Tags   (F)

Wednesday, 5 July 2017

Male Room Texture


     Our new challenge at The Male Room is to add some texture to a masculine project, it doesn't have to be a card but it does have to be for a man or boy.
     For this card I wanted to add several textures, so I went through my embossing folders to see what I had. The two I chose reminded me of the metal plate used on industrial walkways. Silver mirri card was perfect for this, one shiny and one satin gives a slight variation.
     A splash of colour was needed so I have used a stencil to create circuit boards. I don't have silver texture paste (yet) so I used Versamark and silver embossing powder, not quite the texture I wanted but close enough. Once embossed on white card I used Distress Ink Mowed Lawn to get the green background.
     I covered a white card blank with black card and stuck the textured squares on to it. For the greeting I used another square, this time black layered with a white coloured with DI Lawn and black again, mounted on foam pads. To finish off the centre panel a silver greeting was die cut and stuck on, simple and uncluttered, suitable for a teenager as well as an older male.
     The Male Room challenge runs for two weeks so please come and join us with your textured project.


I would like to enter this card in the following challenges:
Crafty Friends - Man or Boy  (F)
Send A Smile 4 Kids - Birthday Fun   (F)
Crafty Catz - Anything Goes/Option - Embossing  (W)


Saturday, 1 July 2017

Buzzing Around The House Of Cards


     Summer has definitely arrived at the House Of Cards with a bright and breezy photo prompt, we would like to see you use Stripes and/or Colours inspired by our photo.
     The picture made me think of bees, it was the pattern of the umbrella that struck me first so I set about finding a bee image. Now you might think that was easy.....it wasn't!  I have a few (ha,ha) stamps and dies but not one single bee that was suitable, so I resorted to the internet and it's mass of free images. A bee stamp and die are now on my wishlist. With my bee image printed and die cut I just had to make a background to show the stripes.
     What better than sun rays to provide the yellow stripes. After a search through my stencils nothing much inspired me so I went through some dies and found the prefect one. I die cut some strong card and used that as a stencil to work three shades of Distress ink through.
     The striped panel didn't look right on a white card blank so I coloured the edges yellow, then stuck the panel flat and the bee die cut on foam pads. It's a very simple card with a sweet and simple message so I have decided not to add anything else to it.
     The House Of Cards challenge runs all month so please pop over and join us, all you have to do is make a card inspired by our photo prompt.

Stripes and/or Colours 

I would like to enter this card in the following challenges:
Star Stampz - Bright Sunshine   (F)
Through The Purple Haze - Spots and/or Stripes  (F)
Brown Sugar - Anything Goes  (W)

MHK Designs July Challenge


     MHK Designs begin a new challenge for July, we have an inspirational photo for you to work with. You don't have to use an MHK Designs image to join us but we would like it if you did.
     My inspiration for this card came from the flowers in the candle stick, so I have combined two digi sets to get this image, (the candle stick is a sneak peek at a new set due for release next month). With a little play in my photo package I was able to tuck the flowers into the candle stick and print.
     Colour has been added to the image using alcohol markers, but there was a large area of white around it so the edges have been coloured with Distress Ink to match the mat layer.
     There are several lovely sentiments with this flower set but I have decided not to add one yet, I shall do that when I have chosen what the card will be used for.    
     Remember you don't have to use an MHK Designs image to join the challenge but you might end up winning some just by playing along.

Pansy Corner


MHK Designs blog

I would like to enter this card in the following challenge:
Colour Crazy Craft - Anything Goes   (F)


Tinned Desk Tidy


     I've always liked the labels on these soup tins so I wanted to see how I could reuse them, Altered Eclectics is all about mixed media and recycling so this is my DT project.
     Now that tins have a ring pull lid you don't get a jagged edge when they've been opened, it's still quite sharp so I had to be careful.
     I cut the labels off and set them aside while I washed the tins and let them dry thoroughly. Then, once dry, I used double sided tape to stick the trimmed labels back on the tins.
     I have used Rusty Patina Rustique to cover the metal, making sure to cover the edges as well as the main body of the tin. I have also dabbed a little over the edges of the labels to hide the straight lines.
     They make great brush holders to sit on my desk and I rather like the aged look they now have. I find it amusing that I have used a paint containing rust to paint a tin.
     Altered Eclectics is a month long challenge so pop over and join us with your projects, anything goes EXCEPT cards and ATC's.


I would like to enter these tins in the following challenges:
4 Crafty Chicks - Crazy Egg/Anything Goes   (W)
Not Just Cards - Anything Goes   (M)