Monday, 29 April 2013

Steampunk Cinderella

     At last here is the steampunk shoe I promised before Easter. It has taken a little longer than anticipated but it's finally finished.
    It began last year as an idea to accompany The Boot but it took ages to find the right shoe. It couldn't be any old shoe, it had to have the right look to begin with and I finally found it a couple of months ago in a charity shop. There was only one shoe so I got it for a small donation rather than throw it in the recycle bin.
     The first thing to do was chop off some of the heel and replace it with a bolt. It already had a strap and buckle which was perfect.  I had a small musical movement in my stash so I punched a hole just below the buckle for the handle to poke through and stuck the movement in the toe  of the shoe. I had to add some packing to stop it from sliding forward and to make sure the handle cleared the buckle when it was turned.
    I covered the heel with aluminium tape to help keep the bolt on and hide the join.
    I have collected all sorts of bits from charity shops and junk shops over the last year just for this project. Not everything was suitable in the end but I have used a wing nut on the back held in place by wire threaded through a button and tied off inside the shoe.  The chain of charms is part of an old necklace secured at the top by a small bull clip and at the bottom by a screw top brad through one of the holes in the strap. Also on this side is a large gem stuck in the middle of a ridged washer.
     The metal toe piece is a decorative corner from Creative Expressions bent to fit. The crochet lace has been added to the back of the strap using double sided tape and the zipper rose was made from a new zip I chopped up. I found a really good tutorial on line showing how to make zip flowers, this one is no where near as good as the tutors!!
    The inside of the shoe had to be hidden after all the things that have been attached to it so I have chopped up some polystyrene and covered it with a dark red fabric that matches the stitching all around the shoe. This is not stuck in so if anything comes undone or the music stops working it can be sorted without destroying the shoe.
    The clock is made from a charm stuck on to card and covered with a Glass Glintz dome, stuck on with Glossy Accents. The wings are from a butterfly stamp cut out and stuck on the back. It is attached to the memo pin with a jump ring.
     The invitation is cut from black card using a Spellbinder die Decorative Labels Eight. I've run around the edge with a gold acrylic paint to jazz it up a little and spelt invitation in peel off letters.
     The light bulb paperclip is from a stationary shop but I can't remember which one ...sorry, that's what happens when you spend the best part of a year collecting bits and pieces, but it is fun.
    The right side of the shoe has been dabbed with silver acrylic paint and then I've stuck on some cogs I die cut out of an old pie dish. If you run the pie dish through the Bigshot without any dies it will squash it down nicely ready for you to select what you want to cut. They have been grunged a little with brown paint.
     The cogs have been stuck on with silicone glue and some have screw top brads through them as well. There is another gem washer on the toe and the fizzy drinks can flower that you saw last month has been attached to the heel.

    I hope Cinderella likes her shoe, the Prince could have The Boot. They would make quite a couple don't you think?

    I didn't have a particular challenge in mind when I started this as I didn't know how long it would take. Imagine my delight this morning when up pops Make My Monday's new challenge of anything but a card!!!  There are also a couple of steampunk challenges on the go at the moment so lucky me.
 
    I would like to enter this shoe in the following challenges:
Try It On Tuesday - Inventors, Inventions & Steampunk
Make My Monday - Anything BUT a card
Crafty Emblies - Anything goes

Sunday, 28 April 2013

Stamp into spring

  The current challenge at Inkspirational  is a sketch which made me think of postage stamps. There is a reverse scallop edge on the sketch which is very much like a Spellbinder die I have so that's where I began.
    I have stamped my image and embossed in white on black card, the stamp is from Chocolate Baroque - Wild Meadow. I've also added some sparkle to the flowers but it doesn't really show in the photo...sorry.
    I die cut my frame using Spellbinder dies Inverted Scallop Square and Square and placed this over the top of my stamped image.
    In the corners of the black card are small clear gems to compliment the flowers.  The background was made by stamping in black on a white card blank using the smaller matching stamp in the same set.
I would like to enter this card in the following challenges:
Inkspirational - Sketch ( scallop edge, flower)

Friday, 26 April 2013

Fancy folds

    Here's another Dahlia fold card, it's like T-Bag folding with Tetley rather than Typhoo!! Haven't come up with any ideas for PG Tips yet though!!!!
    If you would like to know why all the folding then please come back in about ten days time for a full run through and a link to a fab tutorial.
    This card was made using some oriental papers I got at a show a few months ago, it's not double sided but I think it's OK as it's all about blue and white anyway.
    I have made my flower and mounted it on white card that has the corners nipped with a fancy punch, then silver thread has been laced around the edge. I have used the same paper as a backing layer on to a white card.
    There are silver peel off decorations in the corners and a silver flower in the centre. It's plain and simple, suitable for any occasion.
I would like to enter this card in the following challenges:
Make My Monday - Fancy Folds
Crafty Emblies - Anything goes

Wednesday, 24 April 2013

Swinging Santa

     Swinging Santa is this weeks Christmas card inspired by 52 Christmas Card Throwdown's Father Christmas / Santa, CraftyHazelnut's Christmas Challenge Red & Green and Jingle Belles Recycle.
     I began by making a red and green bauble using a great technique that will feature here again soon called Dahlia folding and some old Incire paper I had in my stash, red one side and green the other. The outer edge of the bauble has been daubed with gold paint. I had a Santa cut out that I rescued from an old card and kept in the big box of 'useful' bits, so I stuck him on the front.
     The back of the bauble has a large white scalloped disc stuck on it so that a personal greeting can be written later and it has a small piece of green ribbon so it can be hung on the tree. It is attached to the card with some low tack tape so the recipient can take it off and hang it up.
     The backing paper is layered on to gold and stuck on a deckle edge card with a small star added in each corner.
   
 I would like to enter the following challenges:
52 Christmas Card Throwdown - Father Christmas
Jingle Belles - Recycle something

Tuesday, 23 April 2013

St.Georges Day


Happy St.Georges Day!  
Saint George is the patron saint of England but he was actually a Greek. 
St.George became an officer in the Roman army but he was executed on April 23rd 303 for refusing to renounce his Christian faith. He was Canonized in 494 by Pope Gelasius 1.
Saint Georges flag was adopted by England in 1190 for the ships of the Crusades.
The Synod of Oxford in 1222 declared St.Georges Day a feast day in England.
In 1606 St.Georges Cross and St.Andrews Cross were joined together to make the Union Flag.

If you would like to know how this card was made all the details are over on the J&C Creations blog.
While you're there maybe you would like to take a look at our challenge for this month which is 'Nurturing'.

Have a Happy Crafting St.Georges Day.

Monday, 22 April 2013

Inkspirational CASE


    This weeks challenge at Inkspirational is a CASE. It's a beautiful monochrome card which made me think of a silhouette die I was lucky enough to win recently.
    I began by embossing the background with a lattice embossing folder and mounting this on a piece of card that I coloured black with Distress Ink. I then used some black ribbon bought from a local supermarket after Christmas which has 'Especially For You' written on it on top of white card then black.
    The silhouette die was placed on black card in the middle of an oval die and then cut out, the back of the oval has been covered with white card so the lady appears white rather than black. This was stuck on with tape in the middle and thin foam pads top and bottom to keep it level as it sits over the ribbon band.  
    I chose to make an easel card from this so I used the black lady to hold up the easel by mounting her on foam pads. I have not used any greeting other than on the ribbon so this card can be used for several different occasions. The base needed a little something in the corners so I've added some silver peel offs coloured black with a Promarker.
    I wanted to decorate the envelope but a stuck on silhouette may get caught up in the post and damaged so I used the die to cut a lady from foam sheet. This makes a great silhouette stamp from any die, on this occasion it was just the effect I wanted. Once you have your foam shape you can stick it on to an acrylic block with a glue stick and use it as a stamp, being foam it doesn't soak up much ink but still gives a good image.
    The final touch was to go over the lattice background and put pearl dots at each junction using Cosmic Shimmer PVA pearl glue.
  

Friday, 19 April 2013

Spring wings

     With the arrival of warmer weather comes the expectation of spring. I've seen bumble bees in the garden and lots of the flowers are growing now so hopefully it's finally here.
    This week at Make My Monday it's a colour challenge of blues and browns so that's where I started. Distress Inks Salty Ocean and Brushed Corduroy were used to blend a background, then I used Chocolate Baroque stamps Texture Fragments and a great technique featured at Technique Time Tuesday called Water Stamping, you can see a tutorial here. I also used the blue ink to stamp some colour at the bottom and Archival Coffee for the twigs at the top.
    Country View Crafts are featuring Butterflies this challenge and Creative Moments topic is Spring.  The butterflies are stamped with a Kaisercraft set in Archival Coffee and embossed in clear. They are painted with Cosmic Shimmer Drawing Inks which gives them a pearly look. I've found that when using Cosmic Shimmer paints it's best to emboss your image, it helps keep the colour contained in the image.
    The small butterfly has his antenae drawn on with a brown pen but the large one has flower stamens coloured with a peel off marker that is supposed to be brown, it looks a little reddish here though...sorry. Each butterfly is fixed by it's body only allowing the wings to be shaped slightly.
    The image is matted on chocolate pearl card and then blue pearl paper before going on to a white card blank. I haven't added a sentiment to the card so it can be used for any occasion.
I would like to enter this card in the following challenges:
Make My Monday - Blues and Browns
Country View Crafts - Butterflies
Crafty Emblies - Anything goes

Wednesday, 17 April 2013

Two Blue

    This week I've opted for something Clean And Simple for my Christmas card. 52 Christmas Card Throwdown have a great colour challenge of Navy, Light Blue and White and Winter Wonderland don't want to see red or green.
    The background is made using Distress Ink Faded Jeans, blending foam and a piece of torn paper. Begin by inking the sky so it's quite dark using the torn paper as a mask, move the paper down and ink again but not so dark. Repeat this a few times to build up your snowy mountain scene, leaving the bottom snowy white.
    Before the ink has dried spritz with water and dab off the drops, this will lift some of the ink and give the snowy effect. Distress Inks are perfect for this technique but you do need to try out different types of card as they do not all behave the same way, once you've found one that works keep a small piece and write what it is and where it came from so when you run out you don't have to start all over again.
    The deer are die cut with a Sizzix die, both deer had antlers but I cut them off the light blue one to get a doe. They are cut from glitter paper, the light blue one is stuck straight on to the picture but the dark blue one is mounted on foam pads. The picture is mounted on a small layer of silver mirri card and then on to a dark blue pearl card.
I would like to enter this card in the following challenges:
52 Christmas Card Throwdown - Navy, Light Blue & White
Winter Wonderland - No Red or Green

Sunday, 14 April 2013

Ink-spring-ational blossom

     This weeks challenge over at Inkspirational is a photo of some beautiful pink blossom. I'm not a pink person but that blossom is just SO pretty I had to try and make something nice and pink.
    My first thought was to use this cherry blossom stamp from Lakeland, bought many years ago, and some flowersoft that's been lurking in my cupboard for ages.
    The blossom is stamped in Archival Ink Coffee and clear embossed. I then coloured in all the blossom with a Sakura Stardust pink pen so it would still look pink under the flowersoft.
    After sprinkling on the flowersoft and while the glue was still wet I sprinkled some fine pink glitter to give a little sparkle. The picture is matted on pale pink pearl card and then cerise pink pearl card before being mounted on what was a plain white card blank. The card blank has been stamped with a flower stamp and Perfect Medium and then chalked with pink shimmer chalk.
    The little knot is made with Mizuhiki cord in shades of pink. This cord is amazing to work with, it's made from a type of paper that is twisted and starched to make it strong, it's also archive safe. This knot is called a Plum Flower Knot and symbolises beauty, nobility and courage.
    The oriental style writing on the side is stamped in Brilliance Pearlised Orchid using a stamp I've had so long I can't remember where it came from but it is a firm favourite, I just hope it says something nice!

Friday, 12 April 2013

Cosmic clingfilm

    A strange title you may think but that just about describes the way I made my background for Make My Monday's challenge - create a background.
    I began with a white piece of thick card which I put in the bottom of a shallow box and then sprayed with Cosmic Shimmer Mica Misters in Antique Rose and Patina. I use a shallow box as the spray can escape a little and I've already been in trouble for redecorating the kitchen worktops before!! My usual spray booth is the greenhouse but it was wet and cold today so I used lots of newspaper under my box just in case.
     When the spray was still very wet I put scrunched up clingfilm (food wrap) on top and left it there until dry. This makes a great pattern as the mica gathers along all the fold lines, you can't hurry it up with a heatgun though, you just have to wait!
    With such a patterned background I chose to use silhouette type stamps from Chocolate Baroque's Wild Meadow embossed in dark blue, black was to harsh.
    The mica pattern shines well when the card is at an angle but face on you can see the sprays paint colours clearly. This technique works very well on the paler colours as the mica seems to show a little more than on dark colours.  
    I have added a dark blue butterfly cut with a Joy Craft die and while still in the die I have used Perfect Medium to ink up the wings. Once removed from the die I have added some silver mica powder which is sealed with hairspray.
    The card blank has been coloured with a pale green chalk before adding the picture which is matted with dark blue.
    I have not put a greeting on my card as I felt it didn't need one on the front, I shall add that inside when I've decided what to use it for.
    If you have any brand mica sprays have a go at this, it's fun because the outcome is always different. Just make sure you have a wet surface to lay your clingfilm on to and don't forget to scrunch it up, layed flat it will not do much atall.

Wednesday, 10 April 2013

Lots of spots

     My starting point this week was a sketch from 52 Christmas Card Throwdown followed by 'lots of spots' from Winter Wonderland and CraftyHazelnut's Christmas Challenge is to use the word 'Christmas' on the front of your card.
    I began by embossing a large DL card blank with a snowfall folder, my first spots. Then I found a spotty paper that has trees with spots on too. There is a small scalloped edge at the bottom which I managed to do with my trimmer, I've never used that blade before, it's quite nice.
 
   The green paper has 'Merry Christmas' all over it so I cut a piece out and mounted it on silver mirri card. The top 'Christmas' has had Glossy Accents added to it to bring it out a little. There are three brads added to the card to finish it off.
   My mojo is on a go slow this week but I'm hoping it will be back in full force next week!
I would like to enter the following challenges:
CraftyHazelnut's Christmas Challenge - Use 'Christmas' on the front
Winter Wonderland - Lots of Spots


Monday, 8 April 2013

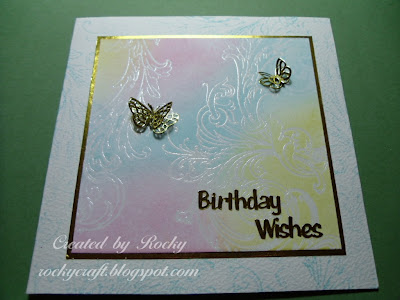
Pastel Birthday

   This card is a little out of my colour comfort zone so it was a challenge for me. Inkspirational are looking for pastel pink, blue and yellow in their card this week so I had to try it and this is the result.
    I began with a white piece of card and stamped a swirl on it with Perfect Medium and then clear embossed it. This was to keep my swirls white when I coloured the background with Distress Inks in Tumbled Glass, Scattered Straw and Spun Sugar. I have also stamped the swirl around the edge of my card blank using Tumbled Glass.
    The background is matted with a small edge of gold to match the butterflies. As I had used embossing already I didn't want to emboss again and risk overheating my swirls so I used peel offs. If you put three identical butterflies together by folding them in half and matching up the wings you can get the centre one to stand out while using the other base halves to attach to the card. They will flatten in the post but they do spring up a little again once out of the envelope.

Friday, 5 April 2013

The things we do for Art

     Try It On Tuesday is a challenge site looking for something recycled, so all in the name of art I have forced myself to eat a small box of chocolates ( given for Mother's Day) to be able to take part.....now that's dedication!!!!
   Country View Crafts challenge this month is Butterflies and Creative Moments challenge is something with wings so that gave me the direction for my photo frame and also the subject of my photo.
    I have cut and scored the lid of my box so that I can fold the centre in to form the photo recess. I then cut a piece of card the size of my photo and used this to make sure I got the recess right before gluing.
   The whole box was given a light coat of white acrylic paint to try and dull down the swirls and logo before covering it with pages from an old dictionary. I used Eco Green's Matte Medium to stick all the pages on, it's an eco friendly, non toxic medium that sticks really well with no bubbles or wrinkles.
    I decided that as I was going to use a colour photo I would leave the frame black and white. I then wanted to keep my embellishments neutral too, but they didn't really show up very well. That meant I had to colour them a little without over doing it. The pages from a dictionary are also rather thin so I had to put them onto thin card to be able to make the flowers and butterflies.

    Each flower is made from four shapes die cut with Sizzix Tattered Florals. This type of flower can be made with any six petal flower shape. I have coloured each shape with Distress Ink Black Soot both front and back, then stamped using a swirl and gold embossing powder. All decoration was done before assembling the flowers.
    The butterflies are decorated in the same way but only on the top layer. The one underneath is not embossed. To make the antenna I have used some flower stamens and coloured them black with a Promarker. They are also a Sizzix die from the Movers and Shapers range.
    I have only used two flowers and two butterflies as I want the focal point to be the photograph. This is one of my favourite pictures and was taken in the back garden a couple of years ago.
    I have asked my friends to keep any chocolate boxes they may have so I can make some more frames but I don't mind if I have to eat some myself too, after all 'it's all in the name of art!'

Tuesday, 2 April 2013

Star of The East.....

 ...oh Bethlehem star guiding us on to heaven afar.
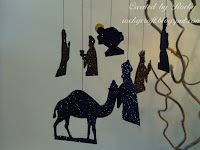
   This week at 52 Christmas Card Throwdown it's anything BUT a card, tag or ATC. Winter Wonderland are looking for stars and Jingle Belles would like to see lots of glitter, shimmer and gems. CraftyHazelnut's Christmas Challenge is a Christmas song or carol but I'm not sure if this mobile will qualify.
   I have a template for this star so I made up two of them in a really gorgeous pearl gold thick paper. The centre of the stars are recessed so I have added clear glitter to them to make them stand out.
   The nativity scene hanging from the star are all cut out in black glitter card using a Sizzix longplate. I had to remember to cut out each character and it's mirror so I could stick them together on the black thread, baby Jesus has a small gold halo added.
   Each character has been added to the star using black cotton thread and a large needle. The thread is fixed inside each star with tape to hold it in place. Not all of the figures hang level, it's very difficult to achieve this so I didn't try!
   Once the figures were stuck together I ran round the edges with a black Promarker to cover any small white marks from the card core that were showing. After all the figures were hung in place I stuck both stars together and hung the whole thing from a gold thread on the top point.
   I would like to enter this mobile in the following challenges:
52 Christmas Card Throwdown - Anything BUT a card, tag, ATC.
Winter Wonderland - Christmas Star
Jingle Belles - Bling

Water Stamping at Technique Time Tuesday

    This month at Technique Time Tuesday we are featuring 'Water Stamping'.  There is a tutorial on the blog to show you how to do this technique. Please pop over and see what the design team has come up with and join us with your creations.
    This card was made using Distress Inks in three shades of blue, the ink has been blended onto the card with cut and dry foam. Once the card was covered with ink I then used a rubber stamp and water to stamp onto the ink. Where the wet stamp touched the ink it has 'bleached out' the ink leaving a pale image.
    One tip I have for you on this technique is to try a test on a small piece of card first as different types of card produce different effects. Some cards are more absorbent than others so blending will be different and so will 'water stamping'. Please try different types of card until you find one that does what you want, then keep a small piece with the brand name and where you got it from written on it so when you run out you know where to get more!
 
   This card also has a sheen to it because while it was still damp I went over it with a pearl mica powder. The powder has only stuck to the damp background areas and not the image. Although the ink was damp and should hold the mica quite well I have gone over it with a light spray of fixative (cheap hairspray) just incase.
   As the swirls came out quite well I chose to decorate with just a ribbon and a small sentiment so as not to cover up my background too much.
   I hope this has encouraged you to come over to Technique Time Tuesday and show us what you've made.