Showing posts with label holly. Show all posts

Saturday, 7 September 2019

Golden Bauble


     This card was made to showcase the new holly stamp and die by John Next door, when teamed up with the ivy corner it makes a great set of foliage.
     To begin with I cut and coloured the ivy, using several colours of ink makes it look more natural.
     The holly was stamped in dark green ink on green and then coloured with another shade of green ink to give it depth. John's method for lining up the die really does work, once cut out all  the holly was just right.
   
       I snipped between the leaves on the closer pair and on one sprig cut off the single leaf, once arranged with other foliage you can't tell anything has been changed.
      I was given one of John's baubles already cut by a friend at our little craft group. I matted the bauble on an embossed white panel, then matted that on old gold and a white card blank.
     Once the bauble was stuck on it was easy to lay up the foliage and decide where to glue it. The addition of a die cut greeting on the bauble and some red gems for berries finished it off nicely.


Materials List
JND135 Holly Die
JND136 Shaded Holly Stamp
JND126 Round Bauble Die
JND124 Ivy Corner Die


I would like to enter this card in the following challenges:
ABC Christmas - S-Sparkle & T-Texture
Sparkles Christmas - Winter Wishes
CraftyHazelnut's Christmas - Anything Christmas/optional patterned paper
Crimbo Crackers - Anything Christmas

Wednesday, 12 June 2019

Purple Christmas


     This is for the new challenge at Christmas At Sweet Stampin', to use a non traditional colour palette.
     I don't have any assembly pictures for this one, it's just the same gorgeous holly wreath die cut three times, a very simple but effective card.
     The holly was cut in lilac, purple and silver holographic card, i did lay it all up a few times before settling on the lilac at the bottom, then the purple, finally topped off with the silver. To make the purple pop I used the same card for the mat layer.
     A simple greeting in the centre looked alright, but looked much better when raised on foam pads. I don't have a stamp or die small enough (yet) so I used a peel off coloured with a purple alcohol pen.
     This would look effective in almost any colour combination but non traditional colours are what we are looking for at Christmas At Sweet Stampin', so please pop over and join us with your festive makes.


I would like to enter this card in the following challenges:
Christmas Crafts All Year Round - Garland, Leaves, Flowers
CraftyHazelnut's Christmas - Anything Christmas
The Holly and Ivy - Anything Christmas
Crimbo Crackers - Anything Christmas

Thursday, 1 September 2016

Holly Jolly House of Cards


     House Of Cards have a photo prompt this month with a robin in it so that gave me the ideal opportunity to use one of Stampendous new stamp and die sets called Winter Tweets.

      In with the stamp set there is also a stencil of a tree, I have masked off the leaves as I wanted a winter tree. After fixing the stencil to watercolour card I used embossing paste, then sprinkled it with copper embossing powder and heated it.
     The heat makes the powder melt and the paste bubble up which gives the tree a look a little more like a real tree with knobbly bark.
      Once the tree was cool I used Distress Ink Stormy Sky to colour the card, then used the spritz and flick technique to get a more blotchy effect.
I didn't do this first as the paste would have made the ink react and the powder may have stuck to it as well as sticking to the paste.
     The next step was to sprinkle chunky white embossing powder over the whole card and gently heat to melt it, I found a low heat was fine for this and there was less chance of upsetting the tree trunk paste again.
      The holly leaves and robin were stamped on watercolour card in brown ink and clear embossed. Once dry they were both die cut with the stamp sets matching dies.
     To colour both the leaves and the robin I have used Koi watercolour pens and a water brush, they blend beautifully on the right card stock. If the cutting is a little off perfect then just colour the edges to match the rest and they become much less noticeable.
     Once dry both the leaves and the robin have been worked with a ball tool to get some dimension into them. The robin has double depth foam pads underneath him and the leaves have single depth.
     Matted on to a small brown layer and then on to a green card blank the card is almost ready. The addition of a Christmas greeting taken from another stamp set and embossed in copper to match the tree, then die cut and coloured before mounting on thin foam pads completes the card.
     The new challenge at House Of Cards runs for a month, we accept any type of card as long as it follows our theme which is shown bellow, please come and join us with your cards.


Add a bird and/or colours

 Materials list - available from your local craft shop
Woodware Craft Collection - CRS5092 Winter Tweets stamps / DCS5092 Winter Tweets dies
                                          FRS338 Little Elf (greeting)
                                          DWDEPL Dreamweaver Regular Embossing Paste
                                          EP104 Penny Copper Embossing Powder
                                          DP020 Detail Clear Embossing Powder
                                          FREG021 Chunky White Embossing Powder
                                          XBR-48 Koi Brush Pens

                                          
Stix2 Anything - S57049 1mm Craft Foam Pads
                        S57050 2mm Craft Foam Pads
                        FPAL2732925 9mm Double Sided Tape


I would like to enter this card in the following challenges:
Deep Ocean Challenges - Things With Wings
Christmas Card Challenges - Anything Goes


Wednesday, 17 July 2013

Traditional Christmas

     There's something a little odd about making Christmas Cards when it's 30 degrees outside, at least I didn't need my heatgun for this one!
    Traditional colours are the challenge at 52 Christmas Card Throwdown this week so that's where I started. Dark Brown, Cream, Dark Green and Deep Red are the only colours to be used, a little gold is allowed which is good as I needed a little shine lift.
    The stamp image is from Stampendous - Snowy Postcard, stamped on cream watercolour paper in Archival Coffee and edged with Distress Ink Gathered Twigs.
    The holly is die cut using a Spellbinder die - Little Leaf Sets. I have edged the leaves with a tiny touch of gold, they looked so flat without it, the berries are tiny red gems. The image is mounted on deep red paper, then cream before being stuck to a dark green paper that has been embossed with holly leaves down the left side.
    It looked alright but it needed a lift, so I have die cut the sentiment from satin gold card using a Britannia die and mounted it on thin foam pads.
I would like to enter this card in the following challenges:
Holly Jolly Christmas Challenge - Christmas Outdoors

Friday, 5 July 2013

Introducing Holly

     This is Holly, my little winter fairy. Holly began life as an idea some three weeks ago when I found a pair of Mother Of Pearl earrings that looked like wings.
    I already had the little figure, it was originally a jewellery stand with curly wire stuck in it's head and arms (ouch!) and wearing a rather tacky fabric dress. Once I got it home from the charity shop I striped it bare and used Stazon cleaner to remove the pink paint that covered the upper body.
    I started with the bodice, a piece of red velvet ribbon found at a boot sale, stuck on with Cosmic Shimmer PVA dries clear. Then I coloured the dress area with a gold marker pen from Steadtler, it looks brassy when wet but dries darker.
    All the holly leaves are die cut using my new Spellbinder die set - Little Leaf Sets. I have cut them from dark green thick paper (tried card but it was too stiff) that has been given a gold shimmer with a Cosmic Shimmer mister - Antique Green. There are three different sizes of leaf in the set and six different types of leaf to choose from. I have used the gold marker pen to edge each leaf to give a variegated effect.
    Each leaf has been stuck on individually with CS PVA, I was pleasantly surprised to find this glue really worked well as the figure is made from some type of dense plastic.
    It took a little while to build up the dress with the leaves. I have tried to keep the flow of the fabric within the leaves, this is why paper worked better than card as some of them are shaped to fit.
    Once all the leaves were stuck on I thought she should really have some berries on her dress, so there are several small red gems stuck at random over the skirt. There is one larger gem to the right of her waist at the point where the leaves spread out.
     Her wings are stuck on with Ultra Sticky Red Tape, this tape is amazing, it holds most things including metal. There are two tiny green gems stuck over the holes where the earring fixings were. She may look better with a smaller set of wings stuck below these ones but as yet I haven't found any that look right, so for now she will have one set.
    Well I hope you like her, she will have pride of place at Christmas on my mantle piece. If I find any more of these figures in the charity shops she may have a friend by December.
    I would like to enter Holly in the following challenges:
 Make My Monday - Christmas in July
Holly Jolly Christmas Challenge - Use Something New
CraftyHazelnut's Christmas Challenge - All Wrapped Up (thanks Hazel)

Friday, 28 June 2013

Pearl Berries

     This weeks Christmas card marks the half way point, only six months to go! Enough I hear you shout!
    This stamp is from Chocolate Baroque. I've embossed in gold on white card, twice, so I can cut out the holly leaves on the second copy. The leaves are coloured in with watercolour pencils, including the backs of the cut leaves and shaped a little. The berries are large red pearls that my Mum gave me, I didn't think they'd be much use to me but I have found them very handy indeed, thanks Mum.
    Before sticking on the berries and leaves with a strong PVA glue, I die cut the image using a Spellbinder die - Labels Seventeen, then I coloured the edges with Distress Ink Bundled Sage while the die was still in place so I got that little white border.
 
     The image is mounted on dark green paper then on gold embossed card. The card has little holly leaves all over it but unfortunately that doesn't show up much in the picture.
    The greeting is a die cut sentiment from a set that I've had for ages, I think it was from Lakeland so that tells you how old they are!
    I would like to enter this in the following challenges:
52 Christmas Card Throwdown - Sequins and/or pearls

Wednesday, 15 February 2012

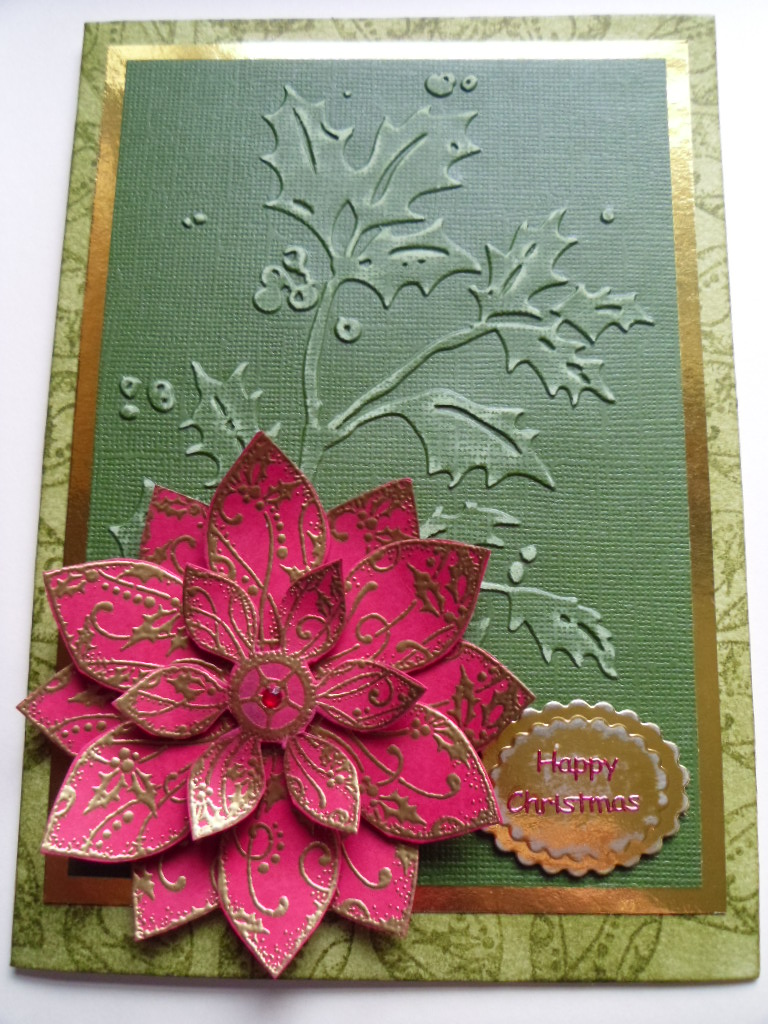
Steampunk poinsettia


For this weeks challenge at 52CCT it's colours, red, green and gold only. As these are traditional christmas colours that I love this one was a pleasure to make.
The poinsettia is a stamp from the 'Steampunk Christmas' set by Chocolate Baroque. I stamped it on red card and embossed it in Cosmic Shimmer Bright Gold, then I cut out two large flowers and one small. These are layered using foam pads to give a little height and the petals have been curled slightly. The addition of a small gem in the middle finished off the flower.
The background is a piece of Coredinations card embossed using the Cuttlebug 'Holly' embossing folder and then sanded using an emery board. I have always loved dry embossing and spent many hours with a light box and a stencil (still do sometimes!) but these embossing folders give such a crisp image in a fraction of the time.
I used a white card blank but chose to colour it green with
Distress Ink 'Forest Moss' which looked OK but it still
needed a little something, so I used the poinsettia stamp and the same distress ink to randomly decorate the edge of the card.

The holly background is matted onto a piece of gold mirri card and then mounted on the green card. I used another small piece of the gold mirri card to cut a scalloped oval with a Spellbinder die. The oval has also been sanded to distress it a little before adding the greeting, which is a gold peeloff coloured with a red permanent marker pen. This was then mounted onto the card on a foam pad.

I do hope we'll get these colours come up again, I've really enjoyed this one.