Saturday, 20 February 2021

Mica Magic Metallic


     John has been on TV again this week with some new products and some old ones, this tag is made with the Mica Magic Metallic set which has been around for a while but is a firm favourite.
     I have always loved the effects you can get with mica, I have a stash of powders from years ago and really enjoyed stamping and colouring with them. The beauty of the Mica Magic is it is not a powder, it's a sort of creamy consistency but not quite like a gilding wax, very easy to apply and it doesn't smell.
     It's definitely magic to be able to turn a piece of embossed black card into something that looks like a sheet of aged metal. On this project the mica was applied using my fingers, left to 'set' for a short while....long enough to make a cup of tea....and then gently buffed with a cotton cloth.
     It's all very well making these gorgeous pieces of card but what do you do with them? I have seen it used to cover journals, boxes or just cards, but I chose to cover a mount board tag. It was glued down with some strong PVA, left to dry and then trimmed to fit. The edges of the tag were showing white so I coloured them black with Distress Ink.
     I die cut two banners and cut the greeting into them, then stuck small pieces of silver mirri card behind the words to make them shine. I also die cut a small shape in mirri card and mounted it on a black disc, using the banners and the disc I made a rosette.
     The rosette was stuck down on black foam so the disc sits proud of the banners, which were stuck down with redline tape. A couple of lengths of ribbon to finish off the tag and now I have something to either add to a card or to hang around the neck of a wine bottle when gifting it.
      I'm often asked about ideas for making masculine cards, I would have to say that this type of project would be ideal for both genders, just vary the embossed image and with Mica Magic available in many colours the choices are endless.


I would like to enter this tag in the following challenges:
Little Red Wagon - #589 Tag, You're It
Watercooler Wednesday - WWC309 - Masculine    Rocker
The Male Room - #147 Steampunk
Fab 'n' Funky - #511 Birthday

Monday, 15 February 2021

Mica Magic on MDF


     This weekends project was to use Mica Magic from Craft Artist, it's mica in a soft cake form, not a powder, a bit like eye shadow but definitely NOT for eyes.
     John has said this product was developed for colouring flower foam but has turned out to be very useful on other materials aswell. 
     With this in mind I die cut a foam Cornflower and then coloured it with the Mica Magic Basic Brights set. I coloured front and back, then pulled and twisted the petals to give them some shape.
      The best thing for sticking the foam together seems to be Glue Glaze, again from Craft Artist, although I'm sure there are other glues that will work, it just needs to be thick and strong.

     Once the flower was assembled I moved on to an MDF tag from Stix2. I have seen Mica Magic used on MDF with no need for a primer, I wanted to see if this was easy and what it would look like.
     Not wishing to stick much to the tag once the mica was applied I chose to glue down some spare die cuts I had lying in my stash. These were bits left over from previous projects so they were a mix of colours, this would show me just what the micas would look like over a coloured base. All the bits were cut from card so reasonably sturdy but not too thick.

     Once all the bits were dry I began to apply the Mica Magic with my finger, you can apply it with a dauber or a sponge if you wish. I started with a mix of greens at the bottom and blended it into blues with a touch of  mauve at the top.
     The coverage was very good, it blended very well and took to the die cuts well. It does make a difference what colour the substrate is, dark colours really show of the mica, while paler colours give the mica a more muted look.
     There is a halo around the die cuts were the mica didn't reach the very edge but I quite like this look. If you don't want that then maybe the die cuts should be stuck on after colouring the background.
     The corner die cut was black which mixed with the brown MDF underneath and the bronze mica gives the look of aged metal.
     Once all the mica had been applied I gave the whole tag a buff with a cotton cloth to make it shine and to remove any stray bits, this is when you find out if you stuck all the die cuts down well!
     The butterfly looked a little dull so I decided to try some Pebeo wax, it worked well, I wasn't sure if the two mediums would mix well but they get along very nicely. The wax is a great medium but only available in a limited colour pallet, the Mica Magic comes in a wide range of colours so now it's possible to get that great shine in greens, blues, purples and more.
     The last thing to do after buffing the tag was to add the flower, this was stuck on with Glue Glaze. I like just the one flower, less is more on this tag as it's meant to show off the Mica Magic and it's great coverage of the MDF. A small length of seam binding coloured with inks added the finishing touch.

     Conclusions on Mica Magic - great coverage on MDF, no primer needed. Easy to apply.  An amazing shine once buffed.  The ability to colour almost anything porous - so does not work on glass, plastic or metal.

Materials used 
Craft Artist Mica Magic - Basic Brights
Craft Artist Glue Glaze
Flower Foam - cream
Cornflower Die - retired
S57447 MDF Tag x4 - Stix2
S57262 - 3D PVA glue


I would like to enter this tag in the following challenges:
Creative Fingers - #201 Anything Goes
C.R.A.F.T. - #586 Not A Card
Creative Moments - #208 Anything Goes
Crafty Creations - #418 Anything Goes

Friday, 12 February 2021

Well and Truly Cornered


     A corner die doesn't just have to be for corners, you can make some great patterns with them., just by careful colour choice you can make them masculine.
     Working on a white square of card and using a pencil I marked faintly the centre lines. The Mayfield corner dies were cut out four times in blue card, this gave me 16 corners to play with, I also kept the waste incase it would be useful.
      Starting in the centre I glued down the corners, working towards the outside, checking the measurements along the way to keep it symmetrical.
      Once all corners were stuck down I used a few bits of waste to fill in, then gently rubbed out the pencil lines.
      The centre pattern panel was them mounted on a blue mat and stuck on to a white card blank. The words were added using the small stencils in the Shutter Card set, sticking the 'waste' from the stencils on to the card instead of cutting them through the white panel.

      Using a large DL card blank this one was made by sticking the corners directly on to the card.
      Again the card was marked out with faint pencil lines, this time I lay the die cuts on the card before gluing until I liked how it looked.
      The letters are cut in silver mirri and the corners were cut in two shades of blue. I tried to make sure the spacing was even, it just takes a little time and frequent measuring but I got there in the end.
      Two masculine cards using a corner die and a few extras, with no mention of sport, cars or booze!


I would like to enter these cards in the following challenges:
Cardz 4 Guyz - #264 CAS
Seize The Birthday - Birthday / option Hearts  (hearts at point of corner)
Simon Says Stamp Wednesday - A Slimline Card
Watercooler Wednesday - #308 Occasions

Wednesday, 10 February 2021

Blue and Silver Swinging Snowman


     This one is a mix of old and not so old items, the die to cut the swing card is new to me and the lovely snowman came from one of last years Christmas cards. It's blue and silver to comply with the new challenge we have at Christmas Craft Creations.
     I cut the base card in white using the swing card die, it came with solid panel dies as well so I cut them in silver pearl paper.
     The blue snowflake pattern was a separate die set which I was lucky enough to get at the same time I bought the swing card set. The snowman was cut from an old card and as luck would have it he had a dark blue glitter band all the way around him.
      The hardest thing was making sure I stuck the snowman on the correct side of the circle. A nice easy card to make, especially when you get to recycle parts of old commercial cards, gentle on the pocket too. When folded up it's a 5.75inch square so standard letter post.
      Please come and join us at Christmas Craft Creations with your blue and silver projects, we'd love to see what you've made.


I would like to enter this card in the following challenges:
Winter Wonderland - Anything Christmas
Sparkles Christmas - Snowman     Top 3
The 12 Months of Christmas - #74 Card For A Child
CraftyHazelnut's Christmas - #528 Anything Christmas/Cute
The Holly and Ivy - #87 Anything Christmas
Merry Little Christmas - #31 Anything Christmas     Top pick
Fezziwigs Festive Frolics - #30 Take Your Pick - Shaped card/Snowflakes/Glitter

Monday, 8 February 2021

Izink Smooshed Heart


     Another technique using the Izink liquid pigment inks, I have used this before at Keep On Crafting, when the inks came in a dropper bottle. It's my favourite way to use them because they work so well on non porous surfaces.
     Using two pieces of heat resistant acetate I dropped inks on to one of them, then I put the other piece on top of the inks and smooshed them together, it's like making the ink blot pictures many of us made at school.
     If you work quickly you can smoosh the inks around to cover the whole surface, some may come out on your craft mat so mop it up with a spare piece of card, you can use this for another project.
     Once smooshed pull the two pieces of acetate apart, you will get some interesting patterns, every time you do this it comes out with a different look. Set them aside to dry, which doesn't take very long hence the need to work quickly when smooshing and separating.
    
     These inks can also be added to water to make a co-ordinating spray for your project, even the pearl ones work well, leaving a faint sheen to the droplets.
     The spray pattern will depend on the nozzle of your bottle and the height from which you spray. Mop up any overspray from your mat with the same piece of card, building up a rather nice background.....waste nothing.
     All these mop up pieces make really pretty die cut flowers and you make sure you get full value from your inks.
     For a mat layer I tried various shades of pink pen, card and ink pad, finally settling on a Distress Oxide. I cut the mat and coloured around the edge, no need to colour the middle as it will never be seen.
     What is the best way to glue acetate without it showing?...... For this I used a sheet of DS sticky film, laying the acetate, ink side down, onto the sheet slowly rolling it on to avoid air bubbles, then die cut the heart shape. With sticky all over it has an even cover and nothing appears to stand out.
     The heart was then stamped and embossed in gold. I did try this on an offcut of the acetate to see if the sticky was affected by the heat, it wasn't.
     All that remained was to assemble the layers and add the heart to the centre, again rolling the acetate shape onto the card to avoid air bubbles.


Materials used 
I-Zink Pigment Ink - Orchid (pearlescent)
S57107 - A4 Double Sided Adhesive Tape Sheet - Stix2
S57262 - 3D PVA glue
Distress Oxide Inkpad, White card, White card blank 6x6, heart shaped die (3.5")
Versamark Ink, Antistatic pad, Gold embossing Powder


I would like to enter this card in the following challenges:
Allsorts - Love Is....
Just Us Girls - #570 Valentine

Friday, 5 February 2021

Dipped Wire Flowers


     It started as a comparison between inks, paints and varnish to colour PVA dipped wire flowers, but what do you do with them once you've made them?.....  I made a card. I enjoy the challenge of the experiment but there should be an end use for the ones that work and the ones that don't.....recycle.
     I remember making these with my Mum when I was younger, I think the dipping medium we used was called something like 'Fantasy Film'. This method uses Stix2 Anything 3D PVA glue, it's a good strong glue with the consistency of double cream. I made a set of five small loops with jewellery wire, I'm sorry I don't know what gauge, you can bend it easily with your fingers and it will hold the shape.
     Five small loops makes for a nice size flower, I did find that if the loops went beyond approximately one inch the glue had trouble forming a film, best to keep them under an inch at their widest point.
     I bent the flowers into shape before dipping, if you try it afterwards you run the risk of splitting the film.     
     I decanted some of the 3D PVA into a tiny jam jar so I could dip the flowers into the glue easily. Dipping it in and lifting it out slowly seamed to work well. If the film breaks just dip it back in the jar and try again.
     I only gave each flower one dip but you can dip again once the first is dry to thicken the film. Each flower was left overnight to dry out, the glue goes clear when dry so it's easy to tell when it's done but overnight makes sure it's set completely. I also made some leaves but I wasn't very happy with the shapes, something I need to try again I think.


     I used four different mediums to colour the flowers and leaves:
  1) Leaves - Cactus green pearlescent Izink pigment ink dropper - painted on with a brush. Covers the wire as well as the film, great pearly sheen, no odour.
  2) Blue Flower - Stratosphere blue Izink pigment ink - has it's own brush in the lid. Covers both wire and film, dries matt, no odour.
  3) Pink Flower - Nail varnish - has it's own brush in the lid. Covers both wire and film, nice shine but rather smelly while working.
  4) Yellow Flower - Yellow Fabric Spray Paint - painted on with a brush. Covers well, more of a satin sheen and takes longer to dry completely, no odour.

     So a good strong PVA works well, keep the loops small and try whatever you have in your stash. I really like the Izink bottle inks because they dry matt and most flowers are matt not glossy, plus there is a great range of colours and a little goes a long way. Thank you to Keep On Crafting for asking me to experiment with the Izink pigment bottles, it's been interesting and it's not finished yet.


I would like to enter this card in the following challenges:
Creative Fingers - #201 Anything Goes
Seize The Birthday - #207 Anything Birthday / option Hearts
Watercooler Wednesday - #307 Anything Goes with a Feminine Twist
Unicorn  - #62 Use Flowers

Wednesday, 3 February 2021

Love Is In The Air at The Paper Funday


     I am pleased to say that I have joined the lovely DT at The Paper Funday and this is for their new challenge this month, it's anything goes with an optional twist, the twist this month is 'Love Is In The Air'. 
     
     Cute is not something you'll see here very often but I just love this Stampendous image.
     The hedgehogs were stamped in brown ink onto white card, then with the remaining ink on the stamp I made another image on masking sheet and cut it out. I didn't mask the balloons as they were going to be covered.
      Once the image was masked I used a blending brush and coloured the card with Distress Oxide Victorian Velvet, leaving the area around the hogs  paler than the outside edges.
      
     Using Distress Ink in the same Velvet colour I stamped script across the card.
      The mask was removed from the image and I coloured the hedgehogs with watercolour pencils.
      The balloons were stamped on to a piece of pearl card from Stix2, Misty Rose, it's a perfect match for the Distress Inks. These balloons were cut out and shaped slightly with a ball tool before having pink and white twine added to them.
     The balloons were then stuck on foam pads and put over the original image.
     To get the hogs to hold the balloons I stamped them again and cut out their hands and feet, coloured them to match the original image and mounted them on foam pads, making sure to catch the twine under the hands.
     I chose to mat the image panel with a Bronze pearl card, also from Stix2, because it matched the colours used for hogs spines.
     The whole panel was finally mounted on a white 7x5 card blank. There is no greeting on the outside because I felt there were enough words in the script, it will probably be used as an anniversary card.
     The Paper Funday is an anything goes challenge with an optional twist, so please come and join us with your creations, just remember they MUST be made with paper/card.


I would like to enter this card in the following challenges:
Creations In Pink - #30 Anything Goes In Pink
Send A Smile 4 Kids - Valentine/Love
Shopping Our Stash - Love Is In The Air
Try It On Tuesday - Falling In Love

Monday, 1 February 2021

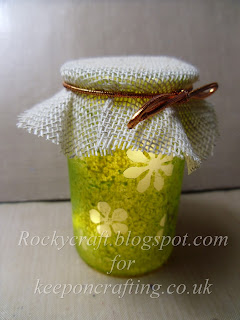
A Little Jar Of Spring Sunshine


     When I was asked if I would like to make some samples for Keep On Crafting using the Seth Apter I-Zink pigment inks how could I refuse, they are amazing inks. Why amazing? because they are water based, thickish inks in a bottle, with their own little brush that will paint on almost everything you can think of. Now for a water based ink that is amazing, they don't bead up on metal, glass or plastic, they just paint straight on without using gesso first!
     For this little project I used a small glass jar about 3 inches in height. I gave it a wash to make sure it was perfectly clean and dried it thoroughly.
     I wanted some tiny flowers all over the jar so I dug out a JND die and some Stix2 masking sheet. The masking sheet is like a very low tack masking tape that rests on a thin plastic film, so die cutting it might be tricky. Not if you put a sheet of copy paper under the plastic side, it seems to help the die force it's way through the plastic and even cut the copy paper.
     Using tweezers I stuck lots of the tiny mask flowers all over the jar and pressed them down firmly.
     For the colour I used one of the older version inks in the dropper bottle - Cactus and one of the newer flat colours - Olive Drab, more Olive than Cactus in the mix.
     I dropped some of the ink onto my craft mat and picked it up with a sponge, dabbing the ink all over the jars sides. I left this to dry for a couple of hours, it does dry quite quickly even on a non porous surface, but I wanted to be sure it was hard. I applied a second coat of the same colours, making sure I had a speckled effect all over. Again I left it to dry for a while as I didn't want the ink to peel off when I lifted the flowers.
     To lift the flowers I used my pointed tweezers and pushed each petal from the end to the middle, to my delight they all lifted perfectly.
     I tried a set of lights inside the jar but it didn't look quite right, too bright. Using a strip of vellum cut to wrap around inside the jar I was able to achieve a slightly more opaque effect. The top needed to be covered and this jar had no lid, so I cut a circle of hessian to go over the top but with battery lights you need to be able to get at the switch which was inside. A small length of copper coloured elastic left over from a jar of jam was just right, now I could get in and out of the jar to operate the lights.
     A few of these little jars dotted about the room help lift the spirits on these dark winter afternoons. I'm really looking forward to being able to craft together at workshops again.


Materials used 
Old glass jar
I-Zink Pigment Ink - Cactus (pearlescent)
JND174 - Small Flowers die
S57268 - Masking Sheet - Stix2
Small string of LED battery lights
Strip of vellum
Small circle of hessian and some fancy elastic


I would like to enter this project in the following challenges:
A Bit More Time To Craft - Anything Goes
Crafts Galore Encore - Anything Goes
Creative Fingers - Anything Goes
The Creative Crafters - Anything Goes