Friday, 29 May 2020

Bright and Loud Circles


     A couple of cards made with John Next Door's new Circle Layer Dies. These are available individually or as a set of three. On both cards I have used all three dies. The top layer is a plain circle but the next two layers have stitched edges.
     I was so busy playing around with the layers that I forgot to take any progress pictures, but it's all quite simple really. The top card has the circles layered evenly and the bottom card has them layered off centre. Both have the layers stuck together flat, you could get another effect by adding foam tape between them. There are lots of examples over on John's Facebook group or on his You Tube channel.
     We're often stuck for masculine cards but I think this lends itself to all manner of themes depending on what else you add to it, if anything, or what colours you use.


Materials List    Available from your local craft shop
PCD217A - Mulitlayer Circle Die A  - Large Circle
PCD217B - Mulitlayer Circle Die B  - Medium Circle
PCD217C - Mulitlayer Circle Die C  - Small Circle
Strong PVA Glue
Coloured Card
Sentiments and image stamp from stash.


I would like to enter these cards in the following challenges:
Art Impressions - All Layered Up
Try It On Tuesday - Cut It Out
Simon Says Stamp Monday - Circles

Friday, 22 May 2020

Tag Card Nature Journal


     Another use for John Next Door's new Tag Card die is to make a journal, this one is only three pages long but you can make it as long as you like. There is a basic assembly video by John HERE.
     For this project I cut one cover in Kraft card and three pages in off white card.
     Using another piece of Kraft card I die cut the corners and leaves to make the decorative cover, this was stuck onto a piece of gold mirri card. To fill in all the gaps I die cut the corners and leaves from gold pearl card and then glued them into the gaps. To finish off I added a die cut circle with a letter embedded in it, just like the rest of the cover, to the centre.
      Each page was decorated with a stencilled design in pastel inks with a rough theme to each page. I clipped the pages together to see if I was happy with the overall look when fully open.
     There are two panel dies in the set, one straight edge and one stitched edge. I used the straight die to cut a couple of panels for each page, then stamped them with a script design and edged them with pastel inks.
      Each page has a selection of die cuts and stamps, you can decorate as much or as little as you wish, leaving spaces for things to be added as you find them.
      Two of the pages have an envelope to house a tag, this tag die is in the set as well but the envelope, Sown With Love by Sheena Douglass, was from my stash.
     I chose not to stick the last page to the cover, this means it will open out, plus it can be added to if so desired.
     Inside the back cover are two die cuts, one is a pocket for tags and tickets, the other is a small envelope for little treasures, both are Sizzix dies.
     With more pages it may be necessary to create a spine to the cover, this is relatively easy to do but does need to be done before you glue in the pages.
     A journal like this would make a nice gift for a someone going off on a walking holiday, or bird watching, it's almost like a mini scrapbook. It's much easier to put together than it looks and is sure to deliver the wow factor to it's recipient.


Materials List    Available from your local craft shop
JND100 - Large Tag Card die set
JNDAD014 Regal Flourish die set
JND094 Decorative Corners die set
Strong PVA Glue
Sheena Douglass die Sown With Love
Sizzix 662697 - Stitched Slot & 657843 Pocket Envelope
Stencils, card and inks.


I would like to enter this project in the following challenges:
Fab 'n' Funky - Anything But A Card
The Sisterhood of Stampers - Birds, Bees and butterflies
613 Avenue Create - Anything Goes/option Diamonds & Lace
The Artistic Stamper - Journaling
Blank Page Muse - Stencil It
Creative Crafting Uncles - Anything But A Card

Wednesday, 20 May 2020

SplatteRings Galore


     Lockdown has had two benefits for me, a little more time to craft, bake and garden, plus some really good demo videos on Facebook and You Tube. This project was inspired by Eileen Godwin's video on Facebook, using some stamps from Visible Image.
      Not being much of a painter this is something I might not have tried, but this is using paint to create a background, not a picture.....that I can manage.
      In the video Eileen used a white card tag backed with greyboard for stability, I have used a piece of mountboard which is nice and strong with a smooth surface.
      Eileen uses small amounts of acrylic paint, any brand as it doesn't have to be the expensive type, and spreads it on thinly with an old plastic loyalty card. It didn't look anything special but it doesn't have to, it's just a background.
      I did make a mountboard tag to start with, then started thinking about a larger project. How could I get a larger splat ring than the Visible Image one?......Ah ha....What about the Inkylicious splatter stamp?
      I have both the large and the small Inkylicious splatter, they are amazingly useful for backgrounds, for this I have used the smaller one.
      Using a circle die I cut a mask from Stix2 Masking Sheet, worked out where my splatter would go and then masked what would be the middle. This is the beauty of using a stamp press, you can line everything up with ease.
       I inked my stamp with Versafine Onyx Black and stamped onto the board, it looked good but another coat made it look better. I carefully peeled off the mask and used it again further up the board.
      Then using the Visible Image splatter I stamped with the same ink in three other places. The ink took a long time to dry, in the end I put it on the window sill in full sun and left it there while I collected all the other bits I would need.
     Using a white gel pen I added circles to the inside of the splatters, I noticed that my circle dies had tiny notches at each quarter, this proved very useful when adding the white lines through each circle.
     For the most part the lines and circles are almost spot on, there is one that is not but it's not glaringly obvious so I think it will be fine.
     I also found a stencil that has circles of increasing size so that came in handy too. I used another stamp from Visible Image to add circles of tiny dots in silver ink, they are not bold but as the board is tilted they appear. The final touch was to find something shiny to go in the middle of the large circles, the stickers I found have been in my stash for years! The small circles looked a bit empty so I added small stickers to them.
      I think it would be very easy to keep adding bits to this but I chose to stop after the stickers, I am happy with how this looks now. As to what I'm going to do with it, well I think it will probably make a book cover as it's approximately 7.5 x 5.5 inches.
     I loved what Eileen had made and once I had tried it I wanted to make more, the challenge of finding something to make a larger splatter really got me thinking. Being home with my stash has got me trying all sorts of things, all I have bought in the last eight weeks is some foam tape and a few plastic hair clips for birds feet.


I would like to enter this project in the following challenges:
Arty Divas - Anything Goes
Through The Craft Room Door - Anything Goes
A Place To Start - Create A Custom Background
Lil Patch of Crafty Friends - Anything Goes


Saturday, 16 May 2020

Advent Folding Tag Card


     John Next Door has a new design out this week, its' a Tag Card inspired by Barbara Dear. It looks much more complicated to construct than it is, so if you need to send a card with the Wow factor then this design could be it. This card is made using the large Tag Card die set, there is a smaller one aswell.
     There is a video on You Tube HERE, by John, showing how to put the basic card together. I did make one small change to my card though. When the tag insert is folded the single tag sticks out further than the two tags, I didn't like this so I moved my score line over by 5mm to get the tags to sit evenly. I would suggest cutting two inserts in rough card and playing around until you are happy with how it all works, this will save any hiccups with your good card.
     For this card I cut the two covers in dark blue card and then cut five inserts in white card. I coloured the inserts with two blue Distress Inks, there were some patches that weren't perfect but much of the card was covered by flaps and tag pouches so it didn't really matter.
      I decorated all the inserts before folding them so there would be no obvious crease lines showing on the finished card, plus it's much easier to stick things down on a perfectly flat surface.

     There are three tags per page so I die cut 12 little envelopes using a Sheena Douglass die called Sown With Love, it's the perfect size to hold the tag that comes in this JND set. All the envelopes were cut from a paper pad that's been in my stash for years.
      There are also 12 flaps in this card, these were cut from two shades of blue card. I used the shapes in JND Pop Box set for this because each shape has at least two sizes, but any shapes you have will do just as well.
      Each flap is slightly smaller than the decorated white shape it covers. All the white shapes have different pictures or sentiments stamped on them, this is a chocolate free calendar but you could write special message under each flap and turn it into an advent chocolate hunt if you wish.
   
     Each tag is different, again you could write special messages on these, to be kept in the card or used on gifts.
     In this die set you get a fancy tag as well as a basic shape so there are many possibilities, especially if you raid your stash and use dies and stamps from other sets.
      I have decorated the backs of each tag that sticks out with the same inks, each one has a die cut snowflake stuck on it just to add to the overall look.
      With all pages decorated I stuck them all together, I would strongly suggest laying them up and checking all is right before you start to glue them together, check twice and glue once!


      When it came to the covers I tried them on the card and noticed that the spine stuck out a little, so I trimmed approximately 2mm off the inside of each cover. This allowed the pages to sit neatly within the covers like a real book.
      Again each cover was decorated before it was stuck to the pages, I kept the front simple as the inside is what will be on view most of the time.
      All of the numbers used are from the Advent Numbers set used with the Pop Box die set released last year. All cut in silver mirri card and stuck on at random so the recipient has to search for the right one each day.
      This card did take a long time to make but I hope you will agree it was worth it, after all it will be on show for almost a month.

Materials List    Available from your local craft shop
JND100 - Large Tag Card die set
JND147 Advent Pop Box die set
JND148 Advent Numbers die set
JND138 - Deer Scenes die set
JND130 - O Little Town Scenes die set
Strong PVA Glue
Papers, card and inks.


I would like to enter this project in the following challenges:
Winter Wonderland - Favourite Colour Combo - Blue & White
Sparkles Christmas - Add Ribbon, Lace or Twine - Twine
The 12 Months of Christmas - Anything Christmas/ option Dec The Paws
CraftyHazelnut's Christmas - Anything Chrsitmas
Crimbo Crackers - Die Cuts
Merry Little Christmas - Anything Christmas
Happy Little Stampers Christmas - Anything Goes/option Ornaments 
Krafty Chicks - Christmas
Fezzwigs Festive - Anything Festive


Wednesday, 13 May 2020

Recycled Die Cut Christmas


      You may think making Christmas cards this early is a bit daft, but when we get let out of lockdown will you really want to be indoors making cards? I know I won't!
      With limited supplies I decided to raid my stash of old Christmas cards and see what I could recycle. I found several rather nice ones that would work well in John Next Door's Square Scene Box.
     Using some dark blue pearl card I cut out my scene box and added the Oakham Lattice for the aperture. I had to trim the old card to fit within the square but thankfully only a little.
     As the old card had lots of trees I decided to die cut some more and pop them at the front, just behind the latticework. I cut them in pearl white to help lift the colouring of the whole card, having a dark blue foreground and background could be a bit too much.
     There is a little sparkle on the old card so I didn't feel the need to add any more, the pearl effect is enough.
   
   
     On the back I have added a white card square to cover the dark blue  edges and give somewhere to write.
     To make it stand up I have cut a small white card stand and glued it in the middle, it will fold flat for posting.
      I'm quite enjoying recycling old cards as some of them are so nice, with a little new work added they have a chance to carry festive cheer again.
      Come on over to Christmas Craft Creations to see what other DT inspiration you can find.


I would like to enter this card in the following challenges:
CraftyHazelnut's Christmas - Anything Christmas Goes
The Holly and Ivy - Anything Christmas Goes
Crimbo Crackers - Die Cuts
Merry Little Christmas - Anything Christmas Goes

Monday, 11 May 2020

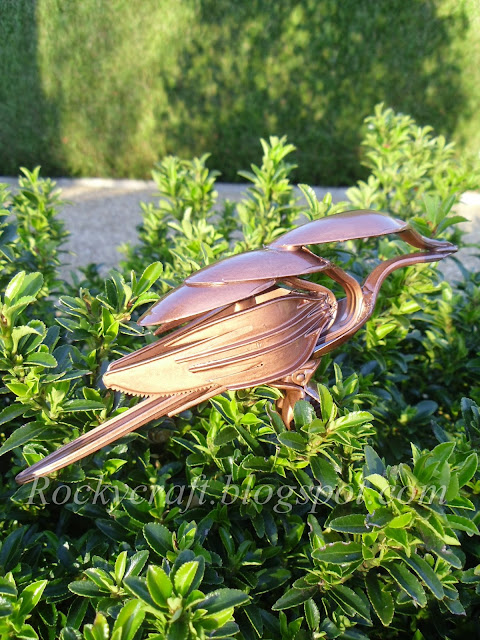
Cutlery Bird


     I have always admired the amazing items made from old metal cutlery, sadly I have neither the skills nor the tools to make my own. What I do have is a selection of plastic cutlery, a heat tool, a glue gun and the challenge to try it my way.
     I used to play around with my plastic stir stick and hot coffee on the train journey back from college, so if hot liquid and mild force will bend a plastic stick then a heat gun should be just as good, if not better........it is!
     Making sure to use a heat mat, a silicone mat and finger guards I started to go all Uri Geller with my cutlery. There were a few melt downs but it didn't take long to work out just how much heat was too much.
     I confess I used a photograph of a metal bird as a guide, but this one is not exactly the same as the photo, I used whatever plastic items I had to hand.
     Using spoons for the body, forks for the wings and knives for the tail the bird started to take shape. Feet were a bit of an issue for a while, then the penny dropped and I payed a visit to my local discount shop for some hair accessories. Small claw clips turned out to be perfect and while I was there I got some other bits and bobs for future projects.
     I have also bought some coloured plastic cutlery to play with, it will be interesting to see if the core colour takes over when melted. I would suggest making sure the windows are open when melting plastic, or better still try and do it outside.

     As this bird was made with white plastic I wanted to see what I could do to colour it. For this one I used a special grey primer for use on plastic, followed by a copper spray paint. There are some craft paints that may work on plastic but I have yet to try them.
     My collection of small plastic bits and bobs has increased a little so I will try some other birds or animals soon.
     Not Just Cards is the perfect challenge blog for a non papercraft project, so pop over and see what else we have for inspiration this month.


I would like to enter this project in the following challenges:
2 Crafty Critter Crazies - Anything Goes With A Critter
Crafty Animals - Anything Goes
Love To Craft - Anything Goes
Worldwide Open DT - Anything For A DT Goes
A Bit More Time To Craft - Anything Goes
The Crafter's Cafe - Anything Goes