Showing posts with label vellum. Show all posts

Saturday, 15 January 2022

Rainbow Frame


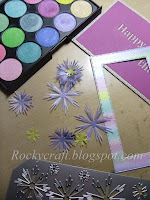
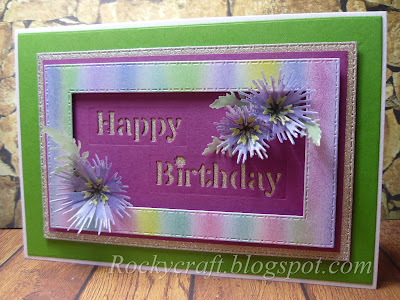
     This card was made using the cut out frame left over from the card in the last post. If you haven't seen it then this was white card that has been coloured with the new Mica Magic Spring set from John Next Door.
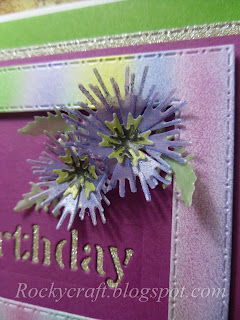
     Mica Magic doesn't just colour card, it will work on many different surfaces, including vellum. The flowers were cut in vellum using the Cornflower die set and the corresponding leaves. Both flowers and leaves were coloured with the mica, for a stronger colour work on the front and for a paler colour work on the back of the vellum.
     To mount up on a white card blank I used some bright green card that was a close match to one of the mica colours. On top of this I used some pink Craft Artist glitter card covered with a die cut layer of a sort of squashed berry colour, again similar to one of the mica colours used. The berry and glitter layer was mounted on 1mm foam while the rainbow frame was mounted on 2mm foam tape over the berry card leaving a border showing.
     Once the frame was in place I was able to add the flowers and leaves to pop out from within the frame, filling in the open areas on the berry card.
     This card has used up some offcuts and a few new bits, it's a good way to make great use of what you've already got on your work bench from previous projects.


I would like to enter this card in the following challenges:
C.R.A.F.T. - #623 New
Watercooler Wednesday - #332 All Things Feminine 
Try It On Tuesday - In With The New
Cut It Up - #243 Anything Goes
Creative Fingers - #222 Anything Goes

Wednesday, 5 May 2021

Sunshine On The River Of Creativity


     There is a new challenge on the block, River Of Creativity is for all crafts, not just paper. There will be a theme each month but it will be quite a broad one, allowing your creativity to run riot. 
     This picture started life as a wooden wallart item found in a charity shop, I didn't like the artwork much but when I looked at the back it was a great shallow frame I could do things to.
     I started to put together the image panel and tried it inside the frame, it was too much of the same colour, so I painted the inside edge of the frame with dark brown acrylic.
     I had a sheet of 12x12 paper that was almost exactly what I wanted but it was a bit too bright and a tad too big, the inside of the frame is 10.75 inches square. After playing around with different ideas I found a sheet of vellum in my stash with little flowers all over it. Perfect, it knocked back the colour and added another feature, as the light changes across the panel the flowers show up. After trimming the paper to fit inside the panel I folded the edges of the vellum over the paper all the way around, this way the vellum stays put and there is no need for glue.

     The bee hexagons are cut from mat photos using a die by Jamie Rodgers, the shape caught my imagination as soon as I saw it, they're like little boxes, which reflects the idea of using a box frame.
      To fix the paper panel in the frame I used some redline tape, this stuck to the vellum overlapped edge so hopefully over time it will not show through the paper as it doesn't actually touch it.
      To fix the bees to the vellum I used some Stix2 3D PVA, strong stuff and acid free. To get even spacing I used a wooden stir stick between each shape until the glue set.
     The corners needed a little something so I die cut some honeycomb in mustard card, thank you Avril for the use of your die, but only stuck them in two of the corners.
      At the bottom I added some paper sunflowers and at the top there is a small die cut bee, this is only stuck on with tack because I'm not sure if I like it, maybe I will find something I like more in time.
     I am so pleased to be working with the girls at River Of Creativity, it's great to have a challenge that welcomes all craft, not just card making. Please pop over and read all about it, then come and join us with your creations.


I would like to enter this project in the following challenges:
613 Avenue Create - #5 Anything Goes
Always Fun - #212 Combine Old & New Products
2 Crafty Critter Crazies - Anything Goes With A Critter
Creatalicious - Things With Wings
World Wide Open Design Team - #4 Anything Goes
Dies R Us - #168 Anything Goes With A DRU Stock Die

Thursday, 15 October 2020

Woodford Vellum Window


     The new Reveal card die set from John Next Door has a 5inch gatefold as it's base, this goes perfectly with the Woodford die set that he released at the same time.
     Using the the two strips of what I think looks like Moroccan tiles, I cut a pattern in the doors, I did the same to two more pieces of card ready to line my doors. 
     On the inside of the doors I added some lilac vellum, it has a tiny stripe in it so I had to make sure both doors matched. Once the vellum was stuck down I added the two extra panels that I had cut, making sure to line up the pattern so the light would shine through.
     Although the pattern was pretty the doors looked a little plain, so I added some tiny silver holographic peel off dots from my stash.
     On the inside of the card I die cut the main Woodford die without any outer or inner cutting edges, just the pattern. Again I cut another panel just the same so I could sandwich some more of the vellum between them, paying special attention to the stripes in the vellum.
     To mount the greeting panel I used some grey card and a piece of lilac marbled paper and two of the centre dies in the set. This shape is so pretty but would also make great masculine cards. The greeting is die cut from silver mirri so it matches the outer dots, bringing the whole card together.
     It's not as fussy as it looks because the dies all line up so well, making it easy to create a pattern. On the window sill with the light behind it it looks rather nice. There will be a few more of these made for the card box, but I will leave the greeting until it's needed, it's always good to have a few cards put by.

Materials List   (available from your local craft shop)
JND170 - Reveal Card die set
JND172 - Woodford die set
S57262 - 3D PVA Glue from Stix2


I would like to enter this card in the following challenges:
UnstampaBelles - Thank you  Mum gave me my first creative inspiration
All Fun Challenges - Anything Goes
Dream Valley - More Than One Fold
Lemon Shortbread - Anything Goes

Thursday, 2 January 2020

Butterfly Media Magic


     This is made using the John Next Door's media plates along with the new stamps and dies. The media plates are an existing item and the new stamps and dies have been made to fit perfectly with them.
     Using Izink pigment inks I inked up the butterfly media plate and smoothed it out with a hard brayer. I have also used a spare piece of card to clean off the brayer, this will be used for another project.
     Using some of the same inks I have inked up some floral stamps and stamped them onto the media plate, then stamped that onto the card, this gives the illusion of flowers in the background.
     I have also used Versafine black and stamped some flowers on the card to look like they are growing in front of the butterfly shape.
   
     There are also a few small silhouette butterflies stamped in grey across the card.
     I trimmed the card ready to put on a black mat layer but before it was stuck down I made a small hole at the butterfly's head and stuck a flower stamen through, securing the stamen on the reverse of the card. This layer was then stuck onto the narrow black mat and then onto a wider coloured layer, before going onto an 8x8 scalloped card blank.
     The top butterfly is stamped in white ink onto vellum, the beauty of a stamp press is you can stamp more than once to build up the depth of ink, this one was stamped three times.
     Once dry the vellum was cut out with the butterfly die, each wing was folded along the join to the body and then the body was stuck down with a strong PVA glue.
     The back of the vellum was coloured with the same inks used on the media plate, so everything co-ordinates and with the body in place the stamens look like little antenna.
      A delicate vellum butterfly has a colourful shadow as it flies across the card. Media plates really are a great way to make backgrounds and with so many shapes available as well as a large rectangle the possibilities are endless.


Materials List    Available from your local craft shop
JLMP003  Butterfly Media Plate
JND110A  Bold Butterfly Stamp
JND109    Butterfly and Dragonfly die set
Hard Brayer
I-Zink pigment inks
Versafine Black Ink
Stix2 3D PVA Glue


I would like to enter this card in the following challenges:
Craft Rocket - Something New
Moving Along With The Times - All Things New
Little Red Wagon - Never Before Used Schtuff
Simon Says Stamp - Something New

Thursday, 26 September 2019

Vellum Cornflowers


     This card was made using the new John Next Door Cornflower and Avonmore dies, along with a few of his other dies.
      The cornflower is quite delicate but still strong enough to shape whether you cut it in foam, card or vellum.
     I used an A5 piece of plain vellum and coloured it with Izink dye ink 'Nuit', it's a gorgeous blue that looks just perfect for a cornflower. The ink was dabbed all over the vellum and left to dry.
     I folded the vellum in half and die cut it as a double thickness, it seems to work better this way if the product you're cutting is thin.
     The die will cut out two petals of three different sizes, I have used two petals per flower. The die also cuts three stamens, one for each size, the stamens are coloured with a black alcohol marker.
     Each petal set was worked gently with a ball tool to give it some shape. I stuck the stamens in each flower, then added a small pearl that has been coloured with the new black Glitter Touch.
     Once all the flowers were made I die cut some black foliage using the  Elderflower die and some dark blue Rose Leaves, the rose leaves are coloured around the edge with black ink and then shaped with a ball tool.
     To make the card I cut a piece of Mouse Grey card large enough to give me a mat layer and then die cut the Avonmore lattice in the middle. I then used the lattice edge to cut a hole in a piece of white card that would be large enough to form another mat layer, this was white card which I then coloured with the same ink pad as the flowers so it would match perfectly.
     The final layer was just a wide white frame to go on top. The white showing through the lattice was alright but I wanted something a little more outstanding so I used the lattice part of the die to 'quilt' some silver mirri card. Quilting is when you use a die to emboss card rather than cut it, for this you will need some kind of embossing mat to go through your machine, it takes the place of the plate that you would normally cut onto.
     With a much better centre I began to assemble the card, it looks like it has many more layers than it does but by doing it this way it will weigh less and be a bit thinner, perfect for posting.
     Base card assembled meant all that was left were the flowers. I placed several on the card and kept moving them around until happy with their position. Then I started to play with the foliage, tucking it under the flowers until happy with it all. I have found in the past that it's best to take a photo of the layout before taking it all off to stick it down with glue, just in case you get distracted and forget where they were.
     Once finished I decided it didn't need a greeting on the outside, that could be added later when required. Using vellum for the flowers gave them a more realistic look and being able to colour plain vellum with dye inks means a wide range of colours is readily available.

Materials List    Available from your local craft shop
JND108 - Avonmore Die
JND115 - Cornflower Die     (Cornflower Stamp JND116 - not used on this project)
JNDAD016 - Elderflower Dies
JNDAD015 - Rose Leaves Die set
CAT005 -Glitter Touch Basics  (Black, Clear, Green)
I-zink Dye Ink - Nuit


I would like to enter this card in the following challenges:
Colour Throwdown - colours #562
Everybody Art - Use Dies
Craft Rocket - Monochrome