Saturday, 24 December 2016

Ovaltine Light


     Earlier in the year I made a fairy jar using a jam jar, that's alright for an adult but what about a young child, I needed something other than glass. I have always loved to drink Ovaltine, it's a malted chocolate drink that comes in an opaque plastic jar, perfect!

     The jar is already opaque so no painting required, just some colouring to be done to that bright orange lid. I used a black marker pen but maybe a spray paint would have been a little better.
     The die is a Robert Adams Nativity set which cuts beautifully. I stuck some thin black card to a Stix2 double sided sticky sheet and then die cut the figures.
      The label on the jar is not glued on so there are no sticky marks to remove, just a small date stamp on the bottom which wipes off using an antibacterial hand cleanser gel.
   
   
     Turning the jar upside down makes the lid a perfect place to put the LED candle and the whole jar glows. The candle is fixed to the lid with a lump of tack so it can be lifted to switch it on and off, once the jar is done up tight it's quite difficult for little fingers to undo.
     Starting with the stable I peeled off the backing paper and stuck the shapes to the jar. The star is cut from gold glitter paper so it tinkles.
     On the back I have used a greeting die that had holly on it, that didn't look right so I trimmed the holly off and just used the words.
     Being plastic it's safe to have out on display where small people may be, if they drop it it will bounce, it's not heavy so if it hits a toe it won't hurt either. It would make a great Christmas night light as well as showing them the meaning of Christmas.


Merry Christmas and a Happy New Year.


I would like to enter this project in the following challenges:
UnstampaBelles - Flickering Lights
Craft For The Craic - Anything But A Card
Crafting With An Attitude - Anything Goes

Thursday, 22 December 2016

Magazine star


     As you can probably tell I love working with these magazine straws, this time a star is born. This was the first design I saw and fell in love with but when I saw the trees I had to make those first.
     Again there are lots of fabulous tutorials on You Tube and Pinterest so pop over and have a look, there are different styles to try too.
     I have given some of the stars instead of cards this year, just writing my message on a handmade tag attached to the star.
     This large star is sprayed gold, then when dry I've added some PVA glue and gold glitter randomly over it. The beauty of these is you can make them any size or colour you want.


I would like to enter this star in the following challenges:
Paperminutes - Stars
Glitter 'N' Sparkle - Christmas with Glitter

Wednesday, 21 December 2016

Plaited magazine trees


     Following on from the plaited wreath I decided to play around and make some trees from old magazines. I've really enjoyed making these because it reminds me of long hot summer days sitting in the garden making corn dollies.
     Trees can be made starting from the top or the bottom depending on which pattern you're following, these started from the bottom because that's the way this video showed.
     The most time consuming part is rolling the straws, making the tree is really quick and easy. You can vary the size of your tree by the size of cone you use to work round. Tip: Don't be tempted to use a polystyrene cone, I did and it got stuck inside, a rolled card one is much easier and surprisingly strong.
     I sprayed the smallest tree with gold paint and stuck a gold glitter paper origami star on the top but these could be painted any colour to match your decor. A large tree with a string of lights around it would look good and you can hide the battery pack under the tree so you can put them almost anywhere.


I would like to enter these trees in the following challenges:
Crafting By Designs - Anything Goes
Inspiration Destination - Anything Goes
Creates and Makes - Anything Goes
Moo-Mania - Trees

Thursday, 15 December 2016

Driving Round In Circles


     Ever wondered what to do with that old road atlas? This year it's being put to use on my front door. I'm not a fan of SatNav, I prefer a good old fashioned map, so when I bought a new road atlas for my car I wondered what I could do with the old one, as an avid crafter I hate to throw anything away.
      I removed each page and trimmed the rough edge, then cut each page into three strips vertically. Using a bamboo skewer I rolled each strip into a straw, I made lots of straws!
     Starting with four straws I followed a great You Tube video and began to plait around a strong card tube from a roll of food bags, I found the aerosol can (as used in the video) a bit too big. If you need to take a break then just pin the straws in place with a clothes peg, that way you don't loose your place or unravel.
     I kept going until it was long enough to bend gently into a full circle and finished off as per the video, then using my trusty hot glue gun I fixed the ends together.
     I didn't want to spray my wreath with paint, I like the map look, it fits perfectly with my families love of vehicles.
     I hunted around for some hessian ribbon and found this one at the local florist, it has wired edges making it easy to shape.
     The leaves are die cut and embossed silver mirri card and the three baubles are shatterproof, all fixed on to the wreath with hot glue from Stix2. I couldn't find any royal blue baubles so I used nail varnish to paint a silver one.
     It is fixed to my front door by threading lacing cord through the wreath and then through some tiewrap blocks stuck to the door. We have a porch so the wreath won't get wet, it's quite strong and surprisingly heavy for paper but then it is nearly a whole atlas. After Christmas it may get put away with the rest of the decorations or it may be recycled.


I would like to enter my wreath in the following challenges:
Holly Jolly - Christmas Card or Anything Christmas
Paperminutes - Christmas Decoration
Mixed Media World - Winter Wonderland
Country View - Christmas
Sparkles Christmas - Anything But A Card
Rhedd's Creative Spirit - Anything Goes
Tuesday Throwdown - Anything Goes
Eclectic Ellapu - Anything Christmas


Sunday, 11 December 2016

Christmas Wishes from The Male Room


     Welcome to Christmas Wishes from The Male Room, sorry I'm a little late. This challenge will run until the end of December, so if like me, you are running a little behind, you will still have time to join us with your Masculine Christmas project.
      I have to confess that this card is a rescue card, I found it in bits on the floor at the end of a craft show. Torn, smudged and with a large footprint on it I still couldn't throw it in the bin.
     The stepper card was fine with just a tear at the bottom, so that is covered with dark red paper. The Greeting panel was ripped beyond all help and the image panel was smudged as well as having a large footprint right across it.
     I have the Woodware Bubble Tree stamp in my stash so I stamped a new panel and transferred most of the Candi from the damaged image to the new one, with the addition of a few Stickles the panel was complete. I have used a peel off greeting as I have lots in my stash to be used up.
     I'm happy to have rescued such a lovely card from the bin, having the same stamp meant it really didn't take much work to save it. So if you go horribly wrong when making something, put it down and walk away, leave it for a while and when you go back to it you may see a way to save it.
     If you don't get time to join us at The Male Room this month then we hope to see you next year with lots more masculine challenges, Happy Christmas!


I would like to enter this card in the following challenges:
Christmas Cards All Year Round - Anything Christmas Goes
Jingle Belles - Anything Christmas
Addicted To Stamps - Christmas


Saturday, 10 December 2016

MHK Designs - The Write Stuff


     Welcome to the last new release set from MHK Designs, this one is perfect for making note cards.
     Starting with a gatefold card I have used a paper from the World Traveller paper set to cover the entire card, including the back. Inside there is a die cut oval of the same paper but one that has been printed in 'draft' mode so that it's very pale.
     The image panels are both die cut plain ovals mounted on die cut scalloped ovals coloured with alcohol markers. These ovals have been stuck flush on to the card but off centre and on opposite sides making the whole card quite flat so it's standard postage.
     Please take a look at all the inspiration on the MHK Designs blog, there is also a chance to win one of the new sets or, if you are very lucky, the entire release.


The Write Stuff
World Traveller


Friday, 9 December 2016

MHK Designs - Fanciful Feathers


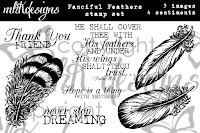
     These gorgeous feathers are from day four of the new releases at MHK Designs, there are three different feathers and five sentiments so something for every occasion. They would make a great masculine card for a keen ornithologist.
     The colours of these feathers have been manipulated in my photo package, printed and then fussy cut to go over a layer of backing paper from the French Country set that has been printed in draft mode and then edged with Distress ink.
     The scalloped edge oval and die cut bird have been coloured with an alcohol marker to try and match the ink of the sentiment. It's all stuck flush so the postage is standard but if you were hand delivering it you could raise the feathers and the sentiment on foam pads to add a little dimension.
     Please pop over to MHK Designs blog and have a look at all the inspiration we have for you, everyone has come up with something different so I'm sure something will spark your imagination.


Fanciful Feathers
French Country


I would like to enter this card in the following challenges:
Southern Girls - Anything Goes
Crafting With Friends - Anything Goes

Thursday, 8 December 2016

MHK Designs - Stitched Tea Party


     Well it's day three of our new releases at MHK Designs and it's time for a cuppa. This set is perfect for sending a note to a friend as it features two lovely images and a selection of useful sentiments.
    A cup of tea is often the British way of coping with life, it's something we turn to when we need just that few minutes to sit and think, calm down or share a moment with friends. Who would have thought boiling water could be therapeutic! If you can't be with your friend for that magical cuppa then you could send them one, then they can think of you as they drink it.
     This is a standard 6x4 white card blank covered with a paper from the French Country set that has the edges inked with Distress Ink Victorian Velvet. The sentiment is on white card, die cut and coloured with the same ink, then mounted flat to the card.
     A white square was die cut and coloured with D.I., then the image panel was also die cut and coloured with the same D.I. These two layers were stuck together and then backed with foam tape on three sides, making sure the opening was the right size to take an individually wrapped tea bag. This is just slim enough to go as standard post in the UK, any thicker and it wouldn't go through that little slot at the post office. I have left the inside blank, ready to write a short letter to be read while the tea is drunk.
     We have two more new releases to show you so pop back tomorrow if you can. If you pop over to the MHK Designs blog you can see some more samples and find out about the chance to win a set.


Stitched Tea Party
French Country


I would like to enter this card in the following challenges:
Creative Moments - Anything Goes
Inspiration Destination - Anything Goes
Digi Tuesday - Anything Goes

Wednesday, 7 December 2016

MHK Designs - Realistic Roses


     Welcome to day two of our new releases at MHK Designs. This set, Realistic Roses, has one gorgeous image and three beautiful sentiments.
     I decided to make something other than a card with this design, it's quite  tall which lends itself to being wrapped around something.
     As I'm not confident putting tissue paper through my printer I used some basic copy paper, the design was printed three times across an A4 sheet, one to colour and two spares....just in case.
     The flowers were coloured with alcohol markers, then the image was fussy cut before being put on the candle. The image was held firmly against the candle with greaseproof paper and then 'melted' into the candle using a heat gun. I did the image first and then the sentiment later. You can see the edges of the paper disappear under a layer a wax and become almost invisible. If you use a coloured candle try to print on paper that has a close colour match.
     A project like this would make a great table centre for Valentines Day, a wedding or just a thoughtful gift to someone special.

Realistic Roses

I would like to enter this project in the following challenges:
Doodle Pantry - Anything Digital
Digital Delights - Anything Goes


Tuesday, 6 December 2016

MHK Designs - Pretty Petunias


     Welcome to the first new release for December from MHK Designs, we have another four to show you this week. This floral set is called Pretty Petunias, it has two blooms and five sentiments making it a very useful addition to your collection.
     For my card I opted to keep it simple with a bold design and large sentiment. The flowers were coloured using my photo package, then enlarged and overlaid. The sentiment was also overlaid and made large, this means the whole image panel was printed as one layer keeping it flat and perfect for standard UK postage.
     With the ability to manipulate digi images within a photo package it increases their versatility making them a very worthwhile purchase, gone are the days of just print and colour in.
     If you like flowers then pop back tomorrow for the next new release, I'm sure you'll love it, plus a project that's something other than a card.


Pretty Petunias


I would like to enter this card in the following challenge:
Allsorts - CAS


Thursday, 1 December 2016

House Of Cards Christmas Blog Hop


      Welcome to the House Of Cards blog hop and DT call. We have several lovely sponsors for this hop, a full list can be seen on the HOC home page as well as a full hop list, just in case you get lost. Comment on every blog in the list for a chance to win some of the hidden prizes and then enter a card for another chance to win a prize.


     Allow me to introduce Nigel, he lives at Beccy's Place with two of his friends, he's a very quiet fellow. He normally holds a lamp but as it's Christmas he's helping put up the stockings.
     I have used Graph-It markers to colour him in, they're a brand of alcohol marker that I have found very easy to use. My blending skills are improving slowly, having the right cardstock is the key.
     Nigel is wearing a traditional red and green outfit with grey green stockings and black shoes with gold buckles. He's holding a holly filled stocking from MHK Designs which is coloured, cut out and stuck on where the lamp used to be.


     I trimmed the image panel to size and then cut two mat layers, both in thin white card. Using the same pens used for Nigel's clothes I coloured around the edges of the thin card so when they were layered everything matched. I have spent ages going through my card stash hunting for a perfect colour match, it seems no matter how much card I have I never have the right shade, so this solves that problem and saves me time.
     Nigel is mounted on a large DL card blank but as he's a digi stamp you could print him out at whatever size you like. All that remained was a greeting from the same MHK Design set die cut and layered, then stuck on with thin foam pads.


Gnomes In My Garden
Deck The Halls


You should have arrived here from Paula's BlogThis hop will run FROM December 1ST AT 6:00 AM CST THROUGH December 15TH AT NOON CST,  ANY CARD STYLE is welcome and we've got a gorgeous photo inspiration for your crafting enjoyment!


Now get to hoppin'!  Your next stop is Rosi's Blog!  Don't forget to link up a project with us after completing the hop for an extra chance to win a mystery prize from one of our fabulous sponsors, too!  Happy stamping to you all! :)


I would like to enter Nigel in the following challenges:
Addicted To Stamps and More - Make Your Mark
Creative Moments - Anything Goes
Merry Monday Christmas - Masculine Christmas Card

MHK Designs - 'Here For You' Surprise Blog Hop

Hello and welcome to a SPECIAL SURPRISE blog hop for our dear friend,  Julie Odil! Julie was recently diagnosed with a rare form of lymphoma, so this hop is our way of letting her know that we are here for her. You should have come here from Shawna's blog. If you didn't, please hop over to  THIS POST for a complete list of participants!
Along with this hop, there is a special release  digital stamp set and  paper pack from the  MHKDesigns Etsy shop designed specifically for sending get well cards to those struggling with different forms of cancer. The colors of the paper pack are lavender (all cancers awareness), lime green (lymphoma awareness), pink (breast cancer awareness), teal (ovarian cancer awareness), and peach (cervical cancer awareness). Take a peek at these products...


......and here's the card I made for Julie using those two special release sets.


Thank you so much for stopping by today. I know that Julie needs our support now more than ever, so let's band together and show her that we are here for her! Your next stop on the hop is back to the MHK Designs blog.

Christmas Card Trees


     Altered Eclectics is all about mixed media and recycling, making projects other than cards and ATC's so when I was given a bag full of old shop bought Christmas cards I decided to make something with them.
     How do you turn paper back into a tree? Well I searched around for an idea and came across a tree that I liked the look of, the only trouble was it was going to be much too big for where I wanted to put it and I found the construction a bit fiddly.
     After a bit of playing around I settled on this method, cut 16 strips 4" x 1", 16 strips 3.5" x 3/4", 8 strips 3" x 1/2" and 8 strips 2.5" x 1/2". This makes 12 layers of decreasing size.
     Curl over and stick both ends of each strip to form a point with the printed side upwards.
     Mark the centre of each strip on the back so you know where to put the foam pad as you build the layers. Begin with the largest strips and stick two together using a large square foam pad to form a cross, then stick two more at an angle to the first two, it will look like one of those ribbon stars you get to stick on presents. Make sure there is a foam pads between every strip and stack them up gradually to form your tree until the last layer of small strips at the top. This tree, depending on the thickness of your foam pads, should come out at about 3.5" tall.


      With the addition of a small origami star made from glitter paper the tree is finished.
     Just right for little table settings, you could add a name tag to each one and use it as a place tag.
     I wouldn't dream of doing this to a handcrafted card but a shop bought one from last year has many uses. The children can make these without too much mess and when the festive season has finished it can be recycled again.
     Come on over to Altered Eclectics to see all the different projects we've made and join us with your creation.


I would like to enter these trees in the following challenges:
Fab 'n' Funky - Anything Christmas
Creative Moments - Anything Goes
Inspiration Destination - Anything Goes


Mizuhiki Reindeer


     Welcome to a new challenge for CraftyHazelnut's Patterned Paper Challenge, it just had to be a Christmas card today didn't it. Our challenege is for anything made with patterned paper so you don't have to make a card to join in, it could be a gift bag, box or decoration.
     This red nosed reindeer is made from Mizuhiki cord, which is Japanese paper cord, it's thin so easily knotted as long as you don't get a kink in it. This is a traditional knot with a twist, the ends are curled to form antlers and the bottom loop is opened up to form his face. With the addition of a small red pompom and a couple of woggly eyes he is complete.
     He is mounted on a matt gold layer with corner detail over e red layer before going on to a holly print backing paper. The holly print is on another layer of matt gold before going on a green card blank. The greeting is a small peel off on red card mounted on foam pads.
     Come and join us with your patterned paper creations, the challenge runs all month and we'd love to see what you make.
     Here's a little note about Mizuhiki cord....
Mizuhiki plays an important role in Japanese culture as a symbol of affection, warmth, and togetherness. Made from washi, or Japanese paper, Mizuhiki is a colorful twine that is tied in knots to decorate gifts.


I would like to enter this card in the following challenges:
Christmas Card Challenge - Anything Goes
The Crafty Addicts - Anything Goes (optional Christmas paper)

Wednesday, 23 November 2016

The Male Room Woods


     Welcome to a new challenge at The Male Room, our theme this time is 'scapes'- city, sea, land or in this case tree.
      Using a Woodware stamp the trees have been stamped several times on a piece of watercolour paper 24cm x 13cm. The card was coloured with water soluble inks, then the trees were coloured with watercolour pens.
     Once dry the card was scored at 4cm intervals to form the concertina effect, on the back there are two panels of patterned paper over thin card stuck at either end to the outside panels, then holes were punched in the folds to thread the ribbon through.
     Stickles were used to add sparkle to the trees and then it was left to dry completely before threading the ribbon through the holes. It is one long length of ribbon threaded with the centre at the front and the tails meeting at the back. The ribbon is then passed through a bead in opposite directions, then through another bead again in opposite directions and secured. The first bead acts as a slide to hold the card shut for delivery and the second bead to stop it all unravelling.
     A tree-scape makes for a perfect male Christmas card, not to sparkly or cute and you can keep the colours masculine.  Please come and join us at The Male Room with your scape's, we'd love to see them.


Materials list - available from your  local craft shop
Woodware Craft Collection - JGS471 Trio of Trees
                                          Sentiment set unknown code
                                          Koi Watercolour Pens
                                          Stickles

Stix2 Anything - Masking Sheet
                        Double Sided Tape


I would like to enter this card in the following challenges:
Christmas Card Challenges - Anything Christmas
ABC Christmas - Criss Cross Something (ribbon through bead)
12 Months Of Christmas - Anything Christmas (optional Bingo)