Wednesday, 23 December 2015

Happy Craftmas!


   Season's Greetings to you!  I have been bitten by the Zentangle bug, so here's another great bauble stamp from Woodware that lends itself to being tangled.

      I stamped the bauble on white card and tangled each flower using a Sakura Micron Fineliner pen. The background is filled in with  red alcohol marker. The centre of the flowers are decorated with tiny Stix2 glue dots covered with a mixture of micro beads, transfer foils and glitter.
     The background is embossed with snowflakes and mounted on to a white card with a red mat in between, the mat is white card coloured around the edge with the same red marker so it matches.
     There is a die cut pine branch mounted on foam pads for the cut out bauble to hang from. With the addition of a gold bow and a die cut snowflake stamped and embossed with a greeting the card is finished.
     My tangling is quite basic as a beginner, I found it helped to just see each small part to be tangled rather than the whole, somewhat daunting project. Over the holiday I shall play some more and see what I can come up with, it really is quite relaxing to just doodle and colour, it has also made me look at my stamp stash in a new light.
     I hope you have a Happy Holiday where ever and what ever you are doing but most of all Happy Craftmas!


I would like to enter my card in the following challenges:
Card Mania - Christmas
Holly Jolly - Christmas

Monday, 14 December 2015

Twinkle, Twinkle


     Several months ago I bought a kit to make 15 German Stars, last night I sat down and made them all, plus a few gold ones. I like to have something a little different on the table at Christmas, nothing too tall, so I have filled a bowl with the stars and added some battery operated LED lights.

      The kit had full pictorial instructions with it but I found a YouTube tutorial much easier to follow, here's the link to part one, you can reach part two from there.
     Once I had done four with the tutorial I could carry one and make the rest with out it, next week may be a different story!

      Having made so many I would suggest cutting the ends to a blunt point as it makes them easier to thread through, don't pull too tight and don't crease the paper unless it tells you to.
     I wanted a few gold stars in with these patterned ones so I had to work out the size of the strip needed. The paper needs to be about 120gsm, patterned both sides and long enough to be a continuous strip. This limits things slightly as most papers only have pattern on one side and the biggest I have is 12x12 inches (about 30cm).
     The kit had strips of 86cm for the large star and 45cm for the medium star. I could only get a maximum of 30cm in length from an A4 sheet, this meant the strip had to be no more than 1cm wide, finding gold on both sides was easy.
     I placed a medium star in the bottom and built the large ones around the outside, keeping one for the top. I mixed in the lights, medium stars and the gold stars as I went, finishing with the battery pack on top covered by the last large star.
     This would be a great way to use up strips of patterned paper, make half a star as a gift wrapping topper. It doesn't have to be Christmas paper, these stars would look great for a birthday or a congratulatory party piece. If you have the time you could stamp a pattern on both sides of the paper or a message.


I would like to enter my star bowl in the following challenges:
Sparkles Monthly - Anything But A Card
The Sisters Of Craft - Anything Goes
Simply Papercraft - Anything Goes
The Glory Of Christmas - Anything Goes

Wednesday, 9 December 2015

Male Room Merry Christmas


     Seasons Greetings from The Male Room, this is our last challenge of the year and it's a masculine Christmas or Seasons Greetings, nice and easy in this busy month.

     I have used a Bubble stamp from Woodware, it's one of my favourites, it's simple enough with out the greeting to be used for congratulation cards or even birthdays. 
     The star is stamped and embossed in silver on blue card, as is the greeting. Not every bubble is filled in, those that are have been filled with a mixture of peel off dots, Candi, gems and glue dots covered with transfer foil, glitter and micro beads. The centre dot is covered with a jewellery finding finished off with a tiny gem.
     Using silver peel off dots and white Candi gives you the ability to colour them to co-ordinate with your project.
     The same stamp has been used to decorate the backing paper, light blue stamped and embossed in white. With a small silver mat layer between them and mounted on a white card the card is finished.
     Please come and join us at The Male Room, we would love to see your masculine holiday cards or projects. Have a Merry Christmas and a Happy New Year, see you on the 6th January for the first challenge of 2016.


Materials list - available from your  local craft shop
Woodware Craft Collection - Stamp - JGCL548 Bubble Star
                                          Versamark
                                          Stampendous Embossing Powder - Detail Silver / White
                                          Candi - Icing Sugar
                                          98091H  Holographic Dots Silver
                                         
Stix2 Anything -  Glue Dots - 3mm / 6mm
                         Glitter / Micro Beads
                         Transfer Foil


I would like to enter this card in the following challenges:
AAA Cards - Night Sky
Christmas Card Challenges - Anything or Photo Insp
Jingle Belles - Anything Goes

Tuesday, 8 December 2015

MHK Designs Stencil In The Roses


     Today is another release from MHK Designs, this time it's Stencil In The Roses. So if you've finished all your Christmas makes you can start on next years birthdays.

      I printed the image twice, making sure they were exactly the same size, kept one complete and cut the other one so I could use it as decoupage. The leaves and petals were worked on a foam mat with a wooden ball tool to give them some shape.
     The backing paper is from another MHK Designs set called Stenciled Roses, it compliments the images perfectly. I changed the colour of my paper using my photo package, then stamped over it with Versamark and dusted with gold mica powder.
     The image panel is mounted on red card and then on to the backing paper. The greeting is printed on white card, cut out and alternate corners trimmed, then edged with a red marker. It is mounted on thin foam pads to give it a little height.

      This digi set comes with flowers of different colours and some great sayings. Both sets are available at MHK Designs Etsy shop.
     We also have a Facebook page, MHK Designers and Friends, for you to showcase you creations made with MHK Designs images, we'd love to see what you make with this one.

Sunday, 6 December 2015

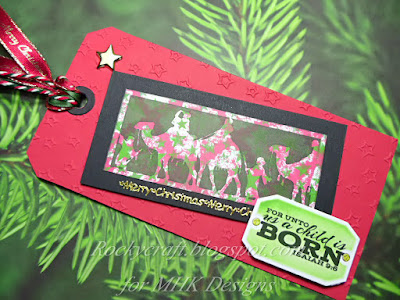
MHK Designs Christmas Silhouette


   Today sees the launch of another gorgeous digi set from MHK Designs, this one is called Christmas Silhouettes. To see more inspiration pop over to our Facebook Page MHK Designers and Friends.
     I made a tag rather than a card this time, I'm going to need a few of these so this will help build my stash.
     The silhouette image is printed on to a dig backing paper from MHK Designs set called Christmas Past. I've mounted the image panel on black to make it stand out a little more.
     To continue the star theme I embossed some red card with stars, added a gold star brad and stuck it onto a plain tag so I can still write on the back of it.
      The greeting is from the silhouette set printed on white card and die cut with a label die, coloured while the die was still on the card and mounted on foam pads. There are two ribbons and a bakers twine through the hole, one is plain green and the other is red with Merry Christmas on it.


      Both these sets are available from MHK Designs Etsy shop, along with many more non Christmas digi's.


I would like to enter this tag in the following challenges:
Hiding In My Craft Room - Christmas Colours
A Gem Of A Challenge - Anything Christmas
Holly Jolly - Embossing


Saturday, 5 December 2015

CASE-ing Christmas Finale


     Sadly this is the last card for CASE-ing Christmas, the blog is closing due to the owners other commitments, we all wish her well and thank all of you for joining us each month.
     This card is made with a clear stamp from Woodware called Patch Robin Square. It is stamped in Versafine Black on to white card, then Zentangled, and yes I did cheat and use a ruler for some of it!
     I chose to paper piece the holly and the robin's wing and red breast, this was done using some lovely papers from a polka dot 6x6 set. The paper pieces are stamped and embossed, unlike the main image, so they stand out a little more.
     The berries are silver holographic dot peel offs coloured red, the border around the picture has been coloured with an alcohol marker in a pale green. After colouring I used a Layer Perfect, which is an 'L' shaped metal edge ruler with graduated markings and holes, to prick out the holes. This tool is good for piercing and great for matting and layering.
     The image layer is mounted on foam pads over a red on green backing before going on a white card blank. In the corners of the green layer there are square clear foam pads covered with Transfer Foil to look like brads.
          Come and join us one last time at CASE-ing Christmas, this month it's just a Winter Holiday card for our challenge, we have three prizes to be won too.


Materials list - available from your  local craft shop
Woodware Craft Collection - Stamp - FRS164 Patch Robin Square
                                          Versafine Ink Black
                                          Stampendous Embossing Powder - Midnight Black
                                          MSP228V Perfect Prints Dark Dots 6x6 paper pad
                                          98091H  Holographic Dots Silver
                                         
Stix2 Anything -  Clear Foam Pads Square
                         Foam Pads
                         Transfer Foil
                         Layer Perfect Tool


I would like to enter this card in the following challenges:
Cute Card Thursday - Festive Colours
Jingle Belles - Anything Goes
12 Months Of Christmas - Anything Goes / optional Santa
A Snowfalkes Promise - Anything Goes

Tuesday, 1 December 2015

House Of Cards Blog Hop

We've come to the end of another term at House Of Cards so we're celebrating with a blog hop!   You should have arrived here from Pat.
This hop will run FROM December 1ST AT 6:00 AM CST THROUGH December 15TH AT NOON CST,  ANY CARD STYLE is welcome and we've got a gorgeous photo inspiration for your crafting enjoyment! 


Here is the photo inspiration~


We've got some fabulous sponsors to share with you.  Make sure you leave a comment at each person's blog along the way because the prizes are hidden and we'll be doing random drawings from the blogs where they are hiding! :)  After you're done, make a creation to share with us here, too, for another chance to win!

Here are all of our fabulous sponsors.
Our team will be using a variety of products
from these amazing companies!

Deedee's Digis
Prize: Digital Stamps Prize Package


Prize: Gift Card to Store
Inspired by Stamping


Prize: Any three products of your choice!


For full prize details please see the House Of Cards blog hop post.


Here is my card using MHK Designs paper set Stenciled Roses


     The little gift boxes were my inspiration from our photograph, I used the gorgeous papers from MHK Designs to make my little parcels. 


      I printed four papers on one sheet of A4 thick paper, then cut four strips of greyboard in graduated sizes. I covered each board strip with a different paper and wrapped bakers twine around them all, making sure the small top one had a bow on it.
     The background gave me a little bit of a headache, everything I tried didn't look right, so I printed an A5 size copy of our photo as a watermarked page using my word processor package. 
     This backing was then edged with gold paper and mounted on a card edged with Distress Ink Victorian Velvet. Each parcel is mounted on foam tape and stacked up on the backing paper. The tiny tag is from a pack of bits my Mum gave me with a tiny peel off greeting added.

Your next stop is Ruza.  Don't forget to link up a project with us after completing the hop for an extra chance to win a mystery prize from one of our fabulous sponsors, too! Happy Stamping to you all! :)


I would like to enter my card in the following challenges:
CraftyHazelnut's Patterned Paper Challenge - Anything Goes
Always Playing With Paper - Non Traditional Christmas
Christmas Card Challenges - Anything Goes

Tube Reindeer


        Well here we are in December and all those Christmas cards and decorations made throughout the year are finally being put to use. This month it's time to concentrate on the little bits and bobs to finish off the Christmas effect, like these little reindeer.
      We have a collection of ideas for decorations and gifts at Altered Eclectics, so pop over for some inspiration, then come back and show us your creations.


     These two little deer started life as a kitchen roll tube, cut the tube in half and you can make two of them.
     Mark the tube as shown on the left, solid lines are cut lines and dotted are fold lines, there is another tiny cut line at the end of the strip across the top.
     Once cut you can decorate before you fold him into place, I used a swirl stamp and a brown inkpad. Avoid his face if you can so that his features show up more.
     The bottoms of his legs have been coloured brown to look like hooves and he has small woggly eyes stuck on, along with a red gem nose. The mouth is drawn on with a pen. The folding over of his back is what makes him stand up properly, there is no need for glue either. The antlers are just folded up and curled around until they look right.
     These are great fun to make with children or for children. They are also small enough to have on your table as place markers, just leave a space to write the names on or hang a tiny sign around his neck.
     Please come and show us your creations at Altered Eclectics, it doesn't have to be Christmas, we are an anything goes as long as it's not a card or an ATC, just something you've altered or recycled.


I would like to enter these reindeer in the following challenges:
613 Avenue Create - Anything Goes / optional Paper Piecing
Crafting When we Can - Don't Forget The Animals