Wednesday 7 February 2024

The Paper Funday Gifted Gnome


     A new month means a new challenge at The Paper Funday. An Anything Goes papercraft challenge with an optional twist, which this month is No Patterned Paper......which I sort of forgot, oops, although strictly speaking it's coloured paper, not patterned.
     He's been printed onto white card and also onto the coloured paper. Using alcohol markers I coloured his hands and nose, then using a glitter Gel pen coloured the gift with silver.
     After cutting out all of the clothing and colouring the shaded areas I began to stick them onto the white card using a good strong PVA glue. Once all the glue was dry I ran a clean, dry brayer over the image to make sure it was all nice and flat.
     Using another piece of the coloured paper I cut a mat layer and mounted the image panel onto it, then onto a white card blank. The centre of the flower has some orange flock added to give it a little pop of bright colour. I found a greeting disc in my stash but it needed a little something, so I die cut a disc from the coloured paper and mounted it on foam pads. 
     If you haven't already seen the team inspiration on The Paper Funday then please pop over and have a look at all the great ideas, once you've made your project come and join us.


I would like to enter this project in the following challenges:
Lil Patch of Crafty Friends - #223 Anything Goes
Inkspirational - #308 Paper Piecing
Gem of a Challenge - Wk3 Anything Goes

Wednesday 6 December 2023

The Paper Funday's 5th Birthday


     The Paper Funday is celebrating it's 5th birthday with a separate challenge to the usual, please join us in our celebrations, you might even win a prize.
     For my birthday card I have used a flower die to cut out the centre of a white layer, then mounted it on foam tape above a piece of patterned paper.
     The greeting has been heat embossed in gold across the centre bar which does not cut the card.
     To add a tiny bit of interest and to tie the whole thing together I have added some small pearls in each corner of the top layer.
     The card is still thin enough to go standard post and by facing the pearls to the back when in the envelope, it should run through their machinery without causing to much fuss.
     Come along and join in the celebration at The Paper Funday. Follow the link to join in the fun.


I would like to enter this card in the following challenges:
Crafter's Cafe - #303 Feminine
Creative Fingers - #267 Anything Goes
Pammie's Inky Pinkies - #2248 Anything Goes
Beautiful Blossoms - #11 Anything Goes or Mood Board
Die Cut Divas - Flower(s)

Paper Funday Christmas Has Landed


     December is upon us already, where did the year go?!  This month's challenge at The Paper Funday has begun, it's an Anything Goes challenge with an optional twist this month of Snowmen or Birds, but that's not all........there is also a chance to win a prize if you join us in our 5th Birthday challenge which is being run alongside the usual one.

     
     This is a small Christmas Journal made with greyboard covered with Christmas papers. I have made one very much like this before and it was such a hit I had to make it again.
     There is a small pocket on the back flap to hold the cover of a note book, this way the note book can be removed when full and a new one added. The note book was made with some copy paper covered with a patterned card overlay and stitched together.
     
     Inside the front cover is a small pocket to hold a tag, next time I think I should add a larger pocket to hold receipts. Double sided papers are perfect for this type of project and I do happen to have just a few!!!
     This project was for our monthly challenge at The Paper Funday which you are welcome to come and join. 
     If you have the time then take a look at our 5th Birthday challenge which is running alongside the usual one, this one is for Birthday or Anniversary projects and there are prizes to be won, so come and join our celebrations.


I would like to enter this project in the following challenges:
Kraftin' Kimmie - Anything But A Card
Crafting From The Heart - Anything Goes
Crafts Galore Encore - Anything Goes
Creative Crafting Uncles - Foliage and Leaves

Wednesday 1 November 2023

Thank You


     A new month means a new challenge at The Paper Funday, an Anything goes challenge with an optional twist and this months it's Thank You.
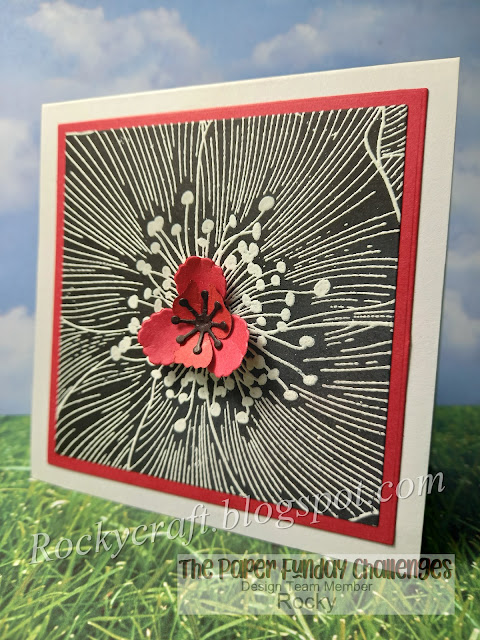
     In the UK November is a month of remembrance for all our armed forces and others who were lost fighting for freedom, their symbol is the poppy.
     I already had this image stamped and embossed after borrowing the stamp from a friend, all I had to do was mount it on a red mat layer and add a die cut poppy. I felt that no words were necessary, none would have been enough.

I would like to enter this card in the following challenges:
Festive Friday - #FF0146 Remembrance Day
Use Your Stuff - #496 Anything Goes

Wednesday 4 October 2023

Cats and Bats


     Another month, another project for The Paper Funday. This is an Anything Goes papercraft challenge with an optional twist, for October the twist is use yellow, orange and green. 
     This card is a CASE of a card by Shelly Matteson, her card is a bit more orangey than mine but in my defence I was using up some gorgeous papers I inherited from my mum.
     The background paper already had a sun/moon type look to it so I cut a moon in vellum and stuck it over the lightest area of the background.
     The colourise pumpkins were cut from some Clarity papers mum had in her stash, I chose a greeny purple one to fit the twist. The leaves come from another sheet of Clarity paper that had amazing Autumn colours on it. Shaped leaves give a bit more texture and depth to the overall picture with bats and cats in black card being set off by a black mat layer. To make the whole thing a little more magical I mounted the picture on some pearlescent orange card. 
      I won't be giving this one away for two reasons, one being I really like it and the second is we don't tend to celebrate Halloween even though the colour are amazing. It will grace the walls of my work area until next year at least.
     Please come and join us at The Paper Funday, it doesn't have to be Halloween and it doesn't have to be a card, as long as it's made with paper or card that's fine with us.


I would like to enter this project in the following challenges:
Two Old Bats Halloween - Anything Halloween
Inspiration Station - #54 Halloween colours
Get Creative - #126 Purple, green black and orange
Unicorn - #92 Autumn/Halloween

Friday 8 September 2023

Snowflake The Winter Dragon


     When is tree shaped treat box not a tree shaped treat box?......When it's a dragon of course!
   The new Charles Treat Box from John Next Door makes a great gift box, but when I started to make one it fell over on my desk and looked just like a dragon's head with perfect spikey teeth. Not very Christmassy?  it is if you like dragons....a dragon is for all seasons......a table decoration with a difference. Make in another colour scheme for Halloween, a special gift or just for fun.
     
     I made a dragon in plain card as a prototype, no point in wasting the good stuff to start with, it meant I could fold and chop it around until it looked right without a worry.
     The body is made from the main part of last years Hexacracker with two hexagons for end caps.

     For the tail I made the treat box into a triangular shaped tree and glued it to the hexabody, making sure that the spines of one edge were pointing upwards and lined up with the peak of one edge on the body.
     With the remaining tree from making the tail I folded it in half and glued the spinney edge. Cutting the tree in half I discarded the folded part and glued the spine along the ridge of the body in line with the tail spines.
     For the head I made the box as a tree but left one side open, the inside of this flap was lined with some marbled effect wallpaper and the spinney edges were folded inward to form the lower row of teeth. To stop the jaw flapping about I glue the largest tooth at the back of the mouth to the corresponding tooth on the upper jaw, the mouth stays open but doesn't drop too low.

     The head was glued onto the body to be higher than the tail, then a spine was added to the head, made in the same way as the main body spine but shorter and glued in the middle to line up with the rest of the spines.
     Wings were made from one tree shape each, the bottom edge was cut with the box die to get a spikey edge, then scored and pleated to give folds. These were glued onto the body at an angle to give a nice sweeping wing that stands up. Wing tips can be glued together so it can be hung up, but you will need to find the centre of balance for your own dragon as it will vary depending on card and embellishments added.

     All that remained were the legs, what better way to stand firm than using four trees. Three tree tops for each leg were cut, I only cut the top part that I would need rather than wasting card. The little trees were cut with an angle to the base so that Snowflake would stand level, having the slightly shorter edge on the inside as well as a flat side to glue to the body.
     Once the dragon was built it was time to cover it in snowflakes and gems for added sparkle and some large blue pearls for eyes. Using a patterned pearl card made it much easier to incorporate sparkle and shine, embossing would have made it harder to assemble and painting might have made it soggy.
     It may sound complicated but it's not really, pick up some inexpensive card and have a play. Dies should be versatile giving value for money, it's NOT just what it says on the packet, it can be so much more.


I would like to enter this project in the following challenges:
Kraftin' Kimmie Stamps - Anything BUT A Card
Peace On Earth - #47 Photo (Snowflakes)
Christmas With The Cuties - #73 Something Snowy
Die Cutting Divas - Anything Goes
The Holly & Ivy - #147 Anything Christmas
Fab 'n' Funky - #579 Wings or Scales

Wednesday 6 September 2023

Wild Flower Gnome in the Spotlight


     A new month means a new challenge at The Paper Funday, an Anything Goes papercraft challenge with an optional twist.
     For this card I have used a SheepSki design called Wild Flower Gnome. I chose to make a simple card with the spotlight method.
     Two copies of the image were printed at the same time, making sure they were the exactly the same size. One image was kept for the base layer and one was cut with a circle die to give two spotlights.
     Using alcohol markers I coloured the two discs and added a little gold pen to the flower centres. For the mat layer I used the same marker as the disc background on a piece of white card, only the outer edge was coloured which gave me the perfect colour match.
     I mounted the discs onto the background before layering up, just incase it went wrong I would only need another background layer. To give wiggle room to the discs I added a little PVA glue to the foam tape when I was lining them up, you get a few seconds to move them around.
     Once the discs were added I layered up the card, I felt it was a little too bare so I added a small greeting to the bottom corner. Inside is still blank so it can be made to suit the occasion when it's needed.
     If you haven't visited The Paper Funday yet then please do, there's lots of inspiration over there from my creative team mates.

I would like to enter this card in the following challenges:
Di's Digi Designs - Die Cuts/Punches
Pammie's Inky Pinkies - #2335 Anything Goes
Lil Patch Of Crafty Friends - #213 Anything Goes
Stamping Sensations - Garden Delights