Friday, 1 July 2016

Summer Squeeze at the House Of Cards


     Welcome to the new challenge for the House Of Cards, we have a lovely summer feel to our challenge prompt this month, all we need now is the rain to stop here in the UK!
     I found a rather nice vintage poster for lemonade which I printed out twice, cutting out the lemons and decoupaging them. The green mount matches the base card just to make it pop out a little.
     The yellow background is made using Distress Ink Squeezed Lemonade and a light burst stencil, I thought it looked a little like a slice of lemon. The poster is mounted on the lemon background on thin foam pads.
     The glass of lemonade was hand drawn and coloured with alcohol markers, with a little white gel pen to touch up the slice of lemon on the rim. It's fussy cut and mounted on thick foam pads so it stands a little above the poster.
     We have lots of inspiration for you at the House Of Cards so please pop over and take a look, the challenge runs until the end of the month.

July - Fruit/Drink and/or colours

I would like to enter this card in the following challenges:
Creative Moments - Anything Goes / Summer
The Sisterhood Of Crafters - Create Your Own Background
Deep Ocean - The Colours Of Summer

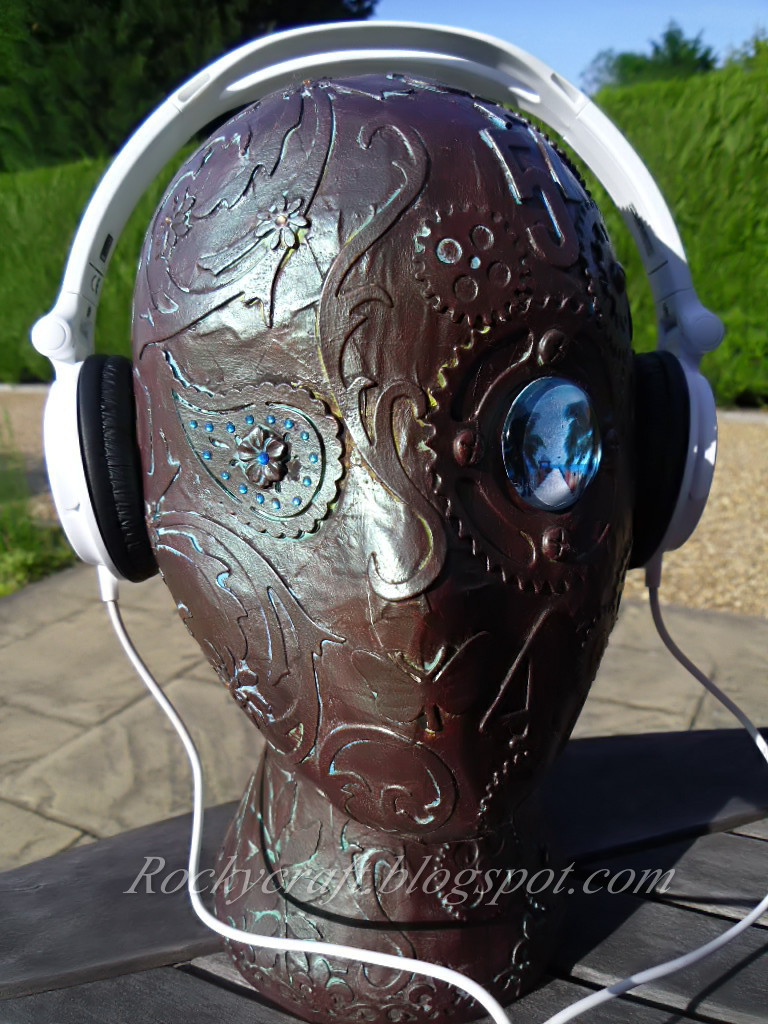
Papier Mache Heads Up


     Welcome to this months project for Altered Eclectics. This one took a couple of months to make, it's an idea that's been buzzing around in my head ever since I saw a polystyrene head in the charity shop.
      I decided that I might want to make another bust sometime, so I covered the head with cling film before starting to cover with papier mache.
     I used approximately 250ml of an inexpensive children's PVA glue and a complete copy of my local weekly newspaper.
   

     The paper cast is about seven layers thick, nice and firm. I tore my paper into pieces, this seems to make the finished cast a little smoother.
     I had to cut from top to bottom to remove the polystyrene form. While the head was undergoing surgery I glued some stones inside to weight the bottom, this will stop it falling over when the headphones are on it.


     Once 'stoned' it was another operation to heal the cut, a little masking tape to hold it shut followed by two layers of papier mache.
     When completely dry it was painted with white gesso. Then came the fun part, adding all the cut outs.
     The left side is covered with cogs, numbers and letters and the right is covered with flowers, music and patterns.
     After the gesso I painted with a mix of Distress paints in Evergreen Bough, Peeled paint, Salty Ocean and Broken China.

      After all the paint had dried, which seemed likes ages, I could begin to 'grunge' it.
     I have used Cosmic Shimmer gilding wax Autumn Bronze to make the head look like an old bronze bust.

     As the wax doesn't completely cover the paint it looks aged and with a good polish with an old duster it shines beautifully.    
     Some finishing touches were some tiny gems on the flowers and along the paisley shapes. The left eye is a glass dome stuck over a desert island photograph and stuck on with silicone glue.
     It has been given the teenage boy seal of approval so now sits on the window sill sporting a pair of headphones, it was intended to stop them being left on the sofa and sat on, so a creative and useful result.
     Please pop over to Altered Eclectics to see what the DT have come up with, we would love it if you came and joined us with your creations, anything mixed media but no cards or ATC's.


I would like to enter my creation in the following challenges:
SanDee and Amelie's Steampunk  - Anything Steampunk
We Love To Create - Anything Mixed Media
Classic DT Challenge - Anything DT
More Mixed Media - Anything Goes (optional Purple)
That's Crafty - Masculine
Country View - Circles 

Easy Origami Box


        Good morning and welcome to my first project for CraftyHazelnut's Patterned Paper Challenge, I'm thrilled to have been asked to join the creative design team. This challenge is fabulous, you can enter anything you've made as long as you use patterned paper, so dig out those papers and come and join us.

     I like to use my papers for all sorts of projects, not just cards. This box is very easy to make, here's a link to a very good video tutorial.
     The only tip I could add to this great video is rather than fold the square in half, corner to corner to find the centre, mark it lightly with a pencil, then your finished box won't have any creases across the lid or base to spoil the end result.

     I have put a card insert inside both lid and base to make it a little neater. The lid has been stamped with cherry blossom and the base with a greeting, both have been coloured around the edges with Distress ink.
     This would be a nice way of hiding a personal message inside for the recipient. If you have several sheets of the same paper you could make the card, tag and gift box to match.
     The acetate butterfly on top is a digi stamp coloured with alcohol markers. You can find a post about where to get the digi's and how to make them here.
      When you've had time to go through your stash of papers and make your project, come and join us at CraftyHazelnut's Patterned Paper Challenge, we would love to see your creations.


I would like to enter this gift box in the following challenges:
Crafty Girls Creations - Anything Goes
Seize The Birthday - Birds, Bees or Butterflies
Decorate To Celebrate - Anything Goes
Try It On Tuesday - I Believe I Can Fly

Wednesday, 22 June 2016

Button It at The Male Room


     Welcome to a new challenge at The Male Room, this time we would like to see you raid your stash for buttons, the DT have come up with lots of different ways you can use them.
     This card is very simple and easy to make. The greeting is die cut from very dark blue card and stuck on to the card blank, then a collection of buttons are added with hand drawn strings, they could have been tied to the greeting but I quite like them drifting across the card.
     Please come and share your button creations with us at The Male Room, we'd love to see what you make.


I would like to enter this card in the following challenges:
Crafty Cardmakers - For A Special Man
Crafty Sentiments - Kids
Cardz 4 Guyz - At The Movies  (Up)


Tuesday, 21 June 2016

MHK Designs Challenge #6

     
      Hello and welcome to our surprise Birthday Beach Blog Hop for the lovely Asha!  You should have arrived here from Nana Connie's blog. If not, start at the MHK Designs blog to complete the hop for more chances to WIN!  We are celebrating a very special lady today and we're doing so by creating beachy birthday cards to wish her many happy returns!

MHK Desings Blog Hop Inspirational Photo


     Asha's birthday card was made using shells and a sentiment from Serene Seaside along with a greeting from Beachy Keen.
     The shells were used at random to create decoration around the central sentiment, this was printed out twice. The top copy has had the verse die cut to make a window, after colouring with Distress Ink acetate was stuck over the opening.
      All around the window and the sides of the card topper there is foam tape, before sticking the topper to the card the window has been filled with micro beads to make it a shaker card.
     The assembled shaker topper has been stuck onto an easel card, the bottom of which has been covered with paper from Country Farm because in very pale sepia it looks a little like sand.
     The greeting is die cut, coloured and stuck on with foam pads, in the corners are little paper clay star fish and shells to add to the beachy look.

Beachy Keen
Serene Seaside


Country Farm - July Release

     Thank you so much for joining in our hop to say "Happy Birthday" to a dear friend!  Your next stop on the hop is Sathya's blog.  The complete hop list can be found on the MHK Designs blog.


I would like to enter this card in the following challenges:
Bunny Zoe's Craft - Summer
Crafty Boots - Summer
Dream Valley - Summer Colours
Melonheadz Friends - Off To The Beach
Ooh-La-La Creations - Sun, Sand & Sea


Monday, 20 June 2016

MHK Designs - Butterfly Elements


     Today is the last new release from MHK Designs, this set is Butterfly Elements. Three great sentiments and three lovely wispy flower sprays with butterflies.
     This image was printed twice on card suitable for alcohol markers, the main image is coloured with a mix of markers and sparkly gel pens and on the second image just the butterflies have been coloured. Each butterfly has been cut out and scored down the middle so it's wings lift up, it's only glued down the middle to fix it to the main image.
     I coloured a white card blank green with Distress ink, layered up with a pearl burnt orange paper and then my main image panel. The sentiment is die cut and coloured with Distress Ink while the die was still in place, this is mounted on thin foam pads. The whole card will go as standard post as it all lies flat in the envelope.
     This may be the last of our new releases but we begin a new challenge tomorrow at MHK Designs blog, so please pop back to see what we have for you. Don't forget to join in with us for a chance to win some of the new stamps.


Butterfly Elements


I would like to enter this card in the following challenges:
Crafting With Dragonflies - Dragonflies / Butterflies
Cardz 4 Galz - Summer Fun
Cute Crad Thursday - Little Bugs / Butterflies
Hanna and Friends - Butterflies


Sunday, 19 June 2016

MHK Designs - I've Been Framed


     Day four of the new releases from MHK Designs is a very versatile set called I've Been Framed, it has five frames and five sentiments that can all be swapped around to give you even more possibilities.
     Hat's Off really appealed to me, it seemed just right for a Father's Day card. I have used it for a general masculine card here and I still have all the other options to try, now that's value for money.
     The hat is an image I already had so I printed the Hat's Off frame and quote quite small, then die cut it ready to tuck in the ribbon band on the hat. It's printed on white card and coloured with Distress Ink while the die was still in place, I've also stamped a crackle over it in the same ink to age it.
     Well Suited has some great papers in it, this one was printed out on cream card after changing it to browns rather than greys. The edges have been distressed with the same ink as the tag and crackle stamped too. There is a small dark brown mat between the backing and the cream card blank.
     The hat is mounted on thin foam pads, there is a small slit cut in the edge of the ribbon for the tag to go in where it's stuck down flat.
     With the addition of some scrabble tiles to spell dad the card is complete. The tiles do sit a little proud of the card so it would be best hand delivered rather than posted.
     We have one more new release tomorrow so you still have a chance to pop over to MHK Designs blog for the chance to win a stamp set.


I've Been Framed
Well Suited


I would like to enter this card in the following challenges:
Die Cutting Divas - Father's Day
Scrap-Creations - Father's Day/Masculine
Inky Chicks - Father's Day/ Male Cards