This sparkling deer is my challenge entry over at 52CCT. It's a colour challenge this week, brown, cream and red. I'm also hoping he will qualify over on Sparkles Christmas Challenge where sparkle and bling are required.
The deer is a Sizzix die cut out of brown glitter paper that I stuck on to card. I didn't do so well as I stuck him on to white card then I had to colour the edges with a Promarker to get rid of the white, better planning next time!
The deer is stuck on to red card using foam pads. The red gem was stuck on his nose with Cosmic PVA. I used a Fiskars corner punch that has tiny snowflakes on it with cream card to get three different shapes of snowflake, then I stuck a tiny gem in the middle of each one. The snowflake on the rosette was coloured with a Brilliance Pearlescent Chocolate teardrop inkpad, the ink wipes off the gem easily.
The rosette in made using the smallest size of Tim Holtz Sizzix Rosette Die. The cream layer is the actual size of the die strip but the red layer has been cut down by a few millimetres before assembly to show a cream border when completed. The Happy Christmas is a tiny peel off coloured with a brown permanent marker.
The whole picture was then layered onto cream card and then back onto red.
52 Christmas Card Challenge - colour challenge, brown, red and cream
Sparkles Christmas Challenge - Sparkle and bling , glitter and gems
Monday, 10 September 2012
Sunday, 2 September 2012
The Old Boot gets Flower Power
Here as promised is The Boot. It began life a long time ago as a lovely new work boot but when it's work was done I thought it should have a new life.
J&C Creations challenge this month is Try Something Different, so I did. I decided that as distress and grunge are so in vogue at the moment I would go the other way.
With the exception of one sequin covered flower they are all die cut from metal, card and fabric using a range of Sizzix and Spellbinder dies.
I wanted to put my flowers on a green base so I had to paint my boot. I masked off the top brown cuff so it stayed brown and then painted with a cream emulsion I have in a tester pot.
The green layer is a mix of various shades of acrylic paint and some Cosmic Shimmer misters.The large purple and blue flower in the bottom left corner is the only metal one I made, it's coloured with alcohol inks.
The large pink flower with the button in the middle is fabric stuck on double sided sticky sheet then on to card and cut out. The netting is also die cut with a card flower in the middle and a gingham brad.The foliage is cut from a mixture of pearl card, plain card and some coloured with Distress inks or sprayed with mica misters.
The butterfly is the only stamped item on the boot. Stamped and embossed then coloured with Cosmic Shimmer Watercolours.I used a flower stamen folded in half and stuck behind his head to give him antenna.
Everything is stuck on with Cosmic Shimmer PVA dries clear glue, it's amazing stuff, much stronger than it looks!
The whole project has taken a few weeks to complete but it has been fun. Oh and it has a jam jar inside so you can use it to store your brushes or put flowers in it!
I would like to enter my boot in the challenge over on Fashionable Stamping Challenges - Handmade Flowers. When you see the creations people have come up with you'll be amazed. I don't enter to win, I just want to share because it was so much fun making something different.
So go on and Try Something Different!
Labels:
Alcohol ink,
boot,
butterfly,
Cosmic Shimmer,
Distress Inks,
flowers,
Sizzix,
Spellbinders
Thursday, 30 August 2012
Creative Expressions DT call
This card is my DT call entry with Creative Expressions, the requirement is to show Texture in any form.
The stamps used are from CE called Art Nouveau Peacock. I began by using Perfect Medium to stamp the beautiful peacock feathers in a random pattern on black card. Then I used Cosmic Shimmer mica powders to dust over the stamping and because the Perfect Medium is so sticky it clings very well. Once I dusted off the excess powder with a big fluffy make-up brush I gave it a light spray with hair lacquer to fix it.
The wording is from the same stamp plate, again I used Perfect Medium but this time I sprinkled Cosmic Shimmer Bright Gold embossing powder on it and heated from behind.
The heart is cut from greyboard using a Sizzix die, I have punched a small hole in one side before beginning to decorate. The board was coloured with acrylic paint that I happened to have near by. When that was dry I used my faithful Perfect Medium again to ink all over the heart before adding a layer of Ultra Thick clear embossing crystals which were then melted with the heat tool.
This process was repeated twice more but on the last layer I also added some of the mica powders so that I would get a faux enamelled effect. While the last layer was still very warm I embossed the smaller feather into the soft enamel. To get this to work well you need to have your stamp inked (in this case with black) and ready to use before you heat the last layer so that you can stamp it as soon as you've put the heat tool down.
I found some teal coloured ribbon to thread through the hole before mounting it on foam pads on the background. I was lucky enough to find a teal mirri card to use as my matting layer before mounting onto a black card.
I am fast becoming a fan of triple embossing, I have found a lot depends on the ferocity of your heat gun. I'm looking forward to making some Christmas decorations using this technique.
The stamps used are from CE called Art Nouveau Peacock. I began by using Perfect Medium to stamp the beautiful peacock feathers in a random pattern on black card. Then I used Cosmic Shimmer mica powders to dust over the stamping and because the Perfect Medium is so sticky it clings very well. Once I dusted off the excess powder with a big fluffy make-up brush I gave it a light spray with hair lacquer to fix it.
The wording is from the same stamp plate, again I used Perfect Medium but this time I sprinkled Cosmic Shimmer Bright Gold embossing powder on it and heated from behind.
The heart is cut from greyboard using a Sizzix die, I have punched a small hole in one side before beginning to decorate. The board was coloured with acrylic paint that I happened to have near by. When that was dry I used my faithful Perfect Medium again to ink all over the heart before adding a layer of Ultra Thick clear embossing crystals which were then melted with the heat tool.
This process was repeated twice more but on the last layer I also added some of the mica powders so that I would get a faux enamelled effect. While the last layer was still very warm I embossed the smaller feather into the soft enamel. To get this to work well you need to have your stamp inked (in this case with black) and ready to use before you heat the last layer so that you can stamp it as soon as you've put the heat tool down.
I found some teal coloured ribbon to thread through the hole before mounting it on foam pads on the background. I was lucky enough to find a teal mirri card to use as my matting layer before mounting onto a black card.
I am fast becoming a fan of triple embossing, I have found a lot depends on the ferocity of your heat gun. I'm looking forward to making some Christmas decorations using this technique.
Wednesday, 29 August 2012
Triple Embossed Tree
This weeks Christmas card is made with traditional colours and basic theme.
The red and green theme is for Winter Wonderland's challenge so I began with a red card, when I matted the green onto it it looked like something was missing so a small layer of textured gold card has been added.
Then it was time to follow Christmas Card Challenges sketch and cut three red patterned papers and lay them on the green. At this point I chose to add a red ribbon with trees in it to tie in with Jingle Belles holiday bingo challenge.
The tree is for 52 Christmas Card Throwdown's challenge this week, use a chipboard embellishment. The tree has been stained green with Distress stain and then triple embossed with clear embossing powder. On the last layer of clear I added some green mica powder which shows a little better in the small photo. Before the last layer could dry I embossed it with a rubber stamp inked up in Archival green.
I recently invested in a different heatgun, it's a Sheena Douglass heat tool, which has made triple embossing So much easier, it doesn't blow the powder away like my other gun.
The tree is mounted on another piece of gold card and stuck on with foam pads.
I would like to enter this card in the following challenges:
52 Christmas Card Throwdown - Embellishment, chipboard.
Jingle Belles - Holiday bingo, emboss, tree, ribbon
Winter Wonderland - Red and Green
Christmas Card Challenges - Sketch
The red and green theme is for Winter Wonderland's challenge so I began with a red card, when I matted the green onto it it looked like something was missing so a small layer of textured gold card has been added.
Then it was time to follow Christmas Card Challenges sketch and cut three red patterned papers and lay them on the green. At this point I chose to add a red ribbon with trees in it to tie in with Jingle Belles holiday bingo challenge.
The tree is for 52 Christmas Card Throwdown's challenge this week, use a chipboard embellishment. The tree has been stained green with Distress stain and then triple embossed with clear embossing powder. On the last layer of clear I added some green mica powder which shows a little better in the small photo. Before the last layer could dry I embossed it with a rubber stamp inked up in Archival green.
I recently invested in a different heatgun, it's a Sheena Douglass heat tool, which has made triple embossing So much easier, it doesn't blow the powder away like my other gun.
The tree is mounted on another piece of gold card and stuck on with foam pads.
I would like to enter this card in the following challenges:
52 Christmas Card Throwdown - Embellishment, chipboard.
Jingle Belles - Holiday bingo, emboss, tree, ribbon
Winter Wonderland - Red and Green
Christmas Card Challenges - Sketch
Saturday, 18 August 2012
Quick note
Warning : this post contains the H word. Just a quick note to say I'm feeling much better after spending yesterday morning doing some housework, now I know I shouldn't use certain words on a craft blog but I did warn you, that's it for this month!!!!
There are a few things in the pipeline so please bear with me and all will be revealed, including what happened to this tatty old boot.
Happy Crafting, afterall it's too hot to be outside so stay indoors and craft!
There are a few things in the pipeline so please bear with me and all will be revealed, including what happened to this tatty old boot.
Happy Crafting, afterall it's too hot to be outside so stay indoors and craft!
Tuesday, 14 August 2012
Poinsettia sparkle
This amazing stamp is from Stampendous, I fell in love with it the moment I saw it on a day out at Stamperama in Stevenage last sunday.
The image has been stamped on white card and embossed in black. The flowers are coloured with a red watercolour marker and a little sparkle has been added to the centres with some Cosmic Twinkle silver glitter glue. The largest flower has been stamped again on a small piece of card and coloured the same red before cutting out all the petals. I used a black Promarker to touch around the edges so there were no white bits showing.
The centre of the large flower is covered with white gems to give extra sparkle. I used some Glossy Accents on the petals but when it dried it left wrinkles, didn't put enough on maybe, but I rather like them as they look like veins so that was a happy accident.
The whole image is cut into three strips and mounted on black card, which is then mounted on red followed by silver mirri card and finally black again.
In this picture I hope you will see the veins on the flower and the shine of the black embossing.
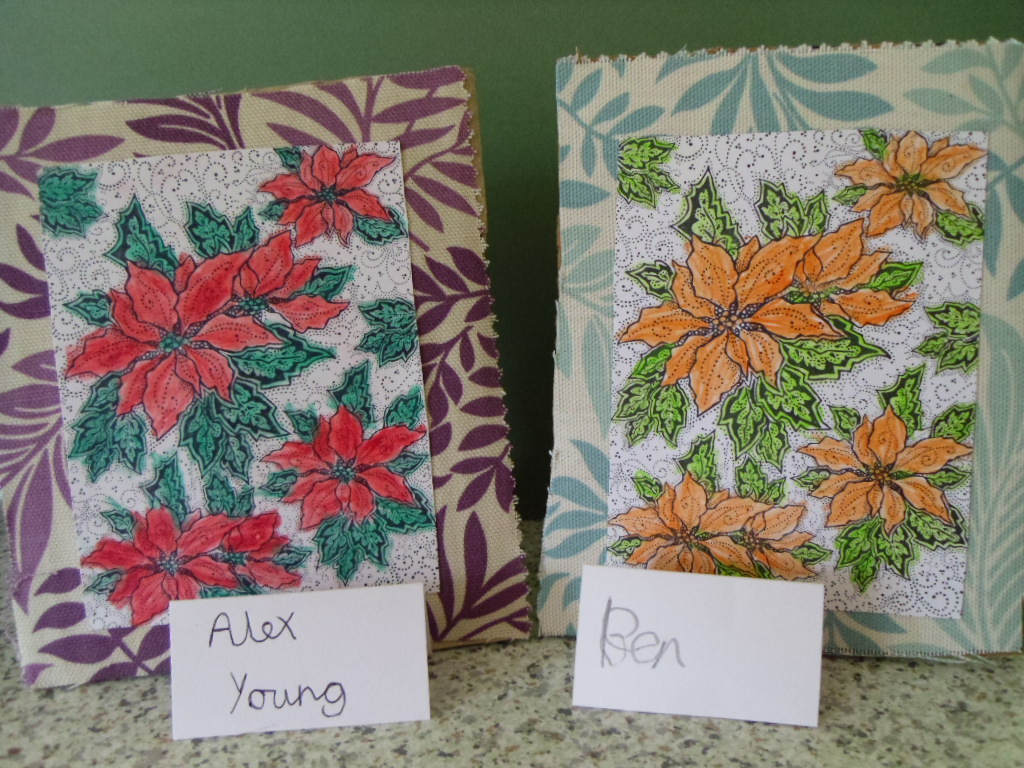
I think there will be much more done with this stamp, it lends itself to many more ideas including the ones shown in the last picture. These are pictures made by my son and his friend who were watching me while I made the challenge card. They used a stamped image which they coloured in and mounted on some fabric bits I had hanging around, then they mounted that on cardboard and made a stand on the back so it would stand up by itself. I was so impressed by them that I promised to blog their efforts for them, well done boys!
The image has been stamped on white card and embossed in black. The flowers are coloured with a red watercolour marker and a little sparkle has been added to the centres with some Cosmic Twinkle silver glitter glue. The largest flower has been stamped again on a small piece of card and coloured the same red before cutting out all the petals. I used a black Promarker to touch around the edges so there were no white bits showing.
The centre of the large flower is covered with white gems to give extra sparkle. I used some Glossy Accents on the petals but when it dried it left wrinkles, didn't put enough on maybe, but I rather like them as they look like veins so that was a happy accident.
The whole image is cut into three strips and mounted on black card, which is then mounted on red followed by silver mirri card and finally black again.
In this picture I hope you will see the veins on the flower and the shine of the black embossing.
I think there will be much more done with this stamp, it lends itself to many more ideas including the ones shown in the last picture. These are pictures made by my son and his friend who were watching me while I made the challenge card. They used a stamped image which they coloured in and mounted on some fabric bits I had hanging around, then they mounted that on cardboard and made a stand on the back so it would stand up by itself. I was so impressed by them that I promised to blog their efforts for them, well done boys!
I would like to enter my card for the following challenges:
52 Christmas Card Throwdown - Black ,White, Red and Silver
Jingle Belles - Sketch
Christmas Card Challenges - Texture
Thursday, 9 August 2012
Snowman shaker card
This weeks challenge at 52 Christmas Card Throwdown is a sketch. I then decided to see how many other challenges I could enter using the one card. It was a 'challenge' but that's what it's all about isn't it and it has been fun.
I made three little shaker boxes with three stages of snowman construction stamped in them. The images are from The Snowman stamp set and Archival Cobalt ink was used. The snow in the shaker is a mixture of white glitter flakes, Polar White Flowersoft and my new purchase - Clear Micro Beads, the beads help the flakes to keep moving around.
The backing paper is a scrapbook page from stash. The lace is paper lace and there is a little ribbon bow on top of the bakers twine. I have chosen to use punched snowflakes instead of stars and put small blue gems in the middle of each one, they are mounted on small foam pads to give a little height. The card has come out almost 8 inches square so I think this will be a hand delivered one.
I would like to enter it in the following challenges:
52 Christmas Card Challenge - Sketch
Winter Wonderland - Lace & Ribbon
Christmas Cards All Year Round - Children's
Christmas Card Challenges - Use something new
Crafty Hazelnut's Christmas Challenge - Favourite Colour
Sparkles Christmas Challenge - Punch It
Does anyone know where I can get star shaped brads? I've been looking for a couple of weeks but found nothing yet, your help would be appreciated.
I made three little shaker boxes with three stages of snowman construction stamped in them. The images are from The Snowman stamp set and Archival Cobalt ink was used. The snow in the shaker is a mixture of white glitter flakes, Polar White Flowersoft and my new purchase - Clear Micro Beads, the beads help the flakes to keep moving around.
The backing paper is a scrapbook page from stash. The lace is paper lace and there is a little ribbon bow on top of the bakers twine. I have chosen to use punched snowflakes instead of stars and put small blue gems in the middle of each one, they are mounted on small foam pads to give a little height. The card has come out almost 8 inches square so I think this will be a hand delivered one.
I would like to enter it in the following challenges:
52 Christmas Card Challenge - Sketch
Winter Wonderland - Lace & Ribbon
Christmas Cards All Year Round - Children's
Christmas Card Challenges - Use something new
Crafty Hazelnut's Christmas Challenge - Favourite Colour
Sparkles Christmas Challenge - Punch It
Does anyone know where I can get star shaped brads? I've been looking for a couple of weeks but found nothing yet, your help would be appreciated.
Subscribe to:
Posts (Atom)