Warning : this post contains the H word. Just a quick note to say I'm feeling much better after spending yesterday morning doing some housework, now I know I shouldn't use certain words on a craft blog but I did warn you, that's it for this month!!!!
There are a few things in the pipeline so please bear with me and all will be revealed, including what happened to this tatty old boot.
Happy Crafting, afterall it's too hot to be outside so stay indoors and craft!
Saturday, 18 August 2012
Tuesday, 14 August 2012
Poinsettia sparkle
This amazing stamp is from Stampendous, I fell in love with it the moment I saw it on a day out at Stamperama in Stevenage last sunday.
The image has been stamped on white card and embossed in black. The flowers are coloured with a red watercolour marker and a little sparkle has been added to the centres with some Cosmic Twinkle silver glitter glue. The largest flower has been stamped again on a small piece of card and coloured the same red before cutting out all the petals. I used a black Promarker to touch around the edges so there were no white bits showing.
The centre of the large flower is covered with white gems to give extra sparkle. I used some Glossy Accents on the petals but when it dried it left wrinkles, didn't put enough on maybe, but I rather like them as they look like veins so that was a happy accident.
The whole image is cut into three strips and mounted on black card, which is then mounted on red followed by silver mirri card and finally black again.
In this picture I hope you will see the veins on the flower and the shine of the black embossing.
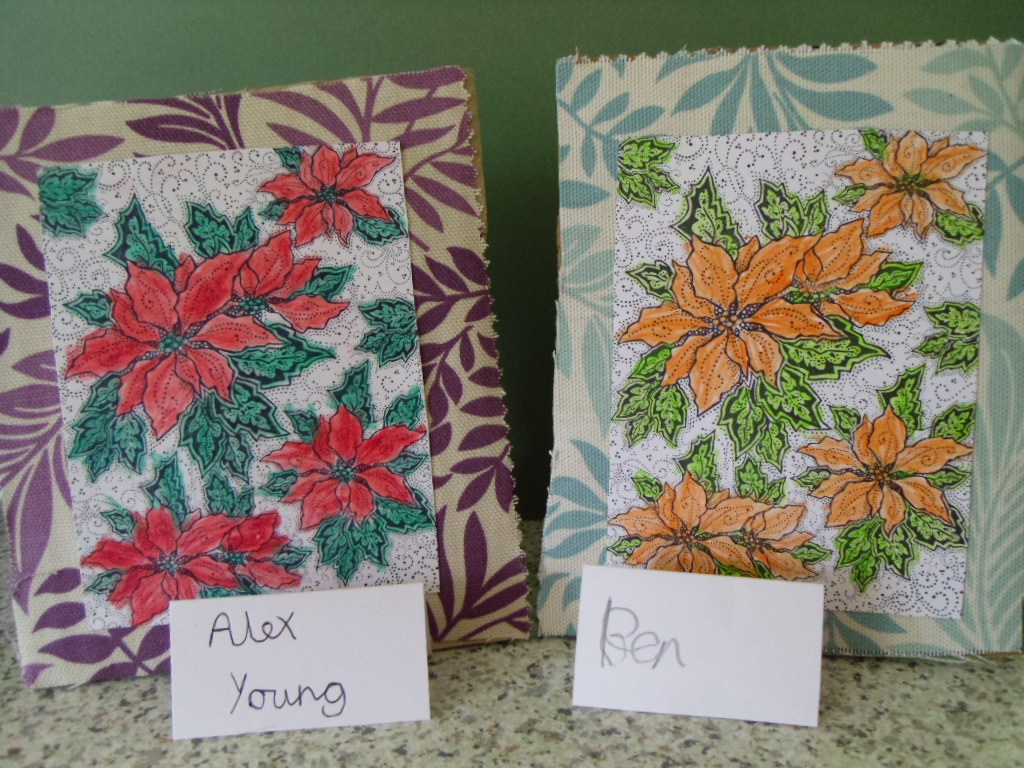
I think there will be much more done with this stamp, it lends itself to many more ideas including the ones shown in the last picture. These are pictures made by my son and his friend who were watching me while I made the challenge card. They used a stamped image which they coloured in and mounted on some fabric bits I had hanging around, then they mounted that on cardboard and made a stand on the back so it would stand up by itself. I was so impressed by them that I promised to blog their efforts for them, well done boys!
I would like to enter my card for the following challenges:
52 Christmas Card Throwdown - Black ,White, Red and Silver
Jingle Belles - Sketch
Christmas Card Challenges - Texture
Thursday, 9 August 2012
Snowman shaker card
This weeks challenge at 52 Christmas Card Throwdown is a sketch. I then decided to see how many other challenges I could enter using the one card. It was a 'challenge' but that's what it's all about isn't it and it has been fun.
I made three little shaker boxes with three stages of snowman construction stamped in them. The images are from The Snowman stamp set and Archival Cobalt ink was used. The snow in the shaker is a mixture of white glitter flakes, Polar White Flowersoft and my new purchase - Clear Micro Beads, the beads help the flakes to keep moving around.
The backing paper is a scrapbook page from stash. The lace is paper lace and there is a little ribbon bow on top of the bakers twine. I have chosen to use punched snowflakes instead of stars and put small blue gems in the middle of each one, they are mounted on small foam pads to give a little height. The card has come out almost 8 inches square so I think this will be a hand delivered one.
I would like to enter it in the following challenges:
52 Christmas Card Challenge - Sketch
Winter Wonderland - Lace & Ribbon
Christmas Cards All Year Round - Children's
Christmas Card Challenges - Use something new
Crafty Hazelnut's Christmas Challenge - Favourite Colour
Sparkles Christmas Challenge - Punch It
Does anyone know where I can get star shaped brads? I've been looking for a couple of weeks but found nothing yet, your help would be appreciated.
Wednesday, 1 August 2012
Christmas greens
This weeks Christmas card was inspired by an inspirational photo shown on Christmas Stampin' All Year Round, all that was needed then was to join it to the other challenges I wish to enter.
I began with a white background, masked off a small circle and then used Distress Ink Iced Spruce to create the sky and snow drifts. I left the moon mask in place while I spritzed the card with water to create snowflakes, I have also spritzed with a pearl mica spray to get a subtle shimmer.
The tree was die cut using a Memory Box die and then placed on sticky film before sprinkling with green glitter.
Ultra mini brads in pale green have been added to the tree before it was stuck in place on the background. The reindeer was die cut with a Sizzix die from the Merry Christmas Set in textured gold card and then mounted on foam pads onto the background. The card was matted onto dark green card before a ribbon greeting was added to the top corner. The next mat layer is the same gold textured card as the deer and finally matted onto a card of the same green as the tree.
It may be August 1st but there are only 145 days to Christmas!!!
I would like to enter this card in the following challenges:
52 Christmas Card Throwdown
Christmas Stampin' All Year Long
Jingle Belles
Christmas Card Challenges
Crafty Hazelnuts Christmas Challenge
Tuesday, 24 July 2012
Holly Wreath
This weeks challenge over at 52 Christmas Card Throwdown is to use a wreath on your card. Also over on J and C Creations challenge blog the theme is anything goes using Sizzix dies so this card joins them together nicely.
The holly leaves have been cut from cream card stamped with a music score. There were four different colours used, Archival Coffee, Distress Brushed Corduroy, Distress Forest Moss and Distress Iced Spruce. I cut 30 leaves from the Sizzix Festive Greenery die as it has four different holly leaves on it. All the leaves were then edged with Distress Forest Moss.
The wreath was built by gluing each leaf to another, I used a round shape as a template to help me keep a decent shape, it's not as easy as you think to make a good circle!
Having glued the wreath together I then stuck red gems on as berries and put a red bow at the top.
The numbers are cut from sticky sided card using Sizzix alphabet Round Table. Peel off the top layer and sprinkle with gold glitter, I found that the glitter was shedding a little so I sprayed it with hair lacquer to fix it.
The numbers are mounted on foam pads and fixed in the middle of the wreath.
The backing paper is from Chocolate Baroque CD Rom Seasons Greetings printed in draft so that it's paler and doesn't overpower the wreath. The holly paper is matted on to red mirri card and mounted on to what used to be a white card blank, the edges have been coloured with Distress Forest Moss to get a nice dark green as the white didn't look good. In the corners of the holly paper are small gold peel off corners, I've used peel offs because I can usually get two or three corners to emboss well but the fourth never seems to work.
It was fun making a Christmas card in such hot weather, after all it was too hot to be outside wasn't it?!
Friday, 20 July 2012
Hint of blue
This weeks offering for 52 Christmas Card Throwdown is following a colour theme of Black ,White and a hint of Blue.
The image is a stamp from Chocolate Baroque found in the same set as last weeks tree, Madonna and Trees. The image is stamped and embossed with Cosmic Shimmer Black Sparkle onto a piece of Centura Pearl card, this card has a golden pearl shine to it. I have painted the swaddling clothes with a pale blue Cosmic Shimmer watercolour which matches the Brilliance Pearl Inkpad Sky Blue that was used to colour the edge of the matting layer. I often use the Brilliance pearl inks to colour mat layers because you can use ordinary card and only colour the edge that will show rather than using a large piece of more expensive pearl card only to cover most of it up.
The swirls down the side are die cut with Sizzix die Festive Greenery from a white glitter card and then studded with pale blue gems. It does have a rather nice twinkle to it but unfortunately my camera work leaves much to be desired...sorry.
I would like to claim a little artistic license on this card as I have painted the halo's a very pale gold, I felt they needed to be highlighted a little. Having played with this stamp for the first time I really like it, there will be more cards made with this one. The Madonna is quite tall but fits nicely onto a large DL size card.
Christmas crafting goodies are arriving in the shops now so Happy Hunting.
Friday, 13 July 2012
True Friend Tag
This months challenge over at J and C Creations is Anything Goes with the emphasis on Sizzix dies. Now how could I let an opportunity go by without making my favourite flower. I'm not normally a very 'cute and girlie' crafter but I do love flowers and although this tag looks purple it is actually more of a gorgeous plum colour.
Here is a list of all the Sizzix dies used : Tag & Bookplates / Tattered Florals / Tattered Flower Garland / Festive Greenery.
To begin with I cut a tag using Foundations Coconut White card, this card works very well with Distress Inks. I inked the tag with Seedless Preserves Distress Ink from the Autumn collection, it's a lovely deep plum colour which my camera doesn't seem to pick out very well....sorry. Then I used Tim Holtz stamp Fabulous Flourishes spritzed with water, this will lift the ink back out of the card and leave a gentle image. The edges have been coloured with Black Soot Distress Ink and then the whole tag has been sprayed with Cosmic Shimmer Enchanted Gold Mica Mist.
The flower has been coloured in the same way but not sprayed with mica. For the tutorial on how to make this flower here is a link to a previous post. The leaves are from the garland die and have been coloured with Crushed Olive Distress Ink then veins added with a gold gel pen. The swirls were cut from green card and sprayed with mica as well. The sentiment is a stamp from stash embossed in Gold and cut out with Spellbinder die Mega Deckle Rectangles and mounted on foam pads. The ribbons are a green organza from stash and some American Seam Binding coloured with Seedless Preserves. I really like this ribbon as you can colour it to match your project so easily, after all how often do we spend ages hunting for just the right colour.
I hope you find this useful, there will be lots more flowers to come with a little finale at the end of the challenge so please pop in when you can. All items used here can be found at JandC Creations. Happy Crafting.
Subscribe to:
Posts (Atom)