The base for this special birthday card was all things I-Zink, well almost all things, with a splash of John Nextdoor. You will find a product list at the end of this post including which colours were used.
The leaves were made using pigment droppers on acetate. You need two pieces of acetate, drop the ink on one piece, then cover with the other piece and squish the colour between them, this is best done a sheet of paper towel as there may be some leakage along the sides. Pull the two pieces of acetate apart before the ink dries, this will give you two coloured sheets of acetate.
Once completely dry place the acetate on some double sided sticky sheet ready for die cutting. There are many ways of attaching acetate but I have found this to be the best way for me, as the adhesive is all over the acetate there are no visible marks once it's stuck down.
For this card I die cut one large, one medium and three small leaves from this A6 sheet.
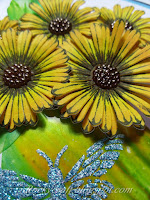
For the flowers I used the Gerbera stamp and die set. I chose to colour the flowers before cutting them so that I wouldn't accidentally pull a petal off. Each flower is made up of three layers, all petals shaped before assembly.
The little embellishments in the centre came from my random stash box so I can't tell you where they came from but they were the perfect colour.
The Gerbera set produces six flowers each use so I made them all up, the ones that may not be used on the card would join the flower stash box for future use.
I lay the flowers on the cut to size white card topper and moved things around until happy with the arrangement, then it was time to peel of the backing on the two larger leaves and stick them in place. At this point I took a picture so I would remember what went where.
I took the flowers off and set them aside. Using a stencil and some I-Zink texture paste I put a butterfly on the largest leaf, while still wet I sprinkled it with a mix of teal and iridescent glitter and set it aside to dry.
Once the paste was dry I put two mat layers on the topper card, one in teal to match the butterfly and the other in dark brown to match the flower centres, then I stuck it onto a 6.75 inch white card blank. This was all done now so that the flowers didn't get squashed.
I needed to add a greeting but I wanted it to look like a plant label tucked in the posy. I have some wooden cutlery picked up on a recent outing, the handle of the fork was just the right size. The greeting is stamped in dark brown and the prongs cut off, to be kept for future use.
The flowers were laid back on the card, using the picture as guidance, to work out where to put the label. I then removed the flowers and drew round the end of the label so I knew where to stick it. Once firmly in place I added the flowers and stuck them down, the last little leaf was tucked into place at the end. I have kept the number of leaves and flowers odd as I think it looks a little more natural.
What do you do with a left over flower and a couple of leaves? Make a matching tag!
Using a white tag I ran around the edge with a little foil in teal and dark brown and stuck the flower and one leaf on the bottom.
A teal greeting cut from the same card as the mat layer made sure it all co-ordinates.
The I-Zink droppers can be added to water to make a coloured spray, perfect for dyeing cotton ribbon, again keeping the colours the same.
A special card and matching tag for a special birthday.
Materials used
I-Zink pigment droppers - Cactus, Volubilis & Mango
I-Zink texture paste - Jasmine
I-Zink dye ink pads - Aurore, Miel & Cire
John Nextdoor stamp set - JND5001 Gerbera
John Nextdoor die set - JNDGD010 Gerbera
I didn't mean to publish this today, it was one of my application projects for John Next Door's Angels. It was around this time last year that I began working on my first Hochanda release for the Angels, I'm happy to say I'm still with them and still loving every minute of it.


Oh wow this is a stunning card and tag. I love them both. Take care. Hugs Jackie
ReplyDelete