Tuesday, 1 December 2015

Tube Reindeer


        Well here we are in December and all those Christmas cards and decorations made throughout the year are finally being put to use. This month it's time to concentrate on the little bits and bobs to finish off the Christmas effect, like these little reindeer.
      We have a collection of ideas for decorations and gifts at Altered Eclectics, so pop over for some inspiration, then come back and show us your creations.


     These two little deer started life as a kitchen roll tube, cut the tube in half and you can make two of them.
     Mark the tube as shown on the left, solid lines are cut lines and dotted are fold lines, there is another tiny cut line at the end of the strip across the top.
     Once cut you can decorate before you fold him into place, I used a swirl stamp and a brown inkpad. Avoid his face if you can so that his features show up more.
     The bottoms of his legs have been coloured brown to look like hooves and he has small woggly eyes stuck on, along with a red gem nose. The mouth is drawn on with a pen. The folding over of his back is what makes him stand up properly, there is no need for glue either. The antlers are just folded up and curled around until they look right.
     These are great fun to make with children or for children. They are also small enough to have on your table as place markers, just leave a space to write the names on or hang a tiny sign around his neck.
     Please come and show us your creations at Altered Eclectics, it doesn't have to be Christmas, we are an anything goes as long as it's not a card or an ATC, just something you've altered or recycled.


I would like to enter these reindeer in the following challenges:
613 Avenue Create - Anything Goes / optional Paper Piecing
Crafting When we Can - Don't Forget The Animals

Wednesday, 25 November 2015

CAS Thanks


     The Male Room challenge this time is Thanks or Thanksgiving, you have two weeks to make your masculine project and join in the challenge.
     I chose to make a very simple card, with just a small amount of decoration. To do this I masked off a strip down my card blank, I use my trusty pricking mat from Woodware, it has no holes in it as it's never used for pricking. It's great for stamping on as it has a little give in it, perfect for working on an uneven surface and grid lines for getting things straight.
     Low tack stencil tape from Stix2 masks off the work area and holds down the cog stencil too.
     Using Distress inks I coloured the card, carefully removed the tape and stamped my greeting in Archival Ink Coffee, there was a tiny smudge by the Y so I covered it up with a little star peel off.
     Come and join in with giving thanks at The Male Room, anything masculine as long as you follow the theme.

Thursday, 19 November 2015

Christmas Wish Books


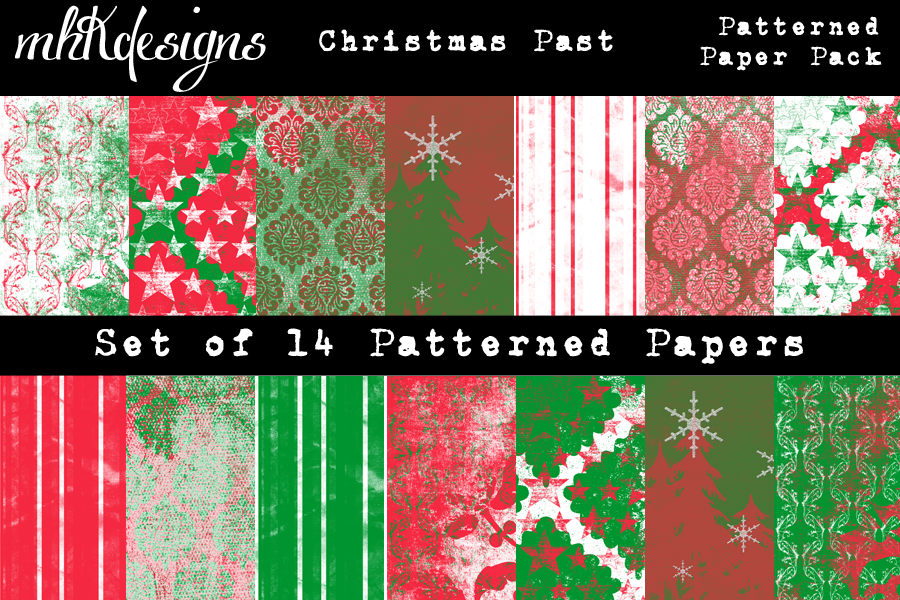
     Here is a little project for MHK Designs using their gorgeous Christmas Past paper set. This set is an absolute steal at just £2.02 for 14 papers, available on Etsy.

      To make the tiny books I started with an envelope punch from Woodware and MHK Designs pretty papers. I printed eight of the papers on an A4 sheet of thick paper and punched eight envelopes.
      To make the spine of the book I cut a strip of card 4 1/2 inches long by 1 1/4 inches wide. The strip is then scored at 1 1/4 and the next eight 1/4 inches, this should leave another panel at the end measuring 1 1/4 inches.

     For the cover I printed two copies of the pine tree paper, one for the front and one for the back. Two greyboard pieces, cut slightly bigger than the envelopes, are covered with the paper.
     The covers are joined by sticking on the spine to both the front and the back, then each envelope was stuck to the spine making sure to put them on the right hand 'mountain' of the spine.
     Turning the book over a small length of red ribbon is added to the 'valley' of the spine before sticking all the valleys shut.
     To add some sparkle there is a glue border all the way around the front cover that is sprinkled with iridescent glitter and a tiny glitter dot in the middle of each snowflake.
     Each envelope has a tiny gold edged white card tucked inside for you to write your wishes on. These would make great little decorations for the children to hang their Christmas wishes on the tree.
     There are lots of digi stamp sets and patterned papers in the MHK Designs Etsy shop, there's a Facebook page to showcase your creations and there will be a new challenge blog in the new year.


I would like to enter these little books in the following challenges:
A Snowflakes Promise - Anything Christmas
The Sisterhood Of Crafters - It's Beginning To Look A Lot Like Christmas

Monday, 16 November 2015

Merry Monday Reindeer


     This project is for Merry Monday who very kindly asked me to be a Guest DT member this week. The challenge this week is to make a Christmas card with a reindeer on it and I had just the stamp in my stash from Indigo Blu, I'm ashamed to say that this is the first time it has seen ink.
      I started with a large piece of white card and stamped my image using Archival Ink Cobalt. I had seen a sample made for Indigo Blu that I just loved, it's why I bought the stamp, but I'm sorry to say I can't remember who made it, if it was you then 'Thank You'.
     Distress Inks Faded Jeans and Dusty Concord where used to make the sky once it had been masked with a die cut circle for the moon and a torn edge to make snow drifts.
     On the second snowdrift I also stamped a bush using the top of the tree while the mask was still in place and again at the bottom of the picture.
      I cut my card down to a size I was happy with, cutting off part of the tree and placing the image in the corner, I think this is what drew me to the original sample, it's off centre.
     Once trimmed to size I added iridescent glitter to the snow on top of the cliff and to the moon. Then spritzed the whole picture with Dreamweaver Moonstone mica powder in water, the shimmer that this gives is amazing and perfect for subtle glimmering snow.
     The image is mounted on Amethyst card, then lilac before going on to a dark blue surround. It makes for a lovely card but I might just have to frame it as a Christmas picture and hang it on the wall next month.
   
     Thank you to Merry Monday for asking me to join them this week, I have had great fun finally using this stamp. Please pop over and join in the challenge by adding your reindeer card to the herd.


I would like to enter my reindeer in the following challenges:
ABC Christmas - W is for Wild Thing
Christmas Stampin' All Year Long - Anything Christmas Goes
A Snowflakes Promise - Anything Christmas
Alphabet Challenge - T is for Tis The Season

Wednesday, 11 November 2015

Remembrance and Gratitude


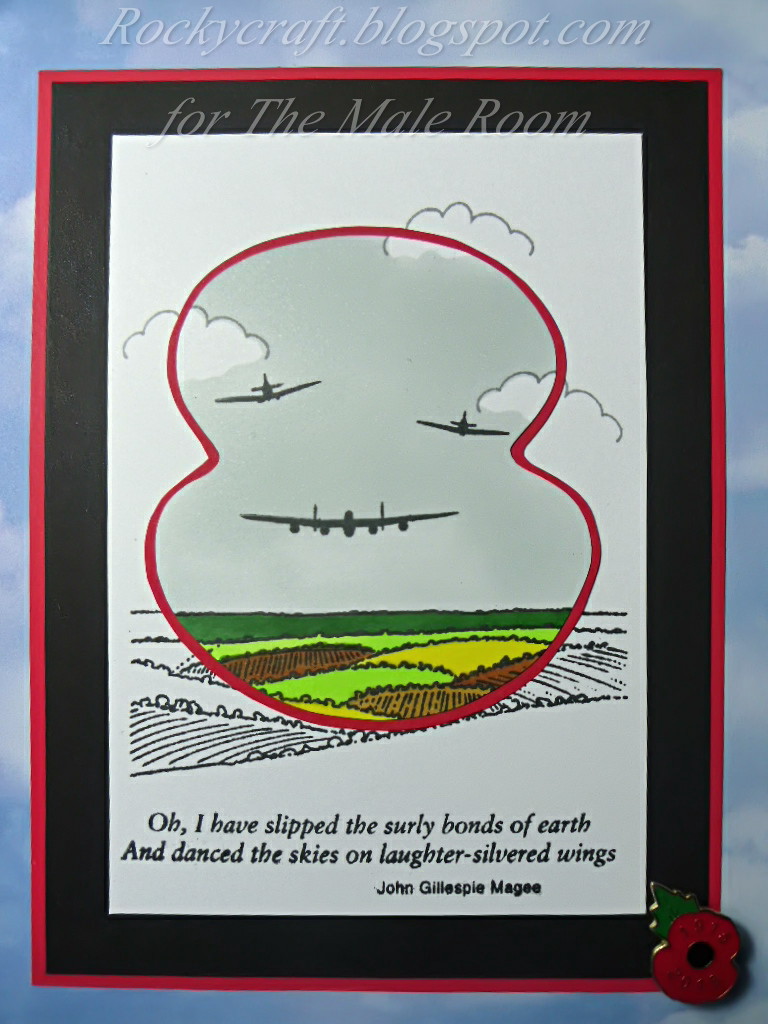
     The new challenge at The Male Room is remembrance or sympathy, which is a fitting theme for today of all days. I spent a day at the Royal Airforce Museum at Hendon last week, a great place to visit, so much to see and for free aswell!!  It's not until you see the aircraft that flew during the war that you appreciate just how basic they were and just how brave those men were, thank you to all of them!
     I have used a stamp set from Hobby Art called Flypast to make this card. It is stamped on white card using Memento ink so that I could colour the poppy shape with alcohol markers, this shape was hand cut and laid over the base layer before stamping.
     Please excuse the slightly uneven red border around the poppy as I had to cut that freehand too. It is all stuck down flush so it remains very simple, with a wide black layer on a thin red edge card.
     Come and join us at The Male Room with your creations for sympathy or remembrance, which ever you prefer to make, we would love to see them all.


I would like to enter this card in the following challenge:
One Stitch At A Time - Remembrance Sunday / The Dead

Saturday, 7 November 2015

Silver Forest


     Welcome to a CASE-ing Christmas project, we have a great card from Donna this month to inspire us, I chose to use the trees and the ribbon as my starting point.
     The card is made using a new product stocked by Woodware from Clear Scraps, it's an acrylic sheet that can be used like acetate but is much more rigid. It comes with a protective cover so it doesn't get damaged before you use it.
     The trees were stamped in Stazon Silver on to the acrylic and on to a piece of black card, making sure to offset them to look like a small forest when the card is assembled.
     Once dry the black card was stuck on to the wrong side of some tartan paper leaving a large spare piece at the top to form the hinge on to the acrylic, it is stuck on to the acrylic with red line tape.
     The small greeting inside is stuck on to the black card and the banner greeting on the outside is stuck on using red line tape. The heart greeting is stuck on with foam pads before adding the twine decoration to the top tartan strip to finish it off.
     Taking photographs of shiny things can be problematic but I hope you can see the effect of the layered trees made possible by using acrylic. The other great thing about this acrylic is if you don't like what you've stamped or it's gone wrong just clean it off with Stazon cleaner and start again.
     Please come and join us at CASE-ing Christmas with your seasonal creations, we would love to see them, this challenge is open until the end of the month.


Materials list - available from your  local craft shop
Woodware Craft Collection - Stamp - FRS278 Winter Forest
                                          Stazon Silver Ink Pad
                                          Clear Scraps Acrylic Sheet
                                         
Stix2 Anything -  Red Line Tape
                         Foam Pads


I would like to enter this card in the following challenges:
Inkspirational - Anything Goes With Silver


Wednesday, 4 November 2015

Bubble And Bling


     Here's another of the workshop cards we are making today at The Corn Hall. There are two colour variations in the samples but it's up to the students how they decorate their tree.
       The tree is stamped and embossed ready to receive it's decoration.
      These two cards have been decorated with a mixture of glue dots and PVA holding glitters and foils. There are peel off holographic dots, some left gold and silver, some silver ones coloured with peel off pens to get red and blue. The same pens have been used to colour Icing Sugar Candi to go along with the gold and silver Candi. Even gems can be coloured with the pens to match your decoration.
      The white decorated panel is then mounted on a co-ordinating layer of pearl paper before going on to a white card blank. The greeting is stamped and embossed, then punched out and mounted on foam pads.


Materials list - available from your  local craft shop
                                          Stamps - JGS355 Bubble Bloom Festive Tree / FRCL184 Christmas Rounds
                                                        JGS404 Christmas Cheer
                                          98091H  Holographic Peel Offs 
                                          Peel Off Pens
                                          826-07  11/2" Circle Punch

Stix2 Anything -  Glitters
                         PVA Glue
                         Micro Beads
                         Glue Dots 3mm / 6mm / 10mm
                         Craft Foils
                         Tape Runner
                         Foam Pads


I would like to enter these trees in the following challenges:
Merry Monday - Red and Gold
12 Months Of Christmas - Sparkle (FT)
Glory Of Christmas - Glitter and Shine