Tuesday, 1 October 2013

Something Spooky at Country View Crafts


      This months challenge at Country View Crafts is to make 'Something Spooky'.  I am so very happy to be one of their gust designers this month having won the August challenge. I felt I really had to come up with something special for Halloween.
     I found this paper mache house in a charity shop a few months ago, it was perfect for this challenge. It had been partly decorated already but nothing that couldn't be painted over. I started by painting it pale brown with acrylics, then gave it a white acrylic wash. It still didn't look quite right so I stamped in brown using a woodgrain clear stamp, because it wasn't mounted I was able to bend it gently to reach into the corners of the gables.
     The roof tiles are Sizzix Rosette strips cut in orange card then distressed with Brushed Corduroy and Forest Moss Distress inks. Each strip is stuck on individually, gluing along the top edge only so when all the tiles are on the roof the front edges can be lifted gently to create a more realistic look. The gables were a bit time consuming but so worth the effort. I have used Flowersoft to create a mossy look to my roof. There are die cut bats mounted on an acetate collar wrapped around the chimney so they can fly around the house. The outside lamp is by Tim Holtz Ideaology, it takes two small batteries. The battery pack is stuck inside the roof using Velcro tape so it can be taken off when I need to change it. There is also a battery tea light inside the house, this has been coloured black with an alcohol marker so it can't be seen through the windows. Inside has been painted black and has two die cut ghosts on the back wall that have been covered with glow in the dark glitter.
     On the wall outside is a Flowersoft wisteria, I know it's not in flower in October but the wall needed some decoration. The bushes are florist moss stuck on with PVA glue. The broom is made from twigs found in the garden bound together with black cotton, the sparkly cat is a foam shape from a child's art pack and the pumpkin is made from scrunched up orange tissue with 'bat' bodies for eyes and a 'bat' wing for his mouth.
      I've really enjoyed making this house. Halloween isn't something we celebrate very much here but I have to admit making 'spooky' things may change that a little. I'm still looking forward to Guy Fawkes night though, fireworks, sausages and a big bonfire!

Wednesday, 25 September 2013

Faux Patina Designer Gift Bag


     This little gift bag is from a template by Papermania, I've included a fifty pence piece so you can gauge the finished size.
     This week at The Technique Twist the challenge is Faux Patina, there is a link to a tutorial which I found very helpful. I have opted for an old leather look rather than metal for my bag.
     I started with white card from which I cut the template. To emboss the sides I did one side at a time as my folder is only a 6x4 . I inked my folder with Old Paper Distress Ink on the embossing side of the folder before embossing my card. Once out of the folder I then Inked with Brushed Corduroy, Gathered Twigs and a dash of Aged Mahogany to get the various shades of brown.
     The shine comes from Cosmic Shimmer Gilding Wax Autumn Bronze which I rubbed on to the card with my finger. Let the wax dry off then buff it up to a nice shine. The tag is Grunge Paper with an eyelet through it, hung on some old gold ball chain. The clasp is a gold button stuck on with ultra sticky tape, I have used a foam pad underneath the flap to lift it up a little.
     I had a very messy time making this but it was fun, I shall definitely be making some more.
I would like to enter my bag in the following challenges:
The Technique Twist - Faux Patina
Anything Goes Challenge Blog - Out With The Girls

The Male Room flock


This time at The Male Room our challenge is animal, bird or fish. We would like to see anything masculine with this theme, card, scrapbook page or gift creation. Please pop over and take a look at the DT samples, they're all quite different so you may see something to spark your imagination, we'd love to see what you create.
This stamp is by Sheena Douglass, I bought it a while back but this is it's first outing, shame on me! It appealed to my sense of humour as my parents live in Wales and my friends surname is Ramsbottom, it was a 'must have' stamp for me.
This image has been stamped with Memento Tuxedo Black so that I could use my new markers to colour it. As you can probably tell I'm in need of practise with them so this was a nice easy start. I look at some of your gorgeous cards and wish I could get my colouring to look that good, I hope I shall improve with time.
I have coloured with greys and a little green, then outlined with a cool grey which looks more blue than grey but works well all the same. I found some green card that looked great as a mat but needed some texture, so it has been embossed with a Darice folder that looks like chicken wire.
Quite a basic card to make that could be used for any occasion. You have two weeks to make your creation so please come and join us at The Male Room.

Tuesday, 24 September 2013

Technique Time Tuesday CASE

      This is a CASE card from Technique Time Tuesday's current challenge. I'm hostess this month with the Faux Silk technique, there is a video tutorial on TTT to show you how we've done it.
     I have chosen a card by a very talented lady named Kimbo to CASE. There are some really great cards entered this month but Kimbo's caught my eye because of the oriental theme and the fact that she had heat embossed tissue paper.
     I chose green tissue to emboss with bamboo leaves, then I crumpled it up and opened it out again. To my surprise non of the embossing cracked at all, maybe it's the Cosmic Shimmer powder that's the secret, I'll have to experiment further. Once opened out the tissue is stuck on to white card but not smoothed out completely, some of the wrinkles must stay to imitate silk.
     The image panel is stamped in Archival Olive Green on cream card, it's an old PSX stamp of my Mum's. Both image and background panels have been mounted on black before being put on a pale green water stamped card.
     The coin is a gift from a fellow DT member, thanks Karen, with a few Mizuhiki cords knotted through it. There is also a Mizuhiki knot at the bottom. Karen of Stamping In Pink has been campaigning to bring back the oriental style, I've been trying to help because I love it's simplicity and style. I think with the launch of some new oriental stamps by Sheena Douglass that we may be on to a winner!
     Please pop over to TTT and take a look at the DT cards and challenge entries, there is still one week left to join us.

Monday, 23 September 2013

Shabby and Vintage at HOC

     Welcome to my DT contribution for month three at House Of Cards. Each month we have a theme but each week we have a different style within that theme. This week it's Shabby and Vintage with a gorgeous colour palette of lilacs, purples and a splash of coral.
     For my card I've chosen to omit the coral and stay with shades of mauve. The background is a white piece of card inked with a mixture of Distress Inks Seedless Preserve and Milled Lavender, then water stamped with a Hydrangea flower.
     The doily is cut from mauve card with an X-Cut die, inked over with Adirondack Eggplant ink and decorated with Cosmic Shimmer Pearl PVA in purple. The silhouette is also an X-Cut die and coloured with Eggplant to match the doily, card edge and leaves, it is mounted on foam pads over a cream circle because it looked too dark over just the doily.
     The flowers are Hydrangea paper flowers I got at a craft show a couple of years ago, coloured with the same distress inks as the background and then dabbed over with a little mauve mica powder. The gems have been coloured with an alcohol marker so they tone in as well.
     Please pop over to the challenge site and have a look at the lovely creations from the other girls on the DT, I'm sure you'll find something to inspire you to join us at House Of Cards.

Sunday, 22 September 2013

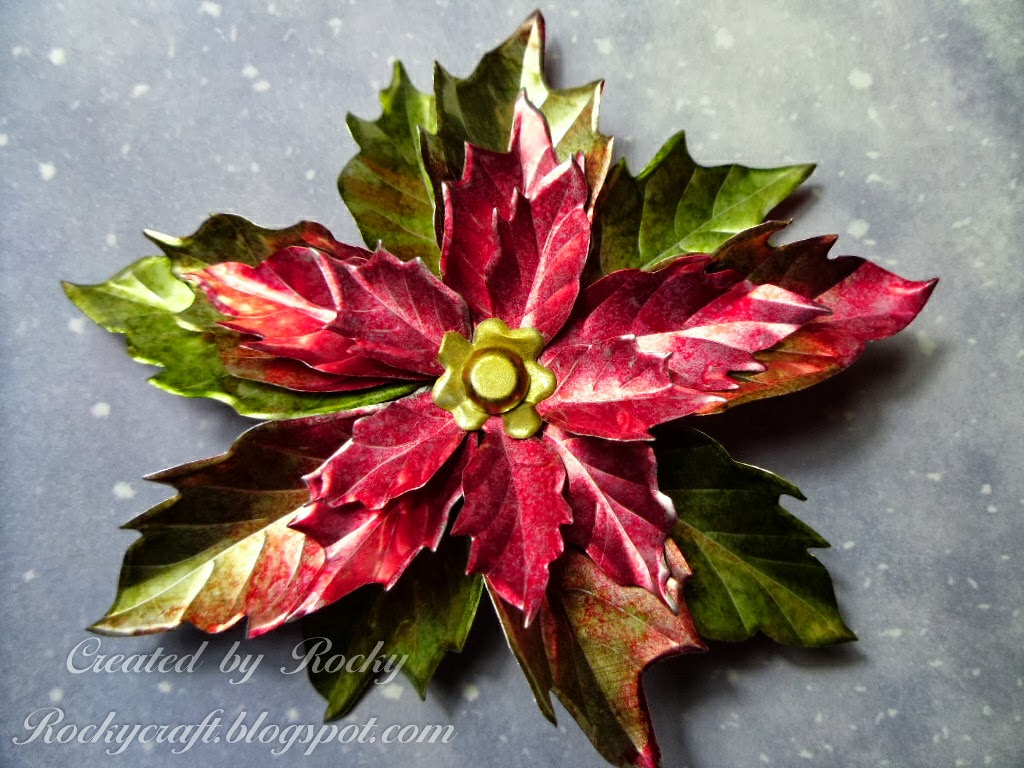
Recycled Poinsettia


     This seasonal brooch has been made from drink cans. It's quite a good way of recycling something and turning it into a hand crafted gift for Christmas.
     To begin with cut open the drink can carefully, I would suggest wearing gardening gloves when you do this to protect your hands and use an old pair of scissors. At this stage the edges are sharp but once die cut they are rounded over slightly and much safer to handle.
     I have used a Sizzix Bigz die, Tattered poinsettia. These dies have a blade embedded in the foam so they are sharp enough to cut metal, unfortunately Spellbinders and similar rely on pressure on the ridge to cut and metal is just to thick.
     My flower has been coloured using Alcohol Inks but alcohol markers will also work well. The metal can be passed through an embossing folder to get texture on the petals but this time I have just used a nylon tool to score veins on them. I remembered I had a metal craft tool set in the cupboard so I have been making great use of that again, it has some really useful nylon tool heads as well as a selection of fancy pattern wheels.
     There are two large petal sets, one coloured with greens, one coloured with green and red, then one middle size petal set and one small both coloured with red only. The centre is coloured yellow as is the paper fastener that holds it all together. There are lots of really nice brads available that would look great as flower centres but paper fasteners work just as well and they can be coloured too.
     I have stitched a brooch back to a felt flower shape that has double sided sticky sheet on it, once the brooch back is on I have peeled off the sticky cover and placed it on the back of the brooch. This saves trying to glue the brooch back on ( I tried that and it didn't go well!) and it covers the brad back making it all look tidy.
     I hope you have a go at this, it's much easier than it looks and you have a valid reason to drink something fizzy now!
I would like to enter this brooch in the following challenges:
Try It On Tuesday - Make your own flowers
Our Creative Corner - Forgotten things

Friday, 20 September 2013

Red, White and Kraft

      Here is this weeks Christmas card.
This one was inspired by the colour choice at 52 CCT and CraftyHazelnut's  request to 'cut it out'.
     I was recently lucky enough to find this Papermania 6x6 stamp in a sale bin for £1, now who could resist that!
     I chose to stamp and clear emboss on white card, then ink over with Distress Ink Festive Berries.
     I didn't want to put cut outs on top, that would be too easy, so I used some Sizzix Movers and Shapers to cut holes in my background instead.

      When I held this over my Kraft layer it looked a little dull, so I used some double sided sticky sheet under where my holes would be and covered them with Glamour Dust Crystal, this kept the Kraft look but added some sparkle.
     All that was left then was to cover the back of my die cut background with foam tape and stick it to my Kraft layer. I suppose you could say it's a bit of a back to front card but it was something I just had to try.
    

I would like to enter this card in the following challenges:
52 Christmas Card Throwdown - Red, White and Kraft