Monday, 28 May 2012

Rose - Sew Simple


 As promised here are the instructions for the paper rose demonstrated on Sunday at Sew Simple. This is a technique that my friend Lynne showed me, it is always a firm favourite whenever it's used.

Materials : Four x 6 petal flower shape - lightweight card
                   ( die cut, punched or stamped and cut out )
                 Strong PVA glue or silicone glue
Tools :       Scissors
                 Cocktail stick or thin paintbrush handle
                 Mini pegs or paperclips

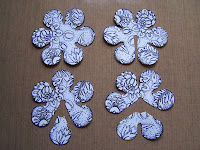
 These four flowers are stamped using a Chocolate Baroque stamp and cut out with scissors. The technique works just as well with die cut or punched flowers. It is possible to use a five petal shape, it will just produce a slightly different flower which would look great in a bouquet.
If you are going to colour your flower it is best to do that now as it's less fiddly before cutting. Remember to colour the back of the petals too, when the flower is built you can see the back of the shapes.
 One shape is left uncut for use as the base. One shape is snipped from edge to middle. One shape is cut to remove one petal and the last shape is cut to remove two petals. DO NOT throw anything away, we need those little petals too.
 Fold and glue the overlapping petals on cut shapes as per the photo. Using little pegs or clips will help hold it while the glue dries. Once the glue is dry use the cocktail stick or brush handle to gently roll the edges of the petals.
Begin by sticking the five petal shape to the base, you may need to flatten the bottom a little. Next glue the four petal shape and so on until you have built your flower. You will need to trim the bottom of each layer slightly to shorten it just enough to sit inside the previous layer.
Each flower you build will be a little different


I hope you enjoy making these as much as I do. Try different flower shapes and put them all together in an amazing bouquet. The floral gift that won't wilt or die. If you have any queries then please contact me either by leaving a comment ( I read them all as I don't get many) or by e-mail on my profile page.  Happy Crafting!!

Friday, 18 May 2012

All that glitters meets 52cct


 Here is my entry for 52 Christmas Card Throwdown this week.
It is also a card made as part of my design team work for the J and C Creations Challenge Blog, this months theme is All That Glitters.
This card has concertina sides so it gives some depth to the images used. The picture at the back is a lovely snow scene from Heartfelt Creations stamped in Distress Ink Dusty Concorde. I then used a damp paintbrush to blend some of the ink from the stamped image into the fence, trees and windows. The sky has also been blended with the purple ink leaving the roof and ground white. Clear glitter has been added to the trees and the roof to give a little sparkle.
The big tree was stamped on acetate using black Stazon, then glittered from the back using Frantage Crushed glass Glitter in green. the acetate layer has been fixed in the centre of the three folds on the side so it appears outside the window but in front of the cottage.
The beautiful window frame is a die from Heartfelt Creations cut out in white card and placed over the hole cut out of the front card. Once stuck down the filigree cut outs were glittered with Frantage Halo Glitter Mix in silver.
The foliage at the bottom was stamped with a Feather Grass Flourish from Heartfelt Creations and embossed in silver. The flowers were cut out with a Marianne die Poinsettia in silver mirri card with centres covered in Gala Glitz Lavender and Blue Glitter.
I found getting a really good picture a little difficult due to the shine on the acetate but I hope you can see lots of sparkle and shine in these two pictures.
All products used can be bought from J and C Creations.

Sunday, 13 May 2012

J&C Creations challenge

May - All that glitters
This creation was inspired by the new embossing powders from Stampendous, they have a real vintage look to them. To begin with I cut the frame from gold satin mirri card using a die from Heartfelt Creations 'Decorative Window Scene'. I then placed it on top of my background paper and lightly drew around the centre opening so I knew where to cut a hole. I mounted the frame on the backing paper after cutting the opening and used Halo Glitter Mix Gold to fill in the cut outs. The frame is mounted on foam pads to raise it away from the photograph a little.
The small flowers are embossed with Aged Rose and Aged Aqua powders giving them a beautiful aged speckled look. The large flower is covered with Earth Elements 'Bed of Roses' which smells heavenly, a rose scented card with added bling, perfect. I stuck some little gems in the flower centres and added a few sprigs of die cut foliage. The finishing touch is a nice cream and aged gold organza bow.
Products used
Heartfelt Creations die  -  Decorative Window Scene
Stampendous Fran-tage Embossing Enamel  -  Aged Aqua / Aged Rose
Stampendous Fran-tage Earth Elements - Bed of Roses
Halo Glitter Mix  -  Gold
all products listed are available from http://www.jandccreations.co.uk/

Friday, 4 May 2012

Buttons and Bows

Here is this weeks contribution to the 52 (Christmas) Card Throwdown challenge.
When I saw 'Buttons and Bows' for this weeks theme I knew it was a good opportunity to use my Tatty Button Tree stamp. The background was inked up with Distress Ink Evergreen Bough from the Winter set. I then stamped with the same ink using the Pine Silhouettes stamp from Penny Black all around the edge. The next layer has been embossed with a That Special Touch mask from Creative Expressions. Using the mask to emboss gives a slightly softer impression than using a folder, the embossed card was then gently inked with Evergreen Bough.
The main image was stamped in Archival Ink Olive and clear embossed. I cut out the picture using a Spellbinder die (Labels 17) then while the die was still in place I inked the edges of the picture to give me a perfectly even little white border.
The buttons have come from various places ranging from craft shops to charity shops. The ribbon has been in my stash for ages but finally found a use today, it has Merry Christmas written on it but unfortunately it doesn't show very well in this photo...sorry. The little bow has also been in the stash box for a while but looked just right with a green button and some Bakers Twine.
It's been a very busy and interesting week for me so far, I will have some crafting news to share with you all very soon.  Happy Crafting!!