Showing posts with label die cuts. Show all posts

Wednesday, 4 October 2023

Cats and Bats


     Another month, another project for The Paper Funday. This is an Anything Goes papercraft challenge with an optional twist, for October the twist is use yellow, orange and green. 
     This card is a CASE of a card by Shelly Matteson, her card is a bit more orangey than mine but in my defence I was using up some gorgeous papers I inherited from my mum.
     The background paper already had a sun/moon type look to it so I cut a moon in vellum and stuck it over the lightest area of the background.
     The colourise pumpkins were cut from some Clarity papers mum had in her stash, I chose a greeny purple one to fit the twist. The leaves come from another sheet of Clarity paper that had amazing Autumn colours on it. Shaped leaves give a bit more texture and depth to the overall picture with bats and cats in black card being set off by a black mat layer. To make the whole thing a little more magical I mounted the picture on some pearlescent orange card. 
      I won't be giving this one away for two reasons, one being I really like it and the second is we don't tend to celebrate Halloween even though the colour are amazing. It will grace the walls of my work area until next year at least.
     Please come and join us at The Paper Funday, it doesn't have to be Halloween and it doesn't have to be a card, as long as it's made with paper or card that's fine with us.


I would like to enter this project in the following challenges:
Two Old Bats Halloween - Anything Halloween
Inspiration Station - #54 Halloween colours
Get Creative - #126 Purple, green black and orange
Unicorn - #92 Autumn/Halloween

Friday, 8 September 2023

Snowflake The Winter Dragon


     When is tree shaped treat box not a tree shaped treat box?......When it's a dragon of course!
   The new Charles Treat Box from John Next Door makes a great gift box, but when I started to make one it fell over on my desk and looked just like a dragon's head with perfect spikey teeth. Not very Christmassy?  it is if you like dragons....a dragon is for all seasons......a table decoration with a difference. Make in another colour scheme for Halloween, a special gift or just for fun.
     
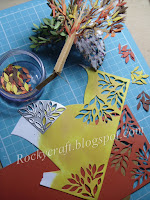
     I made a dragon in plain card as a prototype, no point in wasting the good stuff to start with, it meant I could fold and chop it around until it looked right without a worry.
     The body is made from the main part of last years Hexacracker with two hexagons for end caps.

     For the tail I made the treat box into a triangular shaped tree and glued it to the hexabody, making sure that the spines of one edge were pointing upwards and lined up with the peak of one edge on the body.
     With the remaining tree from making the tail I folded it in half and glued the spinney edge. Cutting the tree in half I discarded the folded part and glued the spine along the ridge of the body in line with the tail spines.
     For the head I made the box as a tree but left one side open, the inside of this flap was lined with some marbled effect wallpaper and the spinney edges were folded inward to form the lower row of teeth. To stop the jaw flapping about I glue the largest tooth at the back of the mouth to the corresponding tooth on the upper jaw, the mouth stays open but doesn't drop too low.

     The head was glued onto the body to be higher than the tail, then a spine was added to the head, made in the same way as the main body spine but shorter and glued in the middle to line up with the rest of the spines.
     Wings were made from one tree shape each, the bottom edge was cut with the box die to get a spikey edge, then scored and pleated to give folds. These were glued onto the body at an angle to give a nice sweeping wing that stands up. Wing tips can be glued together so it can be hung up, but you will need to find the centre of balance for your own dragon as it will vary depending on card and embellishments added.

     All that remained were the legs, what better way to stand firm than using four trees. Three tree tops for each leg were cut, I only cut the top part that I would need rather than wasting card. The little trees were cut with an angle to the base so that Snowflake would stand level, having the slightly shorter edge on the inside as well as a flat side to glue to the body.
     Once the dragon was built it was time to cover it in snowflakes and gems for added sparkle and some large blue pearls for eyes. Using a patterned pearl card made it much easier to incorporate sparkle and shine, embossing would have made it harder to assemble and painting might have made it soggy.
     It may sound complicated but it's not really, pick up some inexpensive card and have a play. Dies should be versatile giving value for money, it's NOT just what it says on the packet, it can be so much more.


I would like to enter this project in the following challenges:
Kraftin' Kimmie Stamps - Anything BUT A Card
Peace On Earth - #47 Photo (Snowflakes)
Christmas With The Cuties - #73 Something Snowy
Die Cutting Divas - Anything Goes
The Holly & Ivy - #147 Anything Christmas
Fab 'n' Funky - #579 Wings or Scales

Sunday, 27 November 2022

Mica Magic Northern Lights


     Mica Magic is mica powder in an almost cream like form, a bit like eyeshadow but please do not use it as makeup. It can be applied with a sponge or on your finger, a brush would work but tends to hold onto the powder so you end up using more. The effects you can achieve with this product are many and varied, this one is a Northern Lights background inspired by a You Tube video from Kevin Nakagawa, he used ink pads for his background.
     All but the black came from the new Dawn Aurora pallet and were applied using the reverse of a piece of  Cut N Dry Foam. The back of the foam is quite firm and doesn't bend so it applies the mica perfectly over embossed surfaces as well as smoothly onto flat card, this is a tip I picked up from the talented Dot when using gilding wax.
     Starting with the lightest colour first I added streaks of yellow and lime green in one direction across my white card, building up with darker green and black.
     The white stars were made using a Posca pen held over the card and tapped with the edge of a ruler to make it splatter.
     Once complete the background was buffed gently with a soft cloth to get a subtle shine. The scenic layer was die cut using a die from JND Snow Scenes in black card, then stuck onto the background with redline tape to make sure it didn't fall of the shiny surface. The scenic background was then matted onto a black layer.
     To find a perfect match for the green mat was almost impossible so I made one using the same green Mica Magic used in the background to colour a piece of white card, only the edge needs to be coloured as the rest is covered.
     My green mat was then added to a black card blank, I tried it on white but it didn't look right, with the scenic layer being added with 2mm double sided foam tape to give a little lift.
      All that remained was to add the die cut Silent Night in black, which was actually cut from the centre of the black mat layer, and embellish with a couple of amber gems. I would love to see the Northern Lights but until I do then trying to make them on card will have to do.
      

I would like to enter this card in the following challenges:
ABC Christmas - W~white/X~xtra special  
The 12 Months of Christmas - #94 Anything Christmas
CraftyHazelnut's Christmas - #622 Anything Christmas
Merry Little Christmas - #47 Anything Christmas
The Sisterhood Of Crafters - Anything Christmas

Wednesday, 7 September 2022

Thinking Of You


     A new challenge at The Paper Funday has begun today, we are an Anything Goes challenge with an optional twist, this month's twist is Thinking Of You.
      My card is quite small at only 4 inches square but it packs a lot of Autumn colour. The leaves were made by using double sided sticky sheets on card, then covering it with gilding flakes, I find this is much easier and faster than using special glue when covering a large area.
      The leaf dies are Vintage Leaves from John Next Door, they have a solid shape and a veined shape to match. Using the gilded card and some black card I cut several leaves to make a small bunch, each leaf has a little shaping so they don't sit completely flat.
      To continue the Autumn theme I have used a Autumn Orange linen card from Crafts Too, which is matted on black and then on to a Kraft card blank.
      A simple sentiment was stamped in black across the top, a small but bright card just to let someone know they are in your thoughts.
      There is a wealth of inspiration over on The Paper Funday challenge, pop over and have a look, then join in the challenge with your own project.


I would like to enter this card in the following challenges:
Hand Stamped Sentiments - #397 Inspiration 
Get Creative - #115 Fall/Autumn
613 Avenue Create - #202209 Anything Goes/twist-Leaves
Pammie's Inky Pinkies - #2236 Anything Goes
Love To Craft - #70 Anything Goes
Inspiration Station - #37 Leaves and Autumn Colours

Friday, 10 June 2022

Living Hinge Pocket Journal


     A simple pocket journal made with envelopes and the new Living Hinge die set from John Next Door. This was a great way to use some of the large stack of 12x12 papers I have in my stash.

    All the envelopes in this journal were made using scrapbook papers but you could easily use ready made envelopes instead, decorating them with stamping or stencils.
     For this journal I made 8 envelopes, joining them together with one length of tape across the middle width on each one, forming a concertina of pockets.
     Each pocket has a white card that slides inside, edged with the bracket die from the set. These could house some favourite photographs from a special occasion making it a tailor made photo album.
     To house these pockets the album was made using 1.5 A4 sheets of 1mm greyboard, covered with scrapbook papers using PVA glue. Once dry the full A4 sheet was die cut down the middle with the Living Hinge, the A5 piece was cut with the Bracket die, then the hinge die allowing enough on the straight side to attach to the large piece. Remember when bending the hinge to use something round as a support underneath so it doesn't fold in the wrong place and leave you with a buckled spine. Both parts were taken outside and given a couple of light coates of spray varnish to seal the paper.
     Using redline tape the bracket flap was attached to the A4 cover to form a wrap round cover, these were then held together with a Velcro type disc under the flap. The Velcro didn't like sticking to the varnished cover very much so I had to add some redline tape to the back of the discs.
     The pockets were placed in the cover and held in place with pegs until I was happy with their placement and the book opened properly, using redline tape they were then stuck in place one side at a time. As the cover is opened the pockets all fan out, you could use more than 8 envelopes to give you a fuller book if you wish.


I would like to enter this project in the following challenges:
Love To Scrap - #155 Anything Goes
Crafty Gals Corner - #232 Anything Goes
Get Creative #112 At Least Two Patterned Papers
Craft Rocket - #93 Girls
Through The Purple Haze - #193 Anything But Square

Monday, 6 June 2022

Living Hinge Flip Flap Journal


     This has been made with the new Living Hinge die from John Next Door and his older Tag Card die set. Journals are very popular and so very useful, now with this die it's easy to make your own.
     The die is thicker and the 'cutting' edge is deeper so it will go through thicker materials, all you will need to do is work out the best 'sandwich' for your machine.
     The cover was made using an A4, 1mm thick piece of greyboard and two double sided 12x12 papers. The greyboard was coated with PVA glue, then placed on to the scrapbook paper and smoothed down with a clean brayer, this gives a good even pressure all over to stop any air bubbles appearing, repeat for the inside cover. If you use a directional pattern always double check this second cover is the same way up as the first.
     With the chosen outside facing up the die was fixed with tape across the middle of the sheet and run through the machine carefully. Each machine is slightly different so it's a case of gently trying until the correct 'sandwich' is found for a good clean pass, various layers of thin card can be added or removed to reach this, never force the die through.
      To get the even curve across the spine I gently bent it around a strong cardboard tube from the middle of a tin foil roll, this meant it had support as it curved and didn't buckle and fold. Once curved the cover was taken outside and sprayed with a couple of light coates of varnish, this will protect the paper and keep it clean.
     The inside was made using the Large Tag Card die set from May 2020. Each section was cut in a different colour, one that matched the colours in the cover pattern. Shapes to write on were cut in cream for the coloured pages and taupe for the cream page, all edged with Distress Ink and glued in place. For the small square tabs the offcuts from the cover papers were used to keep the continuity of colour and pattern.
     On the last page there is a small envelope to hold little trinkets like ticket stubs or labels, it's covered with another piece of the cover paper for decoration.
     Working out how to glue the pages in took a few minutes, I pegged it in place to see if the book would open correctly before making the final decision. I found that it was best to leave 1.5inches from the spine edge clear of glue, this left enough of the flip flap pages to glue down but also left a free moving area at the spine for the book to fully open without buckling the pages.
     I can honestly say that this was a joy to make and, like most crafters, I have a stash of papers I can now use to make journals for all manner of things. 
      This was made with 1mm greyboard, covered with two sheets of ds paper, it bent with gentle persuasion, I also tried a 1.25mm mount board that did not like to be bent. I think the composition of the board you are bending will make a difference so take a little time to experiment before you use your favourite papers.


I would like to enter this project in the following challenges:
Crafting Happiness - #124 Anything Goes
Get Creative - #112 At Least Two Patterned Papers
Pammie's Inky Pinkies - #2223 Anything Goes
Gem Of A Craft - #12 Anything Goes
Crafty Calendar - Anything Goes
Mixed Media Lovers - #14 Anything Goes

Wednesday, 1 June 2022

Father's Day at The Paper Funday


     The new challenge at The Paper Funday begins today. We are an Anything Goes challenge with an optional twist, this month it's Masculine. I chose to make a Father's Day card.
     Using Kraft card I die cut the words with John next Door's individual letter squares, this gave me the chance to lay it out like scrabble tiles.
     I wasn't sure how well the die cut letters would stand up to a woodgrain embossing folder, so I used a ball tool to score the grain lines and a little green ink to highlight them.
     For decoration I have used die cut ivy touched over with a little white ink, a few punched flowerpots and some stamped and cut garden tools. All of these items have had a little shaping so they aren't completely flat.
     On the back of the main panel there is foam tape all around the outer edge but also in between the letters so it doesn't sag. Some of this tape is visible from the outside at an angle so it has been coloured brown with an alcohol ink pen.
     The main panel was stuck onto a satin gold mat layer on a white DL card blank. All the decorations were then added to the card with a strong PVA glue or tiny foam pads.
     With the addition of acetate this could be made into a shaker card for added interest.


I would like to enter this card in the following challenges:
Shopping Our Stash - #471 Make Mine A Tall One
Try It On Tuesday - For The Man In Your Life

Monday, 23 May 2022

Cold Frame Sunflowers


     John Next Door has some new dies out this week, the box frame, window pane and my favourite, the sunflower. This box frame is similar to a past one but this one is just under 6inches square.
     

     The frame was cut from Kraft card, cutting the straight window panes in the front. For the shelves I die cut the edge of the box frame three times, this gave me the right size to fit inside the frame after a little tweeking on the length. The shelves were made and offered up before gluing to make sure they would fit, I was going to have three but after this step it became two, it didn't look right and the pots wouldn't fit.

     Once the shelves were in place redline tape was added to the back of them and a plain off white watercolour card square was stuck in as the backing panel. Fixing the backing to the shelves was important and stopped it bowing out behind the pots.
     A woodgrain frame was die cut in Kraft card and inked with brown to highlight the pattern, this was then stuck on the front around the window opening.
     A small card stand was also cut in Kraft card ready to go on the back of the box once finished.

     For the pots a small flowerpot punch and some orange card was used, a little ink stippled on the pots knocked back the bright orange and a gentle curve added to give them shape.
     For the foliage I used lots of different dies form John's previous releases, cut in various shades of green and inked up with a variety of colours to make them all look different. The sunflowers were cut in yellow and the centres filled with some flock type granules from stash.
     To get each pot to stand on the shelf a small strip of card was cut and folded to form a little square loop, this loop was stuck to the back of the pot and then each pot was stuck to the shelf with the same loop.
     With all pots in position a tall sunflower was die cut and added to the outside of the frame and the card stand was glued on the back. 


I would like to enter this project in the following challenges:
Dare 2B Artzy - Flowers
International Art & Soul - #134 Say It With Flowers
Lil Patch of Crafty Friends - #182 Anything Goes
Gem of A Challenge - Wk11 Anything Goes     (Top 3)

Friday, 22 April 2022

Summer Lantern Birdcage


     The new Summer Lantern from John Next Door is great for small gifts and party decorations. The inserts from the Pop Box die sets also fit this new die giving you even more ways to decorate.
    
     The bird inside the cage was die cut in Shrink Plastic, but like a nitwit I was so keen to shrink it I forgot to colour it first, thank goodness for alcohol markers.
     The wings were stuck on with some very strong glue, then I threaded some nylon twine through the wings ready to be hung in the cage.
     A cage full of flowers would be rather nice too and maybe a little more trimming to make a opening door.
     The cage was cut in silver mirri card, I used the fancy floral die from the new lantern in the roof but used the square grid window from the Christmas Pop Box on the sides. With a rule and a sharp knife I cut some of the bars out of each window to make it look more like a cage.
     Once assembled I cut a square of Kraft card to go on the floor of the cage so it looked a little more like the paper my Mum used to put in the Finches cage many years ago.
     The roof was pulled together with some silver ribbon tied off in a bow, then I added some silver cord so it can be hung up.
     It looked a little bare on top so I added some leaves and a flower with a hint of blue to match the bird.
     There are so many things you can do with this little lantern and being able to use some of the dies you may already have makes it a die set worth having.


I would like to enter this project in the following challenges:
Through The Craft Room Door - 12th April Anything Goes
Lil Patch of Crafty Friends - #180 Anything Goes
Creative Knockouts - #449 Wings and Things/Furry Friends
Creative Fingers - #229 Anything Goes
Pammie's Inky Pinkies - #2216 Anything Goes

Sunday, 10 April 2022

Ares Quilted Leaves


     This was made with two new die sets from John Next Door, Vintage Leaves and Ares background die. Die's can be used for embossing as well as cutting as long as you use a silicone mat and the right sandwich of plates for your machine.
     I cut a rectangle of off white card to the required size, then using various Autumn colours I cut the leaves. The leaves were stuck down on the card with a good strong PVA glue and left to dry.
     Once dry I put the background die on top of the card and ran it through the embossing machine. My machine is a little worn so the rollers are slack, for my own machine (Bigshot)I used the following sandwich, from top to bottom.....Cutting plate, die, card, silicone mat, cutting plate, one cereal packet card, base plate (no tab sheets). You will need to try this on scrap to find the ideal sandwich for your machine before you try it on your project.
     Once you have mastered your own machine you can use many different dies to 'quilt' with. This can be very effective if used under the same die cut background as the raised areas fill the gaps and give a perfect 'quilted' look.
     To mat and layer this I used some of the same card used for the leaves, not wanting to use too much of this precious card I gutted the layers, cutting out the middle part that will never be seen and isn't required for support.
     A layer of double sided foam tape around the top card before going onto the bottom layer gave it a little height.
     For the greeting I wanted something raised but this one was too thin for foam tape. The answer was to cut it once in the gold and three more times in white card, then stick them all together with the gold on top, making the greeting stand tall and solid.
     This makes a nice card for a man, still colourful but no flowers, it could be made in shades of blue or green and still be effective.


I would like to enter this card in the following challenges:
Gem Of A Challenge - #8 Anything Goes
Happy Little Stampers - April Anything Goes with Dies
Craft Rocket - #91 For The Boys/Men
The Male Room - #161 Dry Embossing
Lil Patch of Crafty Friends - #179 Anything Goes
Allsorts - #671/2 Masculine
Crafty Catz - #590 Anything Goes

Tuesday, 15 March 2022

A Tree For All Seasons


   The new Tree Of Life die set from John Next Door lends itself to much more than card making. I love making 3D projects and this was perfect to use with the Stepped Lantern for a seasonal terrarium.
     
     Using Kraft card I cut four trees and folded each one in half. The next step was to glue the trees together in pairs.
     While the trees were drying I cut the Stepped Lantern in acetate, with a black card base and assembled it.
     To get the tree to stand up and stay strong I added two thin strips of Kraft card to the bottom of the trunk before gluing the two sides together to form a complete tree.
    
     For Spring I die cut lots of pink flowers with one of the dies in the set, shaped them and glued them all over a quarter of the tree. I didn't add leaves as many trees flower before any leaves appear.
     The next section was Summer, a healthy covering of green leaves in several shades, all shaped and glue onto the branches.


     Using the same leaf die I cut lots of leaves in Autumn shades, shaped them and glue them onto the tree.
     For Winter I used some flock and a little Flowersoft, both in white. 
     I cut a base to go inside the lantern and made a slit in the centre. I passed the extra tabs on the bottom of the tree through the slit and glued them on the underside, I also added glue around the trunk on the right side of the base.
     Once the glue was dry and the tree was firm on it's base I inked, with green, the half that was under Spring and Summer. Using some flock and Flowersoft from my stash I decorated the 'ground', adding fallen leaves to Autumn and snow to Winter.

     When the tree and base were dry I gently slid them into the terrarium, gluing the 'ground' to the base. A little check on the tree to tidy up any stray decoration and make sure the inside of the acetate was clean before using a length of cord to seal the top.
     Die cut ivy was then used on the top to add some interest to the outside.
     It was a little fiddly in places but not as complicated as you might think, the main thing is to make sure the tree is standing firmly on it's base, you don't want it falling over once inside the terrarium.


I would like to enter this project in the following challenges:
A Perfect Time To Craft - #3 Anything Goes
Classic Design - #3 Anything Goes
Daisy Chain - #61 Use Dies
Happy Little Stampers with Dies - Anything Goes with Dies
Love To Craft - #67 Anything Goes
The Four Seasons - Anything Goes Spring
Gem Of A Craft - #6 Anything Goes

Wednesday, 2 February 2022

Paper Funday Hugs and Kisses


     A new challenge begins today at The Paper Funday, it's anything goes but I have chosen to follow the optional twist of Hugs and Kisses.
     This is made with a mix of old and newish dies from John Next Door. The old die is the cut out heart in the middle, it's from a set that goes well with the pop out box. This has been cut into the front of a DL card blank so that the purple card behind can be seen.
     The newer dies are the strip dies used to make the edging at top and bottom of the card and the embossing on the silver satin card. To use dies as embossing templates is easy and it gives them yet another use. Place a silicon embossing mat under the card you wish to emboss, place the die on the card and run through the machine, you will need to adjust your 'sandwich' - for my machine I use two pieces of card from a cereal box with my clear plates, leaving out the 1 & 2 shims.
     Each silver heart has a scalloped edge purple heart underneath to tie it in with the card liner. It looked a little bare so I used some silver peel off borders to bring in a little more silver, I have lots of peel offs in my stash so it's time to use\them up. I don't feel it's cheating, I know if I tried to stamp a long border like that it would fine until the last bit so at least this way it looks even.
     The Paper Funday has lots of inspiration for you so please pop over and take a look, then come and join us with your creation.


I would like to enter this card in the following challenges:
Shopping Our Stash - #463 Heart and/or beets
International Art & Soul - #126 All About Love/Hearts
Use Your Stuff - #440 Embossing

Saturday, 15 January 2022

Rainbow Frame


     This card was made using the cut out frame left over from the card in the last post. If you haven't seen it then this was white card that has been coloured with the new Mica Magic Spring set from John Next Door.
     Mica Magic doesn't just colour card, it will work on many different surfaces, including vellum. The flowers were cut in vellum using the Cornflower die set and the corresponding leaves. Both flowers and leaves were coloured with the mica, for a stronger colour work on the front and for a paler colour work on the back of the vellum.
     To mount up on a white card blank I used some bright green card that was a close match to one of the mica colours. On top of this I used some pink Craft Artist glitter card covered with a die cut layer of a sort of squashed berry colour, again similar to one of the mica colours used. The berry and glitter layer was mounted on 1mm foam while the rainbow frame was mounted on 2mm foam tape over the berry card leaving a border showing.
     Once the frame was in place I was able to add the flowers and leaves to pop out from within the frame, filling in the open areas on the berry card.
     This card has used up some offcuts and a few new bits, it's a good way to make great use of what you've already got on your work bench from previous projects.


I would like to enter this card in the following challenges:
C.R.A.F.T. - #623 New
Watercooler Wednesday - #332 All Things Feminine 
Try It On Tuesday - In With The New
Cut It Up - #243 Anything Goes
Creative Fingers - #222 Anything Goes

Monday, 10 January 2022

Rainbow Mica Magic


     If you haven't worked with mica before then give it a try, this is Mica Magic, it comes in cake form rather than powder but can be used in the same way. This mica has a binding agent in it already which makes it a little creamy in texture, but it will still dust onto a project just like a powder.
     
     This pallet is the new Spring set from John Next Door, a selection of gorgeous Spring colours.
     To begin this card I coloured an A6 piece of white card with the mica, just using my finger to paint it on in stripes. Once I'd covered the card I left it for a few minutes, then buffed it wish a soft cloth, this brings up the shine of the mica and because of the binding agent it doesn't rub off the card.
     With some of the rectangle dies I cut two frames and a panel from the rainbow card. For this card I only wanted the panel and the outer frame, I have used the inner frame for another project so nothing was wasted.
     To make the background I used a stencil on white card and the white pearl mica from the set, this gives some pattern but doesn't complicate the colours.
     The amazing thing about Mica Magic is you can stamp and emboss over it without having to use specialised ink, I used a Versamark ink pad and detail embossing powder.
     The card blank has been coloured blue around the edge, then the white patterned background was mounted on 1mm foam. The frame was mounted flush to the white background with the sentiment panel went on 2mm foam in the centre.
     I always loved working with mica powders but Mica Magic is so much easier to use as it's less messy, there is no dust floating around when you use it and you still get that great shine.


I would like to enter this card in the following challenges:
Dream Valley - #261 Anything New
Allsorts - #658 Anything Goes / option~New     Top 5
Stamping Sensations - Anything Stamped Goes / option~add a die
Let's Craft and Create - # 179 Anything Goes / option~New