Wednesday 28 September 2016

Autumn Reynard


     Where did the Summer go? It's Autumn already?  At The Male Room we would like to see a masculine project featuring leaves and/or trees as they are about to turn to a glorious array of reds, golds and browns.
     This card started with a background inked in Distress Inks through a gorgeous leaf stencil on cream card. Then the search was on for an image to put on it, a tree?, some more leaves?...how about a fox?
     This lovely little fox is a stamp from Woodware. To give it an even more masculine look I have stamped and paper pieced using a backing paper with moustaches all over it, I managed to get moustache eye brows too. For the darker areas I have used a paper with flowers and leaves all over it.
     The fox is mounted on foam pads over the stencilled background, the greeting is a small peel off on a die cut leaf also mounted on foam pads.
     To finish off it's all mounted on a mid green card that matches up with Peeled Paint Distress Ink.
     You have two weeks to make a masculine project matching our theme, we would love to see what you make, so come and join us at The Male Room where you will find lots more inspiration.


I would like to enter this card in the following challenges:
Cardz 4 Guyz - Autumn Colours
Cards In Envy - Goodbye Summer, Hello Fall
Scrapbook Stamp Society - Anything Goes/Optional Animal

Wednesday 21 September 2016

MHK Designs Challenge #9


     Welcome to very Autumnal challenge on the MHK Designs blog, we have a photo prompt as well as a great selection of colours. You don't have to use an MHK Designs image to join us but you could win some just by playing along.
     Autumn colours are beautiful, I just couldn't resist using them with a leaf stencil. The background was inked with a pale yellow to begin with so the leaf veins wouldn't stay white.
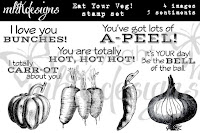
     For the pumpkins I have used the pepper from Eat Your Veg and 'squashed' them in my photo package. Each vegetable is coloured with alcohol markers and fussy cut. They didn't show up very well on the colourful background so I have added a dark green die cut oval behind them, they are all mounted on different depths of foam pad.
     The greeting is from Fruit Borders, die cut and coloured with the same pale yellow ink as the background. It is then mounted on a dark green oval to match the one behind the pumpkins and stuck flush to the card.
     To bring the whole card together it has a dark green mat layer before going on to a square, white card blank. There is no greeting inside so it can be used for almost any occasion.

September Challenge

 The challenge will run for a month so you have plenty of time to come and join us on the  MHK Designs blog. Remember you don't have to use one of our images to play along but we would love it if you did.

Eat Your Veg!
Fruit Borders


I would like to enter this card in the following challenges:
Robyn's Fetish - Anything For Fall
Make My Monday - Autumn Colours
Cards In Envy - Goodbye Summer, Hello Fall

Wednesday 14 September 2016

Live Long and Prosper.


     The challenge this fortnight at The Male Room is one of my favourites, make a masculine project with a Startrek (or other space series) theme. I am and always shall be a trekkie so this was no challenge at all.
      The image of Spock came from a fellow blogger some time ago and has drifted through the inner space of my computer ever since. I believe it's by Mazyart, but I can find no mention of it now. Spock has been coloured with Graph-It markers and fussy cut ready to go on the card, the com badge and cuff bands are coloured with a gold gel pen.
      The sentiment was typed out using my computer, die cut and then coloured with Distress Inks. To give it a more textured look I have water stamped over the ink and then used pearl mica, the water reacted with the paper and made it blister slightly.
      The black card has been sprinkled with chunky white embossing powder and heated from underneath. Then the greeting planet was stuck  flush on to this. Spock is mounted on foam pads, I know he is floating in space but he is a remarkable Vulcan and I had no desire to add another planet at the bottom. Illogical?....maybe, but that's because I'm human!
      The image panel is mounted on to a 7x5 Kraft card, white looked much too stark and took away from the space-scape.
      Inside the card is a page showing the basic dimensions of the USS Enterprise found on line and printed out in draft on cream paper.
      On another small planet, die cut and coloured, is one of Spock's best known greetings which completes the card. I shall decorate the envelope too, but how will depend on whether it gets hand delivered or posted.
      I have enjoyed making this card very much, I still have some other space related images in my stash so you may see some more soon. Remember this one, To Boldly Go, made for The Male Room way back in 2014.
      Please pop over to The Male Room and see all the great inspiration, then come and join us in celebrating one of televisions best loved science fiction programmes and it's 50year (so far!) mission to keep us entertained.

Live long and prosper my crafty friends.


I would like to enter this card in the following challenges:
Stamping Sensations - One For The Boys
Simon Says Stamp - At The Movies
Crafting From The Heart - Anything Goes
Pearly Sparkles - Masculine


Monday 12 September 2016

MHK Designs Treat Box


     Welcome to my MHK Designs inspiration post for this month, with Halloween next month I thought I would make some treat boxes. We don't have many callers for Halloween, it's not such a big event here in the UK, but when we do they expect a little something sweet.
     To begin with I printed the orange spider paper from the Trick Or Treat paper set on thin card, making it much paler than standard so I don't use up all my ink making enough for all.
     One A4 sheet produced three boxes using a Tonic treat box die, the edges have been coloured using Distress Ink Carved Pumpkin and before sticking the box together there is a length of string at the top of each box so it can be hung in a tree.


     The pumpkin comes from the Eat Your Veg stamp set, I didn't have a pumpkin image so I made one by adding a face to the pepper and shortening the stem.
     I used a photo package but this could be done just as well with as black pen and a pair of scissors.
     Each pumpkin is coloured with the same Distress Ink as the box, then cut out and mounted on foam pads. I have a small tree at the front of my house, which has leaves now but not by the end of October, so they will all be hung up ready for the Halloween callers. If it's wet then they will be hung on some small tree branches put in a pot on the front step under cover.


Eat Your Veg
Trick Or Treat
     We have a challenge running on the MHK Designs blog where you could win a stamp set just by playing along, yo don't need to use one of our designs but it would be great if you did.


Thursday 1 September 2016

Holly Jolly House of Cards


     House Of Cards have a photo prompt this month with a robin in it so that gave me the ideal opportunity to use one of Stampendous new stamp and die sets called Winter Tweets.

      In with the stamp set there is also a stencil of a tree, I have masked off the leaves as I wanted a winter tree. After fixing the stencil to watercolour card I used embossing paste, then sprinkled it with copper embossing powder and heated it.
     The heat makes the powder melt and the paste bubble up which gives the tree a look a little more like a real tree with knobbly bark.
      Once the tree was cool I used Distress Ink Stormy Sky to colour the card, then used the spritz and flick technique to get a more blotchy effect.
I didn't do this first as the paste would have made the ink react and the powder may have stuck to it as well as sticking to the paste.
     The next step was to sprinkle chunky white embossing powder over the whole card and gently heat to melt it, I found a low heat was fine for this and there was less chance of upsetting the tree trunk paste again.
      The holly leaves and robin were stamped on watercolour card in brown ink and clear embossed. Once dry they were both die cut with the stamp sets matching dies.
     To colour both the leaves and the robin I have used Koi watercolour pens and a water brush, they blend beautifully on the right card stock. If the cutting is a little off perfect then just colour the edges to match the rest and they become much less noticeable.
     Once dry both the leaves and the robin have been worked with a ball tool to get some dimension into them. The robin has double depth foam pads underneath him and the leaves have single depth.
     Matted on to a small brown layer and then on to a green card blank the card is almost ready. The addition of a Christmas greeting taken from another stamp set and embossed in copper to match the tree, then die cut and coloured before mounting on thin foam pads completes the card.
     The new challenge at House Of Cards runs for a month, we accept any type of card as long as it follows our theme which is shown bellow, please come and join us with your cards.


Add a bird and/or colours

 Materials list - available from your local craft shop
Woodware Craft Collection - CRS5092 Winter Tweets stamps / DCS5092 Winter Tweets dies
                                          FRS338 Little Elf (greeting)
                                          DWDEPL Dreamweaver Regular Embossing Paste
                                          EP104 Penny Copper Embossing Powder
                                          DP020 Detail Clear Embossing Powder
                                          FREG021 Chunky White Embossing Powder
                                          XBR-48 Koi Brush Pens

                                          
Stix2 Anything - S57049 1mm Craft Foam Pads
                        S57050 2mm Craft Foam Pads
                        FPAL2732925 9mm Double Sided Tape


I would like to enter this card in the following challenges:
Deep Ocean Challenges - Things With Wings
Christmas Card Challenges - Anything Goes


Flower Canvas


     Welcome to this months project for Altered Eclectics, a month long mixed media and altered art challenge blog with an anything goes theme.

     This was made using some of the new products available from Woodware and Stix2. It started life as a blank white canvas, it was them painted with one coat of white gesso.
     The paint splatter is from the new collection of fabric spray paints by Colour Factory, here I've used blue, green and yellow. Spayed from around three feet above the canvas I got smaller droplets.
     While the paint was drying I dabbed around the edges with transfer foils in gold and blue, the tacky paint picked up on the foil giving it a little sparkle.
     The flower was stamped on to white tissue paper then added to an area on the canvas painted with PVA glue, it was then sealed with another layer of PVA over the top and left to dry.
      The petals and leaves are coloured with Fabric inks taken from the ink pad with cotton buds and blended on the canvas.
     The 'bubbles' on the flower are filled with a mix of mediums to add texture and interest. The small dots at the base are made using the new glue pen, apply the glue, allow to go clear and then apply transfer foils. The large pearl dots are hot glue dots made on a craft sheet and dusted with pearl mica powder. PVA glue topped with micro beads make the next sparkly row of dots, these are followed with gold holographic peel off dots and to top the whole flower head there are some gold dots made with the new fabric pearl paints from Dutch Doobadoo.
      The sentiment comes with the flower stamp, this is stamped in black on to white tissue and added to the canvas in the same way as the flower was. The tissue goes a little translucent when painted on so the speckles of colour still show through, this is the benefit of using tissue, it almost disappears ans saves you having to try and stamp direct on to the canvas which can be problematic.
     Don't forget any mixed media or altered art project can be added to our challenge blog at Altered Eclectics, the only thing we don't accept is cards and ATC's.


Materials list - available from your local craft shop
Woodware Craft Collection - JSG480 Bubble Bloom - Lilly
                                          Dutch Doobadoo Pearl Pens
                                          Fabricadabra Sprays
                                          Artcreations Canvas
                                          Crafter's Fabric Ink Pads
                                          24173001 White Gesso
                                          98091H Holographic Dot Peel Offs
                                          DWFX04  Dreamweaver Mica Powder - Moonstone
                                          
Stix2 Anything -   S57238 White Tissue
                           S57048 PVA Glue 100ml
                           S57075 Micro Beads (green bead pack)
                           Transfer Foils
                           S57366  Glue Pen
                           S57234 Hot Glue Gun  &  S57235 Hot Melt Glue Sticks

                           
I would like to enter this canvas in the following challenges:
More Mixed Media - Anything Goes (optional - bright colours)
613 Avenue Create - Anything Goes
A Bit More Time To Craft - Anything Goes
Inspiration Destination - Anything Goes

Disco Butterfly


     The first of the month sees a new challenge start at CraftyHazelnut's Patterned Paper Challenge, we are an anything goes challenge as long as you have used patterned paper.
     This piece of paper has been in my stash for years, it's one of those left over pages from a selection pack that just sits waiting to be used.
     As I wanted to use my butterfly stamp I thought there should be a pop of colour somewhere on the paper so I got out the Brusho's and had a play. Working with water on paper is not the best idea but it didn't buckle too much and with some careful drying and pressing it lies flat again.
     The butterfly is stamped and embossed with Disco Black to give it a bit of zing, all that was left was to add a yellow mat layer to make the Brusho stand out and there we have it, another simple card using up some of that stash.
     Come and join us at CraftyHazelnut's Patterned Paper Challenge, it's anything goes with patterned paper so it doesn't have to be a card, it could be a scrap layout, gift box, decoration, anything with patterned paper.


I would like to enter this card in the following challenges:
Deep Ocean Challenges - Things With Wings