Tuesday 30 September 2014

Illuminated Bunny Guest Spot at Top Tip Tuesday


      I have the honour of being a Guest Design Team Member at Top Tip Tuesday this fortnight.  I was thrilled to be asked to make a Non Traditional Christmas project for their new challenge.
     When I saw this cute bunny wrapped in lights I couldn't resist him. Some of you may be aware of my intense dislike of destructive (but cute) bunnies in my garden, so the opportunity to plug one in really made me laugh.
     This cute little bunny is from Zlatoena's Design who are one of TTT sponsors. He would be just as cute used on an Easter project, I don't think the lights restrict him to just Christmas.


     I have several tips for you on this one, Top Tip - use Stardust or glitter pens to colour the lights, it really makes them sparkle. Other tips include, use eyelets for the ribbon holes as it stops the card tearing when the ribbon is pulled. If you can't find a backing card the right colour use white and colour it with ink, but only colour where it will show so you don't waste your ink. Last but by no means least is measure carefully, then check it before you cut or crease, I'm speaking from experience on this one!
     The measurements for this treat box came from Splitcoast Stampers, they have a great tutorial on their site, this one is made with a 12x12 sheet of card. Measurements could be adapted to make other sizes for smaller treats.
     Thank you to Top Tip Tuesday for asking me to join them for this challenge. You can join in with any creation as long as it fits the Non Traditional Christmas theme, you don't have to have a top tip to join in but it would be appreciated.

I would like to enter my treat box in the following challenges:
Christmas Stampin' All Year Long - Non Traditional Colours
Completely Christmas - Anything Goes
Not Just Cards - Anything Goes
Holly Jolly Christmas - Anything Goes

Monday 29 September 2014

Autumn Fruit


     Welcome to another challenge at House Of Cards. This month we have a colour palette for you that is very autumnal.
     My contribution to the Shabby and Vintage team was heavily influenced by the apples.  I found a backing paper that had all of the colours in it so I was very pleased, all that remained was to find a nice fruity picture.
     The image I have used is from a Joanna Sheen disc called Royal Horticultural Society, it has some amazing images on it painted by very talented artists. The frame is a Spellbinder die cut in a peachy gold mirri card.
     The flowers were white before I used Distress Ink Spun Sugar to colour the edges, there are gold caviar beads in the centre glued with Cosmic Shimmer PVA.  The card blank was cream linen so I have coloured it with Distress Ink Weathered Wood around the edge before sticking the backing paper on.
     As usual there is no greeting yet, I don't think it needs one on the front, it will be added inside later when the occasion arises.
     Please pop over to the challenge at House Of Cards to see all the great DT cards, come and join us with your creation.


I would like to enter this card in the following challenges:
A Vintage Journey - The Colours Of Autumn
A Creative Romance - In The Garden
Open Minded Crafting - Autumn
Glitter and Sparkle - Use Flowers

Wednesday 24 September 2014

Memories Of Summer


      Having a little time to play for fun this is a small canvas board I made. It's a sister project to something much larger inspired by a charity shop find, but more on that next week.
     To begin with I painted the board with acrylic paints in pink, cream and pale green. Once dry I began to stamp using Distress Ink Broken China and a Tim Holtz swirl stamp, then with gold acrylic paint and the same stamp. The script is a retired Stampin'Up stamp using DI Aged Mahogany.
     The postcard stamp is from Creative Expressions stamped in Archival Coffee. Before adding any other items the edges have been distressed with DI Brushed Corduroy and the surface stamped with a crackle stamp in the same ink.
     The picture frame is made using a silicone mold and air dry clay, once dry it was painted with brown acrylic and touched up with gold acrylic. The stamp in the centre is a real french postage stamp stuck to the frame and covered with glossy accents.
     The Eiffel Tower and the word Paris are stamped on pearl cream card in Archival Coffee and clear embossed, then die cut using the matching dies in the Sizzix set French Flight. They are both mounted on thin foam pads, Paris is coloured in with gold pen.
     There is a pen nib in the Sizzix set but i chose to stick a real nib onto the writing. There is a gold organza ribbon and bow to hang the postcard up by or fold that down and put the card on an easel.
     What reminds us more of a past summer than photographs and postcards, these things are kept for years and sometimes avidly collected, I have a postcard album my Grandmother gave me that is over a hundred years old, it has some beautiful images in it.


I would like to enter my board canvas in the following challenges:
Stamps and Fun - Create Your Own Background
Rhedd's Creative Spirit - Anything Altered

Wednesday 17 September 2014

Coining It In


      This time in The Male Room we are looking for creations using metal. Our challenge runs for two weeks, so you have time to make something masculine using metal. It could be a card, a layout or a gift, as long as it fits our theme come and join us.
     For me this theme meant I could use some more of my aluminium tape and as I was given this wooden money box by Aldridge Crafts to decorate, it seemed they were meant to go together.
      The roof has been covered with strips of rosette die card to look like tiles, I have used this before on the haunted house. The numbers and monitory symbols are die cut using Sizzix Thinlits, the pound sign is a #7 upside down with the top of a #2 for the top curve and a dash to finish off.


     The coins are no longer in circulation having been pre-decimal or pre-Euro, so hopefully I shouldn't get into trouble for defacing them, they just seemed right for this project.
     The coins are a little thicker than the die cuts so it was a bit tricky to get the tape around them without tearing, I used a large paper stump for this as it's not as harsh as a metal ball tool. I did use the ball tool to make small dents to look like rivets.
     Once all the tape was on and worked into place I used black acrylic paint to dull the whole thing down. Leaving it for a short while to dry off I then rubbed it with a paper towel to remove some of the paint. Hopefully now it looks like an old silver money box that's seen better days but is still loved.
     Please pop over to The Male Room to see what the DT have come up with, I'm sure it will get you inspired to join us.


I would like to enter this project in the following challenges:
Bloggers Challenge - Alter It
Craft For The Craic - Something With Circles On It
Dragons Lair Design Challenges - Anything BUT A Card
 Altered Eclectics - Anything BUT a Card
Oddball Art Stamps - Lots Of Circles

Sunday 14 September 2014

Mosaic Madness Baubles

      It's mid month inspiration time at CraftyHazelnut's Christmas Challenge Extra, where any seasonal creation may be entered, not just cards.
     I have chosen to play with my newly acquired Mosaic Madness set from Stampin'Up. When I say new it's a couple of months ago now, but this is the first time I've had time to play with it and I love it.
     The background is embossed with a folder from the set using Cryogen White card, it has a nice delicate sparkle to it.
     The baubles are stamped and embossed with silver using a paint chart from a local DIY shop, it's great as it has co-ordinated shades of the same colour. To my horror I went to a well known DIY shop to find that these charts are no longer available there, I'm just hoping that I can find them somewhere else.
     Once cool I used the punch from the Mosaic set to cut out all the baubles. Each one has tiny foam pads on the back which also hold the silver thread in place. All the threads are taken to the top of the card to give the impression they are hanging in front of the background.
     The white card has a small silver mat layer on it before being stuck on to a white card blank that has been coloured with Distress Ink Chipped Sapphire around the edge. I find it saves me time and money to use white card blanks and colour them myself.
     I have used peel offs to spell my greeting across my card, to stamp four times and get it right every time would be great but it doesn't usually happen, so this way I can make sure I don't have to start again!
     This card is for a couple of challenges as well as a mid month reminder at CraftyHazelnut's Christmas Challenge Extra, if you have any Christmas creations to show then come and join us, we would love to see them.


I would like to enter this card in the following challenges:
52 Christmas Card Throwdown - Colours  (Silver, Blue and White)
Completely Christmas - Anything Goes
Crafting When We Can - Christmas Come Early
Glitter n Sparkle - Use A Punch


Thursday 11 September 2014

Peacock Sparkle


     After a busy summer spent dashing around I have settled back into routine and found some time to craft for fun.
     I would like to thank my DT friends and my followers for their support recently, crafting has certainly helped me keep it together after the loss of my Father.
     This is a card style that I have made before, acetate and glitter are perfect together and this feather is stunning. This is a very simple card in that it has one image floating mid air. The worst bit is waiting for the glue to dry before adding the next colour!
     I have used a Chocolate Baroque stamp with black Stazon on to acetate. On the reverse I have used Art Institute dries clear glue and various glitters.
     To show off the feather to its best it has been backed with black card, a white card square has been added to the inside to write on. It is hard to find a way of fixing acetate without having it show, for this one I have tried Invisidots, which aren't really, as I don't think brads would have looked right.
     This technique is great for Christmas cards too and you can have several on the go at the same time while waiting for glue to dry.

I would like to add this card in the following challenges:
Lexi's Creations - Sparkle and Shine
Make My Monday - Indian Summer
Loves Rubber Stamps - Glitter and Sparkle
Inkspirational - Photo Inspiration ( Peacock, Blue)

Wednesday 3 September 2014

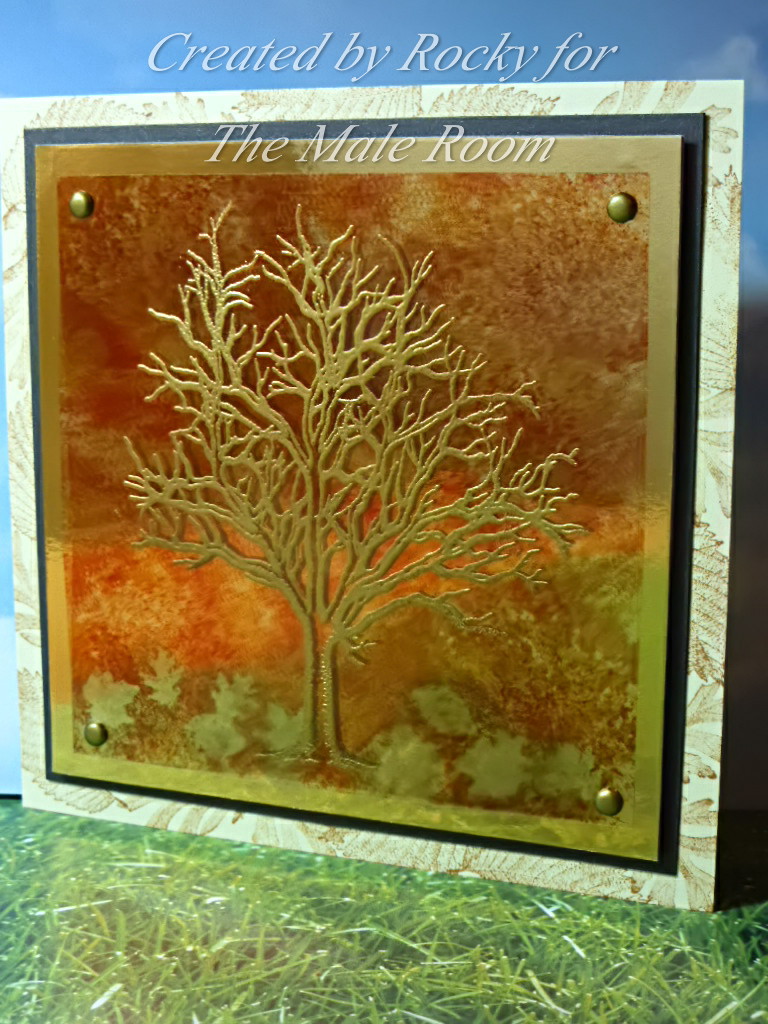
Autumn in The Male Room

      It's Autumn in The Male Room, where did the summer go? We have a new challenge beginning today so now's your chance to use all those beautiful Autumn colours and make something with a masculine feel to it.
     It wasn't until I had finished this that I remembered how much I detest taking pictures of acetate, and to put it with mirri card aswell....Ahhhhh!
     I began by stamping and embossing a bare tree in gold on some heat resistant acetate. On the back I have used alcohol inks in Autumn colours. Then I have stamped with Archival ink using leaf shapes and wiped away the ink before it dries, this takes away the alcohol ink too, leaving silhouette leaf shapes.
     The acetate is attached to the gold mirri card with brads, I did try using some invisible sticky dots but discovered that they were not.
     The mirri card shines through the acetate showing off the colours as well as giving a great shadow effect from the stamping.
     There is a small mat layer of dark brown card under the gold, because the brads made the corners stand out I have used foam tape to mount the gold layer to keep it level.
     The card blank is cream with brown stamped leaves all around the edge to bring the Autumn feel to the whole card. As usual I have not added a greeting at this stage, that will happen when I need to send it to someone.
     Please come and join us at The Male Room, as long as it's Autumnal with a masculine feel to it you can make anything papercrafted.


I would like to enter this card in the following challenges:
City Crafter - I See Clearly (acetate)
Sweet Stamps - Embossing


Monday 1 September 2014

Woodware Baubles for All Crafts Christmas

      We are sponsored by Woodware again this month at All Crafts Challenge and have been given some goodies to play with that had a real Christmas feel to them, so here is part two of my creation. For part one click here.
     I have triple embossed one side of each bauble, they both had two layers of clear UTEE, then the blue one had  a layer of Luna White UTEE and the cream one a layer of Aged Ivory UTEE. By using clear to build up the depth before adding colour I use less of the precious fancy powder.
     For those who are not familiar with tripple embossing it's three layers of powder built up by inking and powdering to achieve a deep enamel that can be stamped into giving texture to your design. The most important thing to remember is to have your stamp inked and ready to go as soon as the powder is molten as it sets quickly, if it doesn't work first time it can be re-melted and try again.
      The cream bauble is stamped into with Archival Coffee on a JustRite stamp, with a scene taken from an old Christmas card stuck on the back. The edges have been sprinkled with the same ivory embossing powder, take card not to overheat as the other side may melt again.  There is a thin gold cord attached to the tiny whole at the top before being covered with two cream organza ribbon bows.

     The blue bauble has been stamped with Archival Cobalt on a snowflake stamp, then a small clear gem added to the middle. Again I have used an old Christmas card for the picture on the back, but you could use photographs to personalise your baubles, just take care when heating. This has the Luna powder around the edge of the picture to bring it all together. A thin silver string for this one and some more of the organza ribbon, this time coloured blue with an alcohol marker.
     The reason I have added the picture side last is when triple embossing there is a lot of heating and I didn't think the picture would hold up to it very well. If you emboss the edges at the end it will also help cover up any little blemishes or uneven bits making your bauble look more professional.
     We are a Non Card multicraft challenge at All Crafts Challenges so please come and join us with your creations, they don't have to be Christmas projects either.

I would like to enter these baubles in the following challenges:
Allsorts Challenge - Early Christmas Makes
Sweet Stampin' Challenge - Embossing
Christmas Stampin' All Year Long - Anything goes
Completely Christmas - Anything Goes


Snowfall

      It's time for another challenge at CraftyHazelnut's Christmas Challenge Extra, anything goes as long at it's Christmas. We are sponsored by Bugaboo Digital Stamps so this month I've chosen to use Christmas Words - Snow.
     The digi is printed on plain white card and coloured with alcohol markers. Then I cut away the top part of the white card to leave the 'word' standing alone. At this point I was sure I wanted to use some snowfall acetate, but had to spend a few minutes playing around to try different looks. I chose to make a tent card, not such a good idea as it tends to slip down to lay flat,.....mmm how to solve that one?....a little wedge shaped double sided foam pad stuck inside the very top to hold the card in position. This does mean that it will not open out flat to write in but as there is very little white card to write on I don't see this as a problem.
     I cut away the front part of my card blank leaving a small strip to stick my die cut icicles to, these were made using a Marianne die.
     The acetate panel fits right to the top inside the card and right to the bottom behind the 'snow' word, red back double sided tape was used for this as it's very sticky and won't fall off.
     There is a large panel of snowflake patterned paper inside the card which shows through the acetate, this does not cover the whole inside as you may be able to see in the photograph. There is a small strip across top and bottom for writing in, alternatively to preserve the clean look of the card you could write on the back.
     To finish off I have used a Zig pen to add small touches of glue that have then been covered with Glamour Dust to add sparkle.
     You have a whole month to join us at CraftyHazelnut's Christmas Challenge Extra with any Christmas creation you make, hope to see you there.

I would like to enter this card in the following challenges:
Allsorts Challenge - Early Christmas Makes
Polkadoodles Challenge - Get Organised for Christmas
Completely Christmas - Anything Goes