Monday 29 June 2015

Cherry Blossom Birthday


     A new project for Creative Expressions this morning using a John Lockwood Striplet stamp, Cherry Blossom. I love oriental designs so this stamp will be used a lot!
     It's a very basic card, nice and easy to make and no additional postal costs either.

    The design is stamped on to smooth white card using Perfect Medium, it's them embossed with CE Cosmic Shimmer Bright Gold.
     I have used Graph It alcohol markers (9201, 5110) to colour the flowers and the open area in the middle. I stamped some extra flowers and cut them out so I could add dimension to the card. Each little extra flower has a tiny gem in the middle.
     The design panel has been cut out and mounted flat onto a plain white DL card blank, I wanted to keep the whole card very simple.
     The greeting is die cut in gold mirri card and glued on flat to the design, the only raised work are the flowers so this scan be sent in the post without too much trouble.

Materials used
CE John Lockwood Striplet Stamp - Cherry Blossom
CE Cosmic Shimmer Embossing Powder - Bright Gold


I would like to enter this card in the following challenges:
Creative Corner - Happy Birthday
Colouring Crazy - Pink and Pretty
Sister Act - Anything Goes

Wednesday 24 June 2015

Up In The Air


     We have a new challenge over at The Male Room this week, our theme is 'Up In The Air' but No Birds Allowed!
      Sometime ago I bought a set of stamps  from Chocolate Baroque called Steampunk Travel. I rather liked the play on words for some of the designs, like this one, it's called a 'Skylight'!
     To keep it masculine I decided to raid my stash and dig out the metal sheets I have from Walnut Hollow. I stamped on to a copper sheet using Stazon, then I used some of the metal work tools to trace around the design outlines and work from e back to stretch the metal and give the design dimension.
     The stippling around the design is done using a small ball tool to make tiny dents.
      Once all the metal work was done it was time to add some age. This was done by dabbing Distress Paints on to the metal and allowing them to dry. Once dry the metal was buffed with a tissue to remove some of the paint and bring a shine to the raised areas, leaving colour in the recesses.
      The background started life as a piece of Kraft card, it was embossed with a cogs folder before adding gilding waxes.
     I have used three colours of wax to build up the worn look, Teal, Chic Pumpkin and Autumn Bronze. These are dabbed on at random and allowed to dry off before being buffed up to a nice shine with a tissue.
     I haven't added much in the centre of the card as this will be covered by the main image panel.
     I like to make mildly grungy items, especially for men and I love the gilding waxes because of their gorgeous colour and the sheen.
     The copper sheet has been stuck down with red line tape on to a black mat layer. This layer has been stuck with red line tape again on to the background. Red line tape is ultra sticky so it's great for metal and other slippery surfaces.
     The word 'Skylight' is stamped on to black card and embossed with copper before being die cut using a small label die.
     Both the design layer and the label are attached with tiny copper brads before the background was mounted on to a black mat.
     I tried this on a Kraft card but it looked too dark so it has been mounted on a cream card blank. I apologise for the photographs but it's tricky taking a good picture of something shiny.
     I do hope you come and join us at The Male Room, we have lots of inspiration from the DT to get you started, you have the next two weeks to join us with your creation.


I would like to enter this card in the following challenges:
Shopping Our Stash - For The Boys
Cardz 4 Guyz - Use a Die or A Punch  (Label)
Clear It Out - Your Style & Favourite Stash Item ( Gilding Wax)
Card Mania - Use A Metal Embellishment (Copper Sheet & Brads)
Crafty Cardmakers - For A Man Or Boy
Get Creative - For The Boys / Father's Day


Monday 22 June 2015

Topography Tag


     This weeks project for Creative Expressions uses one of their MDF tags. I decided to make something for my son to give to his Dad.
     I have an old OS map of our area, not wishing to destroy the original I took a copy of the area I wanted and stuck that onto the tag with a good PVA type glue.
     I used my trusty wallpaper roller to smooth out any bumps and put it aside to dry.  Once dry I distressed the tag with Distress Ink Old Paper, it is patchy on purpose along with a stain just in front of the car.
     The decorations are all oddments collected at boot sales and from charity shops. Scrabble is not much use when half the letters are missing, so the other half can be used for embellishments. The blue metal circle is a watch collar and the ball chain is from an old keyring.
     The car is from an odd cuff link and the spanner is from a board game. All these bits are stuck on with Glossy Accents, it's a great strong, clear glue.
     The finished tag was well received, it will hang in the workshop along with some other little treasures.


Materials used
CE MDF tag
Distress Ink Old Paper
Glossy Accents
Lots of bits and bobs


I would like to enter this tag in the following challenges:
Anything But Cute - Make It Masculine
4 Crafty Chicks - Father's Day
Rhedd's Creative Spirit - Anything Goes Altered Art
Recycle, Re-Purpose & Re-invent - Anything Goes Altered Art

Friday 19 June 2015

Sparkling Tree


     With only 188 sleeps to go maybe now is the time to start making Christmas cards if you haven't already. Come and join us at CASE-ing Christmas, we have lots of inspiration for you, each week we have a card to CASE so there's always something to spark your imagination.

     This week we have a lone tree from Ellen to get us started, you may find something else in her card to start you off but I went for the tree because I love this stamp. This tree is from the same set as the row of trees I used on Monday's post, it's by Creative Expressions.
     I have embossed with Cosmic Shimmer Black Sparkle on white pearlescent card, then die cut with Spellbinder Mega Rectangles. It is finished off with a gold star brad (thanks Ruth) to add my dash of colour so I can enter 52 Christmas Card Throwdown again this week.
 
     The next layer is plain black card, with the final layer being white card that has been edged with Cosmic Shimmer Aurora Crystal Sparkle embossing powder, just covering the edge that is seen gives me a glitter card layer.
     The card base is cut from black card placing the fold just below the cutting edge of the largest die, that way my card has the same shape as the top layers. It is folded to form an easel.
     I have put a small white shape inside to be written on, it is hidden when the card stands.
     To hold the easel I have used the smallest die to cut a black shape and stamped and embossed with white powder.
     The greeting label is mounted on foam pads so it holds back the picture layer when being displayed. The tree is on foam pads on the black layer and that is again on foam pads on the white glitter layer.
     I have added a couple of gold star swirls to the front corners just to tie in the colours.
     Please come and join us at CASE-ing Christmas, we would love to see your creations.


I would like to enter this card in the following challenges:
52 Christmas Card Throwdown - Colours  Black/White and One Other

Monday 15 June 2015

Vintage Heart


   Creative Expressions have some great MDF shapes, this week I've used the heart for my project, it measures about 7.5 inches tall x 4 inches wide and comes with a hole drilled through for hanging.

     I gave the heart a coat of white gesso all over, the chalk paints have a fantastic coverage but it doesn't hurt to make sure the surface is primed.
     The first coat of chalk paint is Mulled Wine, this is on the front only as this is the surface to be crackled, the dark colour will show through the cracks of the paler layer. The back will be lighter so I can add a message to it.  One coat was all it needed for a decent coverage..
     Once the Mulled Wine was dry I painted a coat of Crackle Glaze over it. The glaze has to be painted in one direction only to help the crackles form when drying. I chose to paint this across the heart.
     For the top coat I have used Shy Violet chalk paint, this was painted over the crackle in the opposite direction (up and down) once the crackle was dry.
     It starts to work almost immediately, this may have been due to a warm room. It is important not to overwork the paint or the crackle glaze will mix in and there will be no crackles when dry.
     The back of the heart is also painted with Shy Violet but has no crackle. Using flake and glitter glue I have covered the edge with gilding flakes, Persian Dawn. While I had the glue and flake to hand I also covered a small piece of greyboard with flakes, I did intend to die cut the name from this card but the colour was too light so I used some Foundations Amethyst card instead.
     Each letter was die cut and stuck on with Cosmic Shimmer glue, then outlined with a gold sparkle gel pen. I used pink ribbon fastened to a button to make the hanger, then covered the button with three small paper flowers. The butterfly came off a necklace from a discount shop, he is metal with an extra set of wings that stand up.


Materials used
CE MDF Heart Shape
CE Gesso - White
CE Chalk Paint - Mulled Wine / Shy Violet
CE Crackle Glaze
CE Gilding Flake - Persian Dawn
CE Flake and Glitter Glue


I would like to enter this hanger in the following challenges:
Eclectic Ellapu - Pink Team = Anything Goes
Anything But A Card - Out and About
Not Just Cards - Anything Goes
Crafting From The Heart - Anything Goes

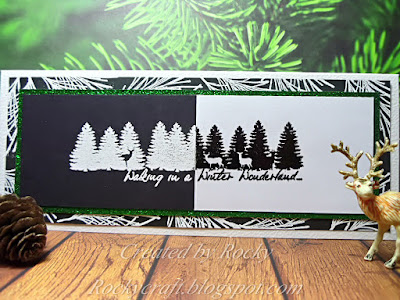
Walking In A Winter Wonderland


      Some mid month inspiration for you from CraftyHazelnut's Christmas Challenge Extra. We are an anything goes Christmas challenge so come over and join us with your seasonal makes.
     This card was inspired by the colour challenge at 52 Christmas Card Throwdown, I used to play along every week but now time escapes me, so it's nice to be able to join in this week.
     The stamp is by Creative Expressions, it's a few years old but I still break it out every year because I love the trees. I've joined a piece of black card to piece of white with masking tape on the back, then stamped with Perfect Medium. After stamping I have removed the tape and embossed them with opposing powder colours, then joined them back up again and fixed permanently.
     This black and white layer is mounted on to a thin layer of green glitter card before being mounted on a wider layer of black card stamped and embossed with a fir branch. All layers are mounted on to a slim white DL card blank.
     It's a little shocking to say we are half way through the year already. I don't know how it's gone so quickly, but at least by making a card or two each week the pressure will be off come November giving me time to focus on decorations and wrappings. Come and join us at CraftyHazelnut's Christmas Challenge Extra and build up your stock box too.


I would like to enter this card in the following challenges:
52 Christmas Card Throwdown - Black/White and One Other Colour
ABC Christmas  - L is for Lyrics ( Walking In A Winter Wonderland)
Tis' The Season - Photo =Snow Scene

Wednesday 10 June 2015

Just Tagging Along


     Welcome to another challenge at The Male Room, this time we would like you to use a tag somewhere on your creation. Pop over to the challenge blog to see the DT inspiration and welcome Chris, the new member to our team.
     I have used the Tim Holtz tag die to cut a tag shaped card from Kraft card, just fold the card and make sure that the fold is inside the cutting edge, it will fit in a large DL envelope.
     The map is some backing paper from Papermania stuck on at an angle. The airmail washi tape also came from Papermania, it is blank down the middle but I have another washi tape with writing on it that fits perfectly over the top.
     The word Travel is stamped and embossed in silver so it matched the aeroplanes propellers, which are cut from silver mirri card.    
The little green tag is cut from another backing sheet and mounted on foam pads. The aeroplane is die cut using a part of an XCut set, I cut it all out in white card and used my Graph It markers to colour the wheels and wings, this is also mounted on foam pads.
     I haven't decorated inside yet as I don't know who it will be sent to, it will join the 'as and when needed' collection for now.
     Please pop over and join us, just use a tag on a masculine creation and link up to the challenge at The Male Room.


I would like to enter this card in the following challenges:
Crafty Boots - Father's Day / Man In Your Life
Pile It On - For A Man / Father's Day
Robyn's Fetish  - Tags
The Paper Players - Masculine

Monday 8 June 2015

You've Been Framed


     This weeks project for Creative Expressions uses one of their MDF frames, I love the colour of these frames so this one has not been painted, just decorated a little.

     There are two frames in the pack, one is 6x4 and the other is 5x3. They have a back, a frame and a stand, it then up to you how you use them.
     I have used the smaller 5x3 frame for this project, which leaves me the larger for another day.
     I have used CE Flake and Glitter Glue on a Tim Holtz stamp of flourishes, adding the pattern to all four edges.
     Persian Dawn Gilding Flakes are a gorgeous mix of gold. copper and silver, they go very nicely with the brown MDF.
     After the gilding was finished it was safe to add an acetate sheet to the back of the frame using ultra tacky double sided tape.
     The acetate will protect my photo when the frame is finished. To make a small gap just wide enough to hold the photo I have added double sided foam tape to the back of the frame, on top of the acetate. The foam is only on three sides and flush with the outside edge of the frame.
     The foam tape is white so it does show even though it's tucked in between two brown layers, so it needs to be coloured. A dark brown alcohol marker was just the thing needed to 'hide' the foam, once coloured it just looks like another layer of MDF.
     Add the little stand to the back and there it is, I didn't glue the stand in place so that if I wish to change from landscape to portrait I can move the stand too, it's quite a tight fit and doesn't drop out.
     The gap is 2mm, the width of the foam tape, which is just enough to slide a photo into.


Materials used
CE Rectangle MDF Frames - 6x4 / 5x3 twin pack
CE Flake and Glitter Glue
CE Gilding Flakes - Persian Dawn
Ultra Tacky Double Sided Tape
Thick acetate
Foam Tape
Dark Brown Alcohol Marker

Friday 5 June 2015

Purple Poinsettia


     Welcome to another card for CASE-ing Christmas, this week we have a lovely card from Judy to case. I loved the colours of her card, so that's what I've gone with.
      I have used a Tim Holtz Bigz die called Tattered Poinsettia to cut my flower. The largest and the smallest petal sets are cut in purple mirri card, the largest is then embossed with a 'script' folder.
     The middle size petal set is cut from textured silver card, along with the centre piece. The greeting is also cut from the same silver card using a die borrowed from a friend so I don't know the brand.
     I have shaped the petals slightly so they don't sit dead flat, then stuck them all together. I have added a gem to the centre, this began life clear, it has been coloured with a Graph It marker to match the mirri card.
     The mat layer was white card, this has also been coloured with the Graph It marker, Bougainvillea 6170, just like the gem. I use my markers quite a lot for colouring mat layers, this way I can get my colours to co-ordinate and I don't have to but lots of coloured card just for matting. There are tiny gems on the greeting to dot the 'i's and small ones in each corner of the top white layer.
     This style of card makes a great winter greeting without having a religious tone to it, ideal if you have friends who celebrate in different ways.
     We are heading toward Christmas a little faster than I would like, so making a card each week really helps make things easier come December, come and join us at CASE-ing Christmas and build up your card stocks too.


I would like to enter this card in the following challenges:
Tis' The Season - Sketch  
52 Christmas Card Throwdown - Previous colour - #13 Jan 2013 Purple/Silver/White
The 12 Months Of Christmas - Anything Goes Christmas


Monday 1 June 2015

House Of Cards Summer Blog Hop


    Welcome to my project for our Summer Blog Hop. I have used background papers from Eclectic Anthology and an image from Stitchy Bear to create my card. Please read on to find out how.
     The background paper is the same throughout, it all comes from Berry Delicious by Eclectic Anthology. The green paper was printed first, then once dry I printed the pink one on the reverse of the green one, making my own double sided paper. This meant when it was cut and folded the pattern continues.
     The image is 'I'm So Busy' from Stitchy Bear, this was printed on cardstock suitable for alcohol markers, then over printed with the green backing paper set to black and white only and 'draft' on my printer settings, this gave a paler grey version of the paper. I also printed a backing paper in the same grey.
     The image is coloured with Graph-It alcohol pens in colours to match the papers. I have also used these pens to colour my mat layers. The addition of tiny gems had added a little sparkle to the card.
     Please come and join us at House Of Cards, read on for the blog hop details.


Hi friends!  Can you believe we've come to the end of our third term here at House of Cards?!  We are saying a fond farewell to some of our DT members and feel so grateful to those staying on.  To say goodbye and thank you, we're celebrating with a blog hop!  You should have arrived here from PAT.    
This hop will run FROM June 1ST AT 6:00 AM CST THROUGH June 15TH AT NOON CST,  ANY CARD STYLE is welcome and we've got a gorgeous photo inspiration for your crafting enjoyment! 


Here's our photo inspiration~

So, are you ready to get hopping?!  Yep, it's time, but first we've got some fabulous sponsors to share with you!  Make sure you leave a comment at each person's blog along the way because the prizes are hidden and we'll be doing random drawings from the blogs where they are hiding! :)  After you're done, make a creation to share with us here, too, for another chance to win!


Here are all of our fabulous sponsors.
Our team will be using a variety of products
from these amazing companies!


Deedee's Digis
Prize: Gift Card to the online store.


The name says it all!  If you're looking for wholesome digital "stamps" and papers that will make you smile, this is the place to shop!  We have a variety of sets for any occasion and any crafter.  Stop by to check them out today!


Eclectic Anthology
Prize: $50 gift voucher to the shop.


Eclectic Anthology is your source for commercial use, royalty free, printable antique and vintage digital graphics.  Much of what you'll see is exclusive to our site and can't be found anywhere else, but we also have some public domain graphics as well.  Everything has been professionally edited and retouched for maximum quality and expert clarity.


Great Impressions
Prize: Prize Package


Great Impressions was founded in 1984 by Ken and Deone Mackenzie.  With a love for stamping, the company grew.  The result is a quality rubber stamp in either wood mount or stickable mount backing for all your stamping needs.  Great Impressions' goal is to provide the highest quality stamps and to inspire creativity!  Please check out our online store to see over 1,000 stamp designs today!  We know you'll find something that will leave a "Great Impression" on you!

Here are the stamps you could win!
(Three total--flower, leaf, and sentiment)


Prize: Gift Card to Store
Inspired by Stamping
Inspired by Stamping is a boutique online craft store based in Australia and was founded by Joanna Munster in July 2011. Our commitment is to bring you the highest quality in paper crafting supplies. We design & manufacture the highest quality of photopolymer stamps that bring superior stamping to all crafters. Whether you're just starting out in card making or a "seasoned scrapper", you'll find that our stamps and products are a great addition to your collection.


Stitchy Bear
Prize: $10 gift voucher to the shop.
We are proud to say that we have been in business, serving our customers since 2010.
We have a very large and talented group of Digital Creators who sell their products in our store and who regularly upload new products. You will find something new almost daily.


And now, here's your hop order~

 House of Cards Challenge Blog

Now get to hoppin'!  Your next stop is  RUZA!  Don't forget to link up a project with us after completing the hop for an extra chance to win a mystery prize from one of our fabulous sponsors, too!  HUGS and happy stamping to you all! :)


Off The Rails


     This months project for Altered Eclectics began life at the NEC as a make and take with Deco Arts and Mark Gould. The base hanger is, I think, made from plywood and ready to paint.
     The first coat was a lovely grey colour, then a little pale green added, once dried off a top coat of cream was added and sanded back to show the other colours.

      Using the same pale green paint and a stencil of writing I have added a layer across the whole hanger. The darker words and the important looking gentleman were painted through a stencil using a dark grey paint.
     The chicken wire was added using a stamp and some more of the dark grey paint. That is how my hanger travelled home and remained for some time.
     It needed something to add dimension and interest to it, but what.....after a rummage in my bits and bobs box I came up with some cogs, a bit of copper wire and a brad thingy that you can make your own picture for.
     So the wire was curled around a bamboo skewer to make a coil and the cog had a screw top brad put through it. The picture brad was a little more of a challenge, I wanted something railway to go in it, it had to be GWR, my Dad was a steam enthusiast and GWR was his favourite network. After a search on the computer I came across this wonderful logo that was used on benches and many other items on the railway. So I printed it off, cut it out and stuck it in the brad, it has a clear dome sticker that goes over the top too.  All the metal extras are stuck on with silicone glue.
     We are a mixed media/altered art challenge at Altered Eclectics, so come over and have a look at what we've all been making, you can join us with your artwork as long as it's not an ATC or a card.


I would like to enter this hanger in the following challenges:
Allsorts Challenge - 313 Vintage
Sweet Stampin' - Father's Day / Special Man
Anything But A Card - Use Five


Bird On A Wick


     This weeks project for Creative Expressions is a quick and easy make, ideal for a last minute gift. I have seen this technique done and the results were gorgeous but until this week I had never tried it myself.

     Using Craft Consortium Bird Tree Tops decoupage paper I cut out two pattern repeats, one long strip meant the birds weren't quite equally spaced. If you are able to tear the edges they disappear more easily into the wax went heated, but that wasn't possible on this design without the risk of damage to the image. As you can see it still melted in to the candle without any problem, it did help that the background was cream just like the candle.
     I melted one image panel at a time as it was easier to hold. I put the image onto the candle and then held it in place with a layer of wax paper over the top, long enough to go all the way around the candle and give you some to hold on to, this keeps the tissue flat and taught. Pass the heat gun over the image area, you will be able to see the wax melt and the tissue edges disappear as you work, do not overheat, it only takes a few seconds.
     Once set the image looks just as though you had painted it on, it's very hard to tell it was tissue to start with. If you wanted to add a greeting you could stamp this on tissue and add it in the same way as the image.
     For display I have added a rose, this started life white. Using Phill Martin's Decadent Wine Ink Spray Mist I have coloured the paper rose. Once dry the wire stem is tucked underneath the candle on the stand, it isn't stuck so it can be removed when the candle is low, that way it won't catch fire.


Materials used
Craft Consortium Decoupage Papers - Bird Tree Tops
Phill Martin Ink Spray Mist - Decadent Wine
Cut-Rite Wax Paper


I would like to enter my candle in the following challenges:
Crafty Calendar - Things With Wings
Love to Create - Anything Goes

Show A Leg


     June already! How did that happen? That means you've only got six months left to make those Christmas cards, so come and join us at CraftyHazelnut's Christmas Challenge Extra with your seasonal makes.
     We are sponsored by Bugaboo Digi Stamps so I have used Season's Greetings Feet for my card. It is printed to fit a DL card blank, that's one great thing about digi's, you can size then to fit your project.
     The image is coloured with Graph It markers using traditional colours. The white border is glittered although it doesn't show well in the photograph. I didn't have a red card blank but I did have some thin red card, so I have covered the front of the blank with it. I've found it's best to take about half an inch of the covering paper over the fold and stick it on the back, this stops the folded edge from peeling up and looking tatty.
     We have lots of inspiration for you over at CraftyHazelnut's Christmas Challenge Extra, it doesn't have to be a card for our challenge, as long as it's seasonal you can join us with your creation.


I would like to enter this card in the following challenges:
ABC Christmas Challenges - K is Keep It Simple
The Glory Of Christmas - Snowman/woman  (does 1/2 a snowman count?)