The new Tree Of Life die set from John Next Door lends itself to much more than card making. I love making 3D projects and this was perfect to use with the Stepped Lantern for a seasonal terrarium.
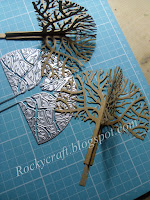
Using Kraft card I cut four trees and folded each one in half. The next step was to glue the trees together in pairs.
While the trees were drying I cut the Stepped Lantern in acetate, with a black card base and assembled it.
To get the tree to stand up and stay strong I added two thin strips of Kraft card to the bottom of the trunk before gluing the two sides together to form a complete tree.
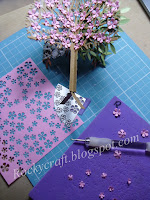
For Spring I die cut lots of pink flowers with one of the dies in the set, shaped them and glued them all over a quarter of the tree. I didn't add leaves as many trees flower before any leaves appear.
The next section was Summer, a healthy covering of green leaves in several shades, all shaped and glue onto the branches.
Using the same leaf die I cut lots of leaves in Autumn shades, shaped them and glue them onto the tree.
Using the same leaf die I cut lots of leaves in Autumn shades, shaped them and glue them onto the tree.
For Winter I used some flock and a little Flowersoft, both in white.
I cut a base to go inside the lantern and made a slit in the centre. I passed the extra tabs on the bottom of the tree through the slit and glued them on the underside, I also added glue around the trunk on the right side of the base.
Once the glue was dry and the tree was firm on it's base I inked, with green, the half that was under Spring and Summer. Using some flock and Flowersoft from my stash I decorated the 'ground', adding fallen leaves to Autumn and snow to Winter.
When the tree and base were dry I gently slid them into the terrarium, gluing the 'ground' to the base. A little check on the tree to tidy up any stray decoration and make sure the inside of the acetate was clean before using a length of cord to seal the top.
When the tree and base were dry I gently slid them into the terrarium, gluing the 'ground' to the base. A little check on the tree to tidy up any stray decoration and make sure the inside of the acetate was clean before using a length of cord to seal the top.
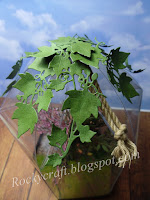
Die cut ivy was then used on the top to add some interest to the outside.
I would like to enter this project in the following challenges:
A Perfect Time To Craft - #3 Anything Goes
Classic Design - #3 Anything Goes
Daisy Chain - #61 Use Dies
Happy Little Stampers with Dies - Anything Goes with Dies
Love To Craft - #67 Anything Goes
The Four Seasons - Anything Goes Spring
Gem Of A Craft - #6 Anything Goes


Hi Rocky this is a stunning project. I love it. Take care. Hugs Jackie
ReplyDeleteThat's gorgeous Rocky, I would never have the patience to do all that!
ReplyDeleteWow, this is COOL! Love the terranium idea and this die set is so unique, well done! Thanks for entering your project in The Four Season Challenge
ReplyDeleteDonna
That is just so clever and turned out gorgeous! Thanks for sharing with us at Four Seasons.
ReplyDeleteOMG this is so cool!!! Thanks so much for joining in the fun at our Four Seasons Challenge! Good Luck and we hope you’ll come back again soon.
ReplyDeleteDarlene
FOUR SEASONS CHALLENGE
DAR’S CRAFTY CREATIONS
Wow, so clever. I am a big fan of 3d projects and I know how much must have gone into this. Someone is going to be lucky to own this .
ReplyDeleteKaren
This is a smashing project!
ReplyDeleteWe do love to see all the entries at Classic.
Thank you for sharing in our challenge at Classic Design Challenge
We really appreciate you joining in.
Jackie DT
Wow that is amazing ! I love 3d projects and this one is fabulous such detail.
ReplyDeleteMarie
Wow! I saw this at Love to Craft and had to pop by for a closer look. Wow! What a fabulous, clever design. Such an incredible amount of detail, I love it!
ReplyDeletexxx