Here is my entry for this weeks 52 Christmas Card Throwdown. This weeks challenge is Green and White and I am pleased to say that this idea popped into my head straight away. It did take a little longer to get it down on card though!!
The background is stamped in Brilliance Pearlescent Olive and a lovely stamp that I think was from Fiskars. I have some lovely olive green card which inspired the whole thing when I found it matched the ink pad, what are the chances of that happening ?!
The rosette paper has been stamped the same as the background, then cut using the Sizzix Tim Holtz rosette plate. The edges are touched with a Gold acrylic dabber...I know gold wasn't in the challenge but I'm going to claim artistic license. The centres are coloured with the olive ink with a die cut snowflake topped with a small dab of golden pearl PVA from Cosmic Shimmer.
The rosette baubles are hung from a die cut tree branch from Marianne Designs by thin gold thread.
The white background has been run through an embossing folder
called Snowflakes from Cuttlebug.
The bottom rosette is built up using two papers. Cut the top layer a little shorter than the bottom with a trimmer or a knife before assembly. Glue the ends together on each layer but before you glue the centres lay one colour onto the other and form the rosette as one, this will give you a perfectly edged, single depth rosette.
I'm sorry to have missed several weeks of the challenge but at least I will have some cards ready for Christmas which is a bonus, as they say 'Every little helps'.
I hope to show you some of the samples for next weeks workshop over the weekend. If it keeps raining then I can't do much in the garden so I will just have to craft!!!
Friday, 20 April 2012
Saturday, 14 April 2012
Peacock shimmer
This little heart was made on a die cut shape using UTEE and mica powders to create a faux enamelled effect. The heart was cut from grey board which is about the thickest card I feel happy cutting. I punched a small hole in the heart before beginning to decorate it.
Dark colours work very well as a base layer for this technique but this time I chose Broken China Distress Ink to go with my peacock theme. After colouring the grey board I built up two layers of clear ultra thick embossing powder. At this point if you are going to stamp into the third layer you will need to ink up your stamp and have it ready and waiting. Then on the third layer I added some mica powders on top. As the clear powder melts the mica will sink in and begin to flow a little giving the most amazing enamelled effect. Before the melted powder cools gently press your pre-inked stamp into the 'enamel' , wait a few seconds and remove it to reveal the impression. This peacock feather stamp is from Creative Expressions 'Art Nouveau Peacock'.
The second card is also from the same stamp set, stamped and embossed in gold. Then coloured in with Cosmic Shimmer Drawing Inks on a background previously sprayed with the new Cosmic Shimmer Vintage Mists. These mists are very subtle so you get all the shimmer with a much less intense colour, perfect for the vintage look.
The stamped image was them cut out with a spellbinder die and edged by leaving the die in place on the cut out and blending Broken China around the edge. This gives you the effect of another layer without building up your card to much, great for trying to save on postage!!
The cut out shape was then matted on a plain layer of card, I couldn't find the right colour to match so I used broken China again to colour the outside edge. Just around the edge because the middle will be covered and there's no point in wasting ink!
There is a thin layer of gold paper around the last layer and then mounted on black to make it really stand out.
I like to use black card a lot with the mica powders as I feel it really makes them shine. They behave differently on coloured card as they are translucent and the base colour will show through affecting the finished piece. If you have some mica powders have a play on various coloured cards and see the different effects you get. To fix the mica powder after dusting an image I use either a fine spray of water (because they have resins in them activated by moisture) or hairspray.
My appologies for not bolgging for a while, it's been a busy few weeks, I'm also getting used to a different blog method which is frustrating when I'd just got the hang of the last one!
Coming soon.....Jubilee bunting and men's cards at Taverham at the end of the month.
Friday, 23 March 2012
Lucky Sweep

This stamp is from Little Claire, he's from a set of two called Cutie-Patooties. His companion is a little girl in apron and mop cap but I fell in love with this little chap. He reminds me of when my Dad used to sweep chimneys and visit weddings to offer good luck. I chose to colour with Distress Inks as I like to blend as well as stamp and paint with them. The layers are all coloured with the Distress Ink to keep the colours co-ordinated and it means I don't need to buy coloured card for backing.
The shape is a Spellbinder die, there are three layers all mounted with foam pads to give dimension. The folding layer is also cut with this die making sure that the fold is below the cutting line and doesn't get chopped off. Easel cards are something a bit different and when used with shaped cards look that little bit special.
I've used the smallest die in the set to cut a plate for the greeting which also holds the card upright for display when mounted using foam pads. If you want to acheive the white edge on a coloured layer then leave the die in place when inking the card, it will protect the edge and keep it white.


I've put a little 'Best Wishes' peel off on the greeting plate. If you're going to stamp the greeting then I suggest you stamp before cutting out, it's easier to line up the die than to hover over the cut shape and hope it's in the right place.
Now I have my Father's Day card made it's time to get ready for the next demo day in Lowestoft. I'll get some of the samples loaded up on the blog when they're finished. If you're coming to Thetford for the Sincerely Yours show come and say hello, I'll be with Aldridge Crafts.
Friday, 9 March 2012
Distress Ink Techniques at Taverham
Sorry for the blog silence over the last two weeks but some delightful thieves decided to steal several yards of phone cable cutting off at least four villages including mine!The next workshop at Sew Simple will be Distress Ink Techniques. These inks are so versatile, it is possible to achieve some very good effects quite easily. We will be getting our hands dirty making beautiful backgrounds and stamping some simple but effective images.
The idea of this workshop is to give you the opportunity to play around with these inks. We will build up a small sample book for you to keep as a reference guide.
Note Added: If you would like this workshop run again then please contact Pam or Emma at Sew Simple in Taverham and place your request.
Wednesday, 22 February 2012
Stitches - Agapanthus, Fimo and lots more.
Just got back from the Craft,Hobby & Stitch trade show at the NEC. Two days of seeing all the new stock, watching some amazing demo's and attending a few workshops. Now comes the trick of trying to remember all that I saw and how it was done!This gorgeous stamp is from Woodware. We went to a workshop run by Stix2 which had us using a hot glue gun to make a puddle of glue on a heatproof craft sheet and then using the stamp to make an impression in the puddle. Once cool we removed the stamp and dusted the glue with mica powder.
There is a similar technique used with UTEE but unlike UTEE this stays a little flexible when cold, ideal if you want to put it on a curved surface.
This technique had us using double sided sticky film placed on chipboard and run through a die cut machine to make a frame. We then used transfer foil to make marks on the sticky side, I chose to stamp the foil leaving flower shapes which you can just about see in this picture. we then filled in the sticky gaps with fine glitter. I was really impressed with the finished look and have arrived home full of renewed interest in foils.
This AMAZING creation is stunning when seen face to face. He was made by Bonnie McGough who is the most inspiring of ladies. Her area of expertise is polymer clay, mostly Fimo. We spent 45 minutes in a workshop with Bonnie and then I spent over an hour with her on the Fimo stand. I came away (eventually) with so many tips and ideas as well as a fantastic book 'The Wonder Of Polymer Clay'.I now have another whole new world to play with. There aren't enough hours in the day or days in the week anymore!!!!
I think a few cards will now have Fimo elements on them. The main thing I learnt was 'it's not as hard as you think', now that's a challenge I can't resist!

Not only did I have the lovely book I bought but thanks to Bonnie's generosity and enthusiasm I also brought home this gorgeous dragonfly so I wouldn't forget how to make him. He has to be cooked so I'm hoping that I may be able to make a few small bits for him to share the oven with.
There were some lovely new products on show, too numerous to mention all of them but keep yours eyes on your local craft shop as I'm sure things will start to appear soon.
Sunday, 19 February 2012
Taverham Card Making Workshop #1
Our first workshop at Sew Simple in Taverham will be quite basic. This will give us a chance to get to know each other and find out what we would all like to get from these workshops.We are going to use Hobby Art stamp set 'Spring'. This lovely set has several elements to it that can be used in a variety of different ways. There are three greetings 'Happy Birthday' , 'Happy Mothers Day' and 'Happy Easter'. I would call this a value for money set because you can do so much with it.
We will do some basic stamping using masks made with sticky notes, create our own backgrounds with elements from the stamp set, mat and layer our design and create something unique.
Here are a couple of ideas using this stamp set. This first card is made using just a few of the stamps, then coloured in with pencils.
The second card is made using a few more stamps and a few more masks. Both designs have been coloured with pencils, the background and greeting shape have been coloured using Distress Inks. The greeting shapes are cut with a Spellbinder die and mounted on foam pads.There will also be a basic guide to ink pads and their uses, there are so many available it can get a bit tricky choosing the right one for the job.
I hope this gives anyone wishing to join us an idea of what we are going to be doing to begin with.
We have many different techniques we can try as the workshops progress, it will give us all a chance to exchange ideas and help each other while we have fun creating. I'm really looking forward to it and if you're joining us I hope you are too!
Wednesday, 15 February 2012
Steampunk poinsettia

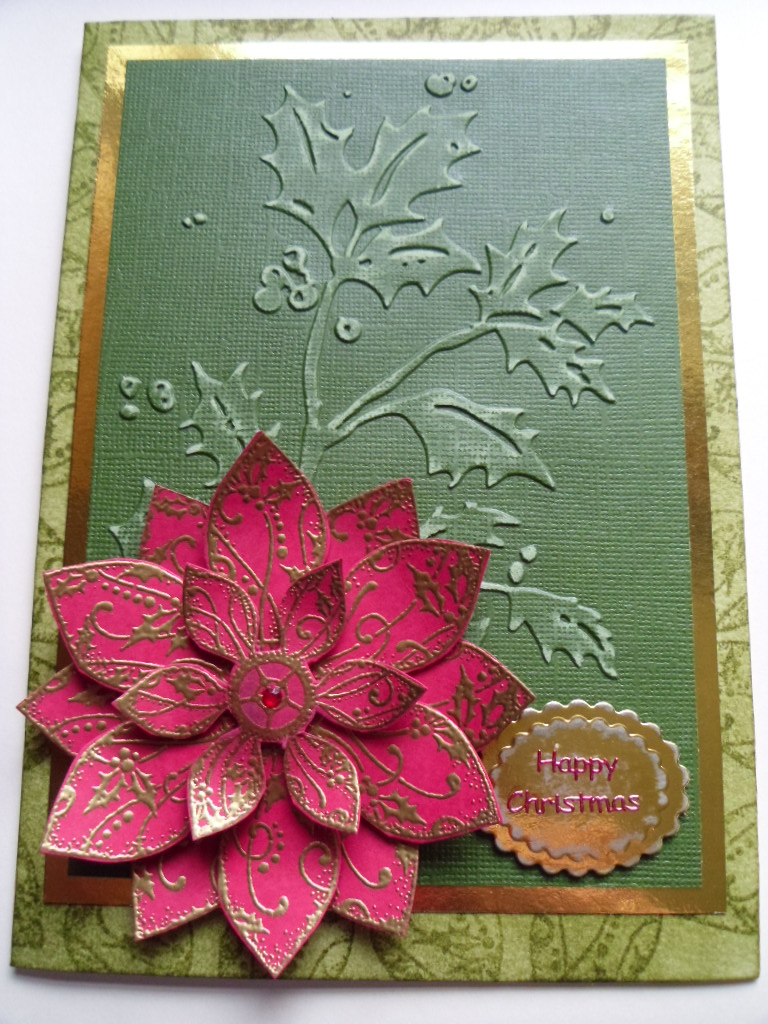
For this weeks challenge at 52CCT it's colours, red, green and gold only. As these are traditional christmas colours that I love this one was a pleasure to make.
The poinsettia is a stamp from the 'Steampunk Christmas' set by Chocolate Baroque. I stamped it on red card and embossed it in Cosmic Shimmer Bright Gold, then I cut out two large flowers and one small. These are layered using foam pads to give a little height and the petals have been curled slightly. The addition of a small gem in the middle finished off the flower.
The background is a piece of Coredinations card embossed using the Cuttlebug 'Holly' embossing folder and then sanded using an emery board. I have always loved dry embossing and spent many hours with a light box and a stencil (still do sometimes!) but these embossing folders give such a crisp image in a fraction of the time.
I used a white card blank but chose to colour it green with
Distress Ink 'Forest Moss' which looked OK but it still
needed a little something, so I used the poinsettia stamp and the same distress ink to randomly decorate the edge of the card.
The holly background is matted onto a piece of gold mirri card and then mounted on the green card. I used another small piece of the gold mirri card to cut a scalloped oval with a Spellbinder die. The oval has also been sanded to distress it a little before adding the greeting, which is a gold peeloff coloured with a red permanent marker pen. This was then mounted onto the card on a foam pad.
I do hope we'll get these colours come up again, I've really enjoyed this one.
Subscribe to:
Posts (Atom)

.jpg)